
An incomplete compilation of things that may improve your gaming experience on Linux
Shell
499
102 commits
updated Jul 7, 2026
README
A linux gaming guide
This is some kind of guide/compilation of things, that I got to do/learn about while on my journey of gaming on linux. I am putting it here so it can be useful to others! If you want to see something added here, or to correct something where I am wrong, you are welcome to open an issue or a PR !
Table of Content
- A linux gaming guide
- Table of Content
- Gaming kickstart
- Extras
- Advanced topics for those interested
Gaming kickstart
Gaming on Linux has never been easier
- Chose your Linux distribution
- Install your GPU drivers
- AMD
- Needs
mesa, which ships theRADVvulkan driver. Probably already part of the base distro
- Needs
- Nvidia
- RTX 2000 and newer: install Nvidia's "open" driver
- Older GPUs: use Nvidia's "closed" driver
- AMD
- Install the Steam client (prefer a distro that ships it so dependencies get properly pulled)
- If the games you want to run isn't in Steam, see Prefix managers
- Game on!
Extras
Performance overlays
Performance overlays are small "widgets" that stack on top of your game view and show performance statistics (framerate, temperatures, frame times, CPU/RAM usages... etc). Two possibilities:
- Recommended: MangoHud
- Available in the repositories of most linux distros
- To activate it, add the environment variable
MANGOHUD=1 - Configuration
- Config files/env vars: HUD Configuration.
- GUI: GOverlay
- Ideal for benchmarking.
- Fallback: DXVK
- Has its own HUD and can be enabled by setting the variable
DXVK_HUD- The possible values are explained in its repository
- Has its own HUD and can be enabled by setting the variable
SteamTinkerLaunch
Steam Tinker Launch opens a window after starting a game from Steam that offers adding in various tweaks before actually starting the game.
Steam Tinker Launch is a versatile Linux wrapper tool for use with the Steam client which allows for easy graphical configuration of game tools, such as GameScope, MangoHud, modding tools and a bunch more. It supports both games using Proton and native Linux games, and works on both X11 and Wayland.
Make sure to follow these instructions.
Game mode
GameMode is wrapper script that puts your computer in performance mode:
- Changes the CPU frequency scaling to
performance - Can change the game's processes priority
- Can change the GPU's power profile
- (see config) to see what it can offer
How to use:
- Archwiki entry on GameMode
- SteamTinkerLaunch can be set to use it
- Lutris uses it automatically if it's detected
Is it running ?
- Run the command
gamemoded -s. - Waybar can be setup to show the state of GameMode.
streaming: OBS
OBS is the famous open source streaming software: it helps streaming and recording your games, desktop, audio input/output, webcams, IP cameras... etc.
obs-vkcapture: low-overhead game capture method
obs-vkcapture implements the "dma-buf" sharing protocol for capturing games with low/no overhead.
To use it:
-
Use
game captureas "source" in OBS-
You may need to run
obs-studiowith the environment variable,OBS_USE_EGL=1OBS_USE_EGL=1 obs
-
-
Run your game with either
OBS_VKCAPTURE=1environment variable- or: prepend your game launch with
obs-vkcapture %command% - Note: SteamTinkerLaunch can help with that
GPU Encoders
- AMD GPUs, prefer using
ffmpeg-vaapito leverage the GPU for encoding. - NVidia GPUs, prefer using
nvencto leverage the GPU for encoding.
Software encoding on AMD Ryzen CPUs
If you want to use a software encoder, it's a very good idea to manually assign separate CCX/CCDs for the game and OBS on AMD CPUs that have more than two. I benchmarked it and it makes a difference.
Saving replays
OBS: replay Buffer
OBS offers saving the last X seconds of your gaming session in RAM, and it saves it to a file once you press a pre-defined keyboard shortcut.
To enable it:
- Settings > Output > Replay Buffer > Enable Replay Buffer
- You can also set there how long is the saved window
- This adds a new button the the main window: "Start replay buffer"
- It will keep in RAM the last X seconds all the time
- While "replay buffer" is started and running, you can either
- press the "save" button that is right next to "stop replay buffer"
- trigger the keyboard shortcut for "save replay"
gpu-screen-recorder
gpu-screen-recorder is a cli, GUI and overlay tool for recording, replay and streaming efficiently with the GPU.
You can run this command with GameMode to be able to save replays with a hotkey. Needs more prep on wayland.
gpu-screen-recorder -w DP-1 -f 60 -q medium -r 20 -k av1 -bm vbr -c webm -ac opus -a "$(pactl get-default-sink).monitor" -o /tmp -v no -sc scripts/clip_upload.sh > /tmp/gamemode.log 2>&1
Useful examples are here.
Linux distribution recommendation
If you are hesitating on what Linux distribution to use. Here's this guide's recommendation:
The reasons for the recommendation:
- To get the best performance, one simply needs the latest updates, as soon as possible.
- Cutting-edge new gaming tools are shipped on those distributions first
CachyOS
- Based on Archlinux
- Rolling-release distro: packages continuously get updated.
- Ships package updates just few days after they get released. While remaining perfectly stable.
- Has a specific Gaming guide
- Many kernels to chose from
CachyOS does compile packages with the x86-64-v3, x86-64-v4 and Zen4 instruction set and LTO to provide a higher performance. Core packages also get PGO or BOLT optimization.
and important for nvidia users:
CachyOS includes a custom hardware detection tool that automatically identifies and installs the necessary drivers and packages for your system. This eliminates the need for manual driver searching, saving you time and effort after installation.
Archlinux
- Rolling-release distro: packages continuously get updated.
- Ships package updates just few days after they get released. While remaining perfectly stable.
- Can use the archinstall TUI tool for a more user-friendly install.
Headset Control
HeadsetControl helps configuring some gaming headsets that have a battery, adjustable side-tone, LEDs...
CoolerControl
CoolerControl is a GUI app for system monitoring and fan curve configuration.
RGB Control
Advanced topics for those interested
What comes here are topics that gamers don't need to be aware of to be able to play, but can be interesting for some, so here they are.
Self-compiling
Compiling is the process of transforming human written code (like C/C++/Rust/... etc) to machine runnable programs (the .exe files on Windows, on Linux they usually have no extension :P). Compiling is actually done by a program, a compiler, on linux it's gcc or clang. There is not a unique way to translate/compile code to machine runnable programs, the compiler has lots of freedom on how to implement that, and we can influence them by telling them to try "harder" to optimize the machine code, by giving them the so called "flags": a set of command line options given to the compiler, an example is
gcc main.c -O2 -march=native -pipe
where -O2, -march=native and -pipe are compiler flags. There are many flags that compilers accept, the ones specific to optimization are given in GCC's documentation. A few important (meta)flags
- The
-Ox, wherex=1,2,3, is a generic flag that sets the generic level optimization, it activates many other flags that actually do something. Distros compile the packages they ship usually with-O2 - The
-marchflag is a flag that tells the compiler to use additional features that aren't available for all CPUs: newer CPU implement some "instruction sets" (aka additional features) that enable them to perform some tasks faster, like SIMD instructions. It makes some programs faster, likeffmpegwith video conversion. These instruction sets are not used by default in packages shipped by distros as they need to have them able to run on all machines, even those from 2001. So one can win some performance by just compiling with-march=nativetheir computational heavy programs. Although some have embedded detection code to use additional instruction sets if detected. Some Linux Distributions like Gentoo enable you to compile every single package on your own machine so you can have ALL the apps built with-march=native(it may take several hours depending on your CPU) - Link Time Optimizations (LTO) that involve the use of the flags
-flto,-fdevirtualize-at-ltransand-flto-partition - Profile Guided Optimizations (PGO) that involve the use of
-fprofile-generate=/path/to/stats/folder,-fprofile-use=/path/to/stats/folderflags. The idea behind is to produce a first version of the program, with performance counters added in with the-fprofile-generate=/path/to/stats/folderflag. Then you use the compiled program in your real life use-cases (it will be way slower than usual), the program meanwhile fills up some extra files with useful statistics in/path/to/stats/folder. Then you compile again your program with the-fprofile-use=/path/to/stats/folderflag with the folder/path/to/stats/folderfiled with statistics files that have the.gcdaextension.
A nice introduction to compiler optimizations -Ox, LTO and PGO, is made in a Suse Documentation that you can find here: https://documentation.suse.com/sbp/all/html/SBP-GCC-10/index.html
The Kernel, Wine, RADV and DXVK can be compiled on your own machine so you can use additional compile flags (up to a certain level) for the particular CPU you own and potentially faster with more "aggressive" compiler flags. I said potentially as you need to check for yourself if it is truly the case or not.
Flags to try
Here is a group of flags can use when building your own programs
BASE="-march=native -O3 -pipe"
GRAPHITE="-fgraphite-identity -floop-strip-mine"
MISC="-floop-nest-optimize -fno-semantic-interposition -fipa-pta"
LTO3="-flto -fdevirtualize-at-ltrans -flto-partition=one"
LTO2="-flto -fdevirtualize-at-ltrans -flto-partition=balanced"
LTO1="-flto -fdevirtualize-at-ltrans -flto-partition=1to1"
It is recommended to try them in the following order, if one fails (for whatever reasons: fails to compile or doesn't work), try the next one:
BASE + GRAPHITE + MISC + LTO3:
-march=native -O3 -pipe -fgraphite-identity -floop-strip-mine -floop-nest-optimize -fno-semantic-interposition -fipa-pta -flto -fdevirtualize-at-ltrans -flto-partition=one
BASE + GRAPHITE + MISC + LTO2:
-march=native -O3 -pipe -fgraphite-identity -floop-strip-mine -floop-nest-optimize -fno-semantic-interposition -fipa-pta -flto -fdevirtualize-at-ltrans -flto-partition=balanced
BASE + GRAPHITE + MISC + LTO1:
-march=native -O3 -pipe -fgraphite-identity -floop-strip-mine -floop-nest-optimize -fno-semantic-interposition -fipa-pta -flto -fdevirtualize-at-ltrans -flto-partition=1to1
BASE + GRAPHITE + MISC
-march=native -O3 -pipe -fgraphite-identity -floop-strip-mine -floop-nest-optimize -fno-semantic-interposition -fipa-pta
BASE + GRAPHITE
-march=native -O3 -pipe -fgraphite-identity -floop-strip-mine
BASE
-march=native -O3 -pipe
DirectX to Vulkan mapping
Most games built to run on Windows will uses Windows' proprietary DirectX graphics API. Linux does not support DirectX and instead supports Vulkan (modern) and OpenGL (legacy), which are an open-source, multi-platform alternative. For games to run on linux, stateful translations layers from DirectX are necessary:
- DXVK: translates DirectX API, from version 8 to 11, to Vulkan
- vkd3d-proton: DirectX 12 to Vulkan Valve/Proton fork
WineD3D: wine's built-in DirectX 8-to-11 to OpenGL translation layer (poor performance)- vkd3d: DirectX 12 to Vulkan,
DXVK self-building
You can compile your own latest one with some "better" compiler optimizations if you wish, and that's what I am doing but I have no idea about the possible FPS benefits of doing that. To do so you will need to put what DXVK's compile script gives you in ~/.local/share/lutris/runtime/dxvk/. Link here: https://github.com/doitsujin/dxvk
git clone https://github.com/doitsujin/dxvk.git
cd dxvk
# Build new DLLS
./package-release.sh master ~/.local/share/lutris/runtime/dxvk/ --no-package
Custom compile flags
DXVK can be compiled with user provided compile flags. For that, you edit build-win32.txt and build-win64.txt and change the following before running the ./package-release.sh script:
[built-in options]
c_args=[... TO BE FILLED ...]
cpp_args=[... TO BE FILLED ...]
c_link_args = ['-static', '-static-libgcc', ... TO BE FILLED ...]
cpp_link_args = ['-static', '-static-libgcc', '-static-libstdc++', ... TO BE FILLED ...]
Where you can replace ... TO BE FILLED ... with BASE + GRAPHITE + MISC + LTO3 flags defined here if you don't enable PGO. If you want to use PGO, you can use the BASE + GRAPHITE + MISC + LTO2 + -fprofile-generate=/path/to/dxvk-pgo-data or -fprofile-use=/path/to/dxvk-pgo-data, depending on the stage you are in. You can change the =/path/to/dxvk-pgo-data path. You also need to add '-lgcov' to c_link_args and cpp_link_args
Note: you need to respect the syntax of the build-winXX.txt files. Flags are quoted and separated with comas e.g. c_args=['-O2', '-march=native'].
These flag changes may improve performance or not, the best is to test with and without and see for oneself. If regressions happen or it doesn't want to compile you can try other flags.
GPU
Some interesting information about GPUs, the device that does the heavy lifting when running games.
Drivers
Drivers for the GPUs comes in two parts
- Kernel driver: usually built as a module
- Nvidia: several kernel modules are possible
- "open" driver (recommended): an open-source out-of-tree (i.e. not available in Linux' source code), built using DKMS, maintained by Nvidia
nouveau: an open-source reverse engineered module, not useful for gaming.- Nova: in-development
nouveaureplacement, written in Rust within the Linux kernel codebase. - "closed" driver: closed source driver wrapped as a kernel module using DKMS. Maintained by Nvidia. Slowly becoming legacy.
- AMD
amdgpu: open-source driver upstream in the Linux source code, maintained by AMD.
- Nvidia: several kernel modules are possible
- User-space driver to implement Vulkan
- AMD
RADVvulkan driver, part of themesaproject
- Nvidia
- proprietary, part of Nvidia's driver install
NVKvulkan driver, still under development under themesaumbrella.
- AMD
Nvidia
- Arch's documentation: https://wiki.archlinux.org/index.php/NVIDIA
AMD
- Arch's documentation: https://wiki.archlinux.org/index.php/AMDGPU
RADV: Self-compile
You can compile only RADV by hand with the extra bonus of using your own compiler optimizations as described in this section and use it for any Vulkan game, in a per game basis.
First, you get the source code
git clone --depth=1 https://gitlab.freedesktop.org/mesa/mesa.git
This command will create a mesa folder. To compile only RADV, you go into the sources folder and do the following
cd path/to/mesa
git clean -fdx
mkdir build && cd build
export CFLAGS="... [To be Filled] ..."
export CXXFLAGS="${CFLAGS}"
export LDFLAGS="-Wl,-O1,--sort-common,--as-needed,-z,now ${CFLAGS}"
meson .. \
    -D prefix="$HOME/radv-master" \
    --libdir="$HOME/radv-master/lib" \
    -D b_ndebug=true \
    -D b_lto=TO BE CHANGED \
    -D b_pgo=TO BE CHANGED \
    -D buildtype=release \
    -D platforms=x11,wayland \
    -D dri-drivers= \
    -D gallium-drivers= \
    -D vulkan-drivers=amd \
    -D gles1=disabled \
    -D gles2=disabled \
    -D opengl=false
meson configure
ninja install
Where you need to fill a a few lines
CFLAGSwith flags, you can useBASE + GRAPHITE + MISC + LTO3from the flags to try section.- If you enabled the
LTOflags you must set-D b_lto=true, otherwise-D b_lto=false - With regards to PGO, first read the bullet point about PGO
- Profile generation
- you must set
-D b_pgo=generate - append
-fprofile-generate=$HOME/radv-pgo-datatoCFLAGS, where you can replace$HOME/radv-pgo-databy another folder if you wish
- you must set
- Profile use
- you must set
-D b_pgo=use - append
-fprofile-use=$HOME/radv-pgo-datatoCFLAGS, where you replace$HOME/radv-pgo-datawith the same folder you used for profile generation
- you must set
- No PGO, you must set
-D b_pgo=off
- Profile generation
These may improve performance or not, the best is to test with and without and see for oneself. If regressions happen, follow the steps in flags to try section to reduce the number of flags.
After running the lines above, you get the driver installed in $HOME/radv-master, you can change the folder name and where it is in the line -D prefix="$HOME/radv-master". Now, to use it for Overwatch (or any other game), you must set the following environment variable (in Lutris, it's in "Configure" > "System Options" > Environment variables, and add it):
VK_ICD_FILENAMES=$HOME/radv-master/share/vulkan/icd.d/radeon_icd.x86_64.json:$OTHER_PATH/radeon_icd.i686.json
where you should manually replace $HOME by your home path /home/Joe and $OTHER_PATH by where radeon_icd.i686.json actually is, you can find out with
sudo updatedb
locate radeon_icd.i686.json
If the games crashes after doing all this, you can either try other git commits (you will need some git knowledge) or revert to the stable driver by simply removing the VK_ICD_FILENAMES environment variable. And if you don't wanna hear about bleeding edge mesa anymore you can simply remove the mesa source folder along with $HOME/radv-master.
Kernel
CPU mitigations
The kernel has various protection mechanisms from malicious program-execution based attacks, that are mostly Side Channel Attacks like Transient execution vulnerability, which are about a legitimate code leaking data to a malicious code that is running on the same core.
These protections/mitigations sometimes come with an extra overhead on the CPU (see 1, 2, 3, 4, 5, 6) and can be disabled by adding mitigations=off to your kernel boot parameters or by building a kernel without the mitigation code paths.
To know what vulnerabilites your CPU is affected by, use lscpu
$ lscpu # for a Zen5 CPU
# [... snip ...]
Vulnerabilities:
  Gather data sampling:      Not affected
  Ghostwrite:                Not affected
  Indirect target selection: Not affected
  Itlb multihit:             Not affected
  L1tf:                      Not affected
  Mds:                       Not affected
  Meltdown:                  Not affected
  Mmio stale data:           Not affected
  Old microcode:             Not affected
  Reg file data sampling:    Not affected
  Retbleed:                  Not affected
  Spec rstack overflow:      Vulnerable
  Spec store bypass:         Vulnerable
  Spectre v1:                Vulnerable: __user pointer sanitization and usercopy barriers only; no swapgs barriers
  Spectre v2:                Vulnerable; IBPB: disabled; STIBP: disabled; PBRSB-eIBRS: Not affected; BHI: Not affected
  Srbds:                     Not affected
  Tsa:                       Not affected
  Tsx async abort:           Not affected
  Vmscape:                   Vulnerable
###
Personal (potentially very wrong) opinion: for regular desktop use, if you get to the point that you are running malicious code, your system is probably already compromised and the said malicious code doesn't even need to use such contrived vulnerabilites to obtain sensitive data. Therefore, using a desktop with mitigations disabled doesn't seem that bad. The mitigations or more for servers running e.g. VMs for different customers and making sure their data remains confidential. This may render your browser vulnerable to side channel attacks from infected/untrustworthy websites that can steal information available within the browser at least.
Threading synchronization
you may have heard about esync, fsync or futex2 threading synchronisation kernel syscalls. They have been developed by CodeWeavers and Collabora. Chronologically, here's what happened
esync- Oldest implementation
- Uses the kernel's
eventfdsystem call.- Issues arise in some distros when a game opens a lot of "file descriptors" (the maximum amount can be increased)
- Support matrix:
- Any Linux kernel with
eventfdsupport - Upstream Wine:
>= 10.15: used as fallback ifntsyncisn't available- Otherwise used by default
- Proton: used as fallback if
fsyncisn't available
- Any Linux kernel with
FUTEX_WAIT_MULTIPLE,- Works witn an additional flag on the
futexsystem call. - It was referred to in wine as
fsync(that we will also callfsync1). - This work did not get upstreamed in the linux kernel (out-of-tree) nor in wine and now part of the past.
- Works witn an additional flag on the
futex_waitv/fsync/futex2implementing a new system call futex_waitv()- Still referred to as
fsyncin wine (so basically anfsync2). Which led to some confusions - Support matrix:
- Linux >=
5.16 - Upstream Wine: never
- Proton
- Linux >=
- Still referred to as
ntsync(also previously calledwinesync)- latest proposal of synchronization subsystem that mimicks Windows' behavior the closest
- Similar to
futexandeventfd, aimed to serve exclusively for mapping Windows API sync mechanisms. - Same performance as
fsyncbut with broader compatibility with Windows apps - Support matrix:
- Linux kernel >= 6.14
- Upstream Wine >= 10.15 (enabled by default)
- Proton
- Official: not yet
- proton-ge-custom >= 10-10 (enabled by default)
- proton-tkg (enabled by default if compiled with support enabled)
x2APIC
x2APIC is the modern successor of the legacy local APIC (the per-core interrupt controller) for handling interrupts and may improve performance.
On AMD Ryzen it's actually not enabled by default. To enable it:
- Add
x2apic_physto your kernel boot parameters- otherwise booting will probably hang with the console showing
x2apic: IRQ remapping doesn't support X2APIC modesomewhere during boot afterx2apicis enabled in the next step.
- otherwise booting will probably hang with the console showing
- Go to BIOS:
AMD CBS > CPU Opitons > Local APIC modeand selectx2apic
To check whether x2APIC is currently active:
dmesg | grep -i x2apic

x2apic: enabled by BIOS, switching to x2apic ops
APIC: Switched APIC routing to: physical x2apic
Custom kernels
Using a self-compiled kernel can bring some gaming improvements. Ready to use pre-build custom kernels are readily available:
- Xanmod kernel
- Liquorix
- Linux-zen
- linux-tkg
- CachyOS: ships many variants
Compiling your own: linux-tkg
For self-compiling a kernel, linux-tkg provides tooling to compile the linux Kernel from source (takes about ~30mins, but can be stripped down with modprobed-db) with some customization options e.g. changing/tweaking the default scheduler ; along with other patches that help getting better performance in games. You can also provide your own patches.
AMD Ryzen CPU cache topology
The cache is the closest memory to the CPU, and data from RAM needs to go through the cache first before being processed by the CPU. The CPU doesn't read from RAM directly. This cache memory is very small (at maximum few hundred megabytes as of current CPUs) and this leads to some wait time in the CPU: when some data needs to be processed but isn't already in cache (a "cache miss"), it needs to be loaded from RAM. When the cache is "full", because it will always be, some "old" data in cache is synced back in RAM then replaced by some other data from RAM: this takes time.
There is usually 3 levels of cache memory in our CPUs: L1, L2, and L3. The L1 and L2 are few hundred kilobytes and the L3 a (few) dozen megabytes. Each core has usually its own L1 and L2 cache, the L3 is shared with other cores.
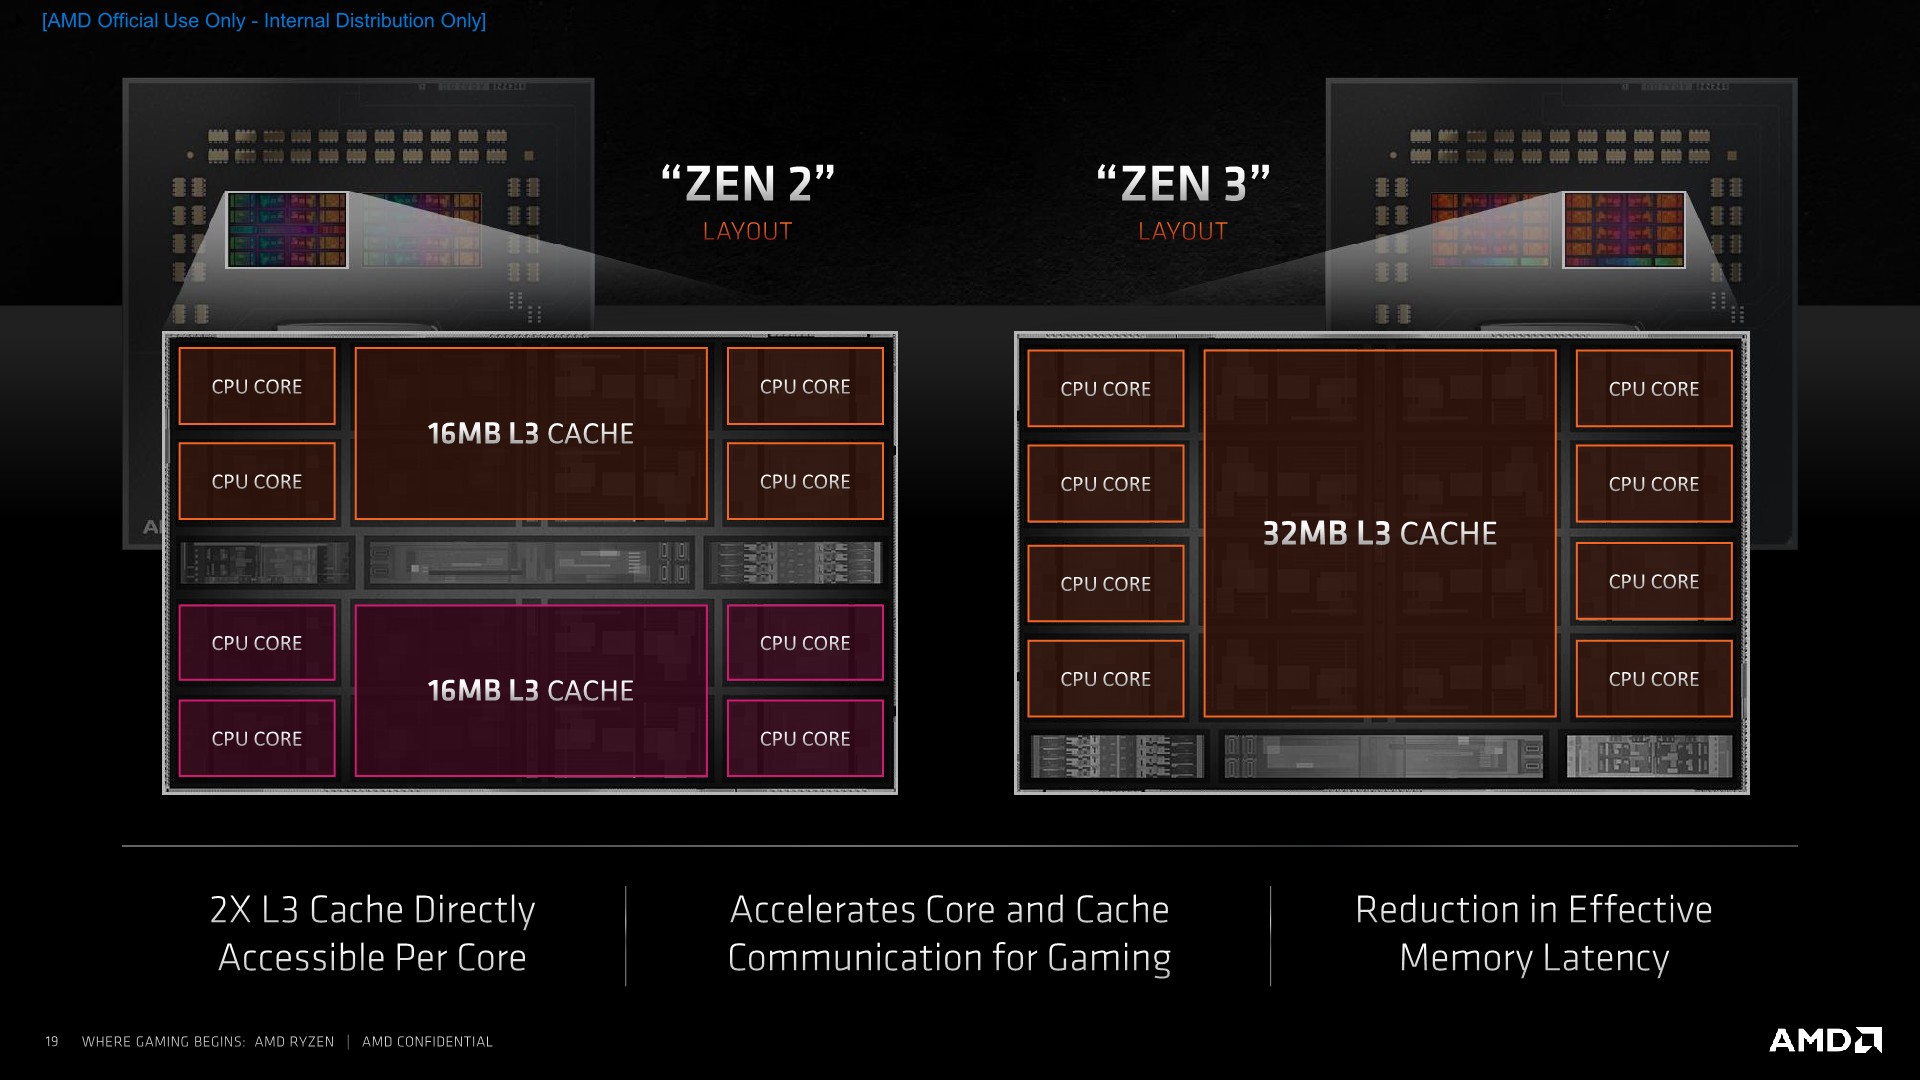
Ryzen CPUs are made of "chiplets": physical "islands" (some kind of sub-CPUs) of 8 cores with identical specs. A CPU can have several "chiplets".
This anandtech article gives a thorough analysis of cache topology in Zen 2 and Zen 3, which apply so far till Zen4 :
zen/zen+/zen2: the chiplets are split into two regions of 4 cores with separate 16MB L3 cache.zen3/zen4/zen5: the chiplet is a single island of 8 cores (2 can be disabled in some variants) with 32MB of shared L3X3D: some AMD CPUs come with a chiplet that has 64MB added to its L3 cache, bringing it to a total of 96MB
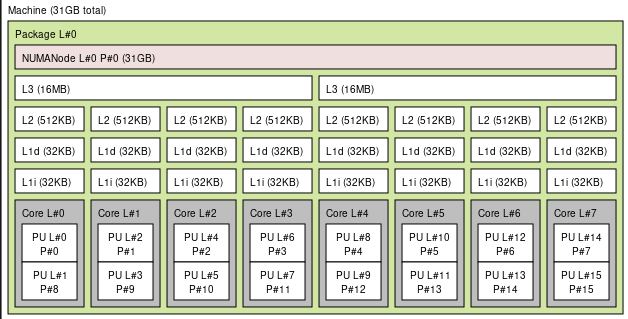
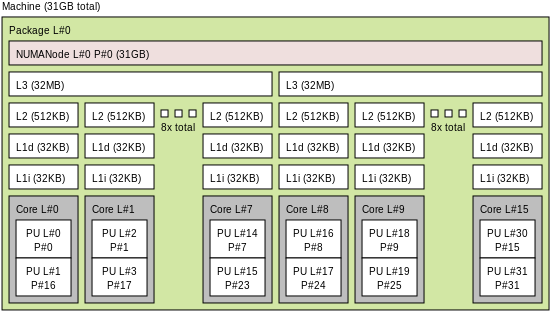
One can obtain the cache topology if his current machine by running the following command:
$ lstopo
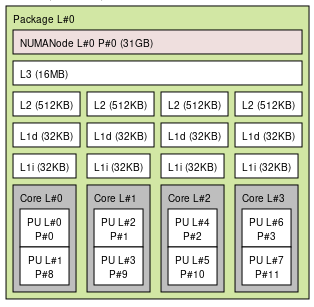
The lstopo of my previous Ryzen 3700X gives this
For my Ryzen 5950X gives this
Core pinning: cpuset
Note: This section is deprecated and needs to be updated to document systemd slices and the taskset CLI tool.
Now that we are aware of cache topology in AMD CPUs. We can try giving an entire CCX (for Zen/Zen+/Zen2 for CPUs that have >=6 cores) or CCD (for Zen3/Zen4, for CPUs that have >=12 cores) to your game, and make (nearly) everything else run in the other CCX(s)/CCD(s). With this, as far as I can hypothesize, one reduces the amount of L3 cache misses for the game, since it doesn not share it with other processes.
cpuset is a linux mechanism to create groups of cores (a cpu set) to which you can assign processes, at runtime. Any process in a given cpu set will spawn child processes in the same cpu set. Have a read at the doc to understand how things work.
Two scripts are provided in this repo:
- tasks_redirect_generic.sh. This script needs to be run with
lutrisopenned by before launching a game.- Creates two cpusets
theGoodandtheUgly. - Redirects every process to
theUgly - Prompts to redirect
lutristo thetheGoodcpuset, so anything launched throughlutrisstarts in the same cpuset automatically.
- Creates two cpusets
- reverse_tasks_redirect.sh: reverses the splitting done by the script above.
- Info: created cpu sets (that are folders) can be removed if all the processes they contain get redirected to the main cpu set, that contains all cores.
Checking that it works
Core IDs should be carefully chosen so the cpu sets are separated by CCX/CCD and not just make a non hardware aware split. One way to check it is, after doing the splitting, to call lstopo in both cpusets and have a look at its output. A way to do so is to move one shell to the new group, as root:
/bin/echo $$ >> /dev/cpuset/theGood/tasks
lstopo
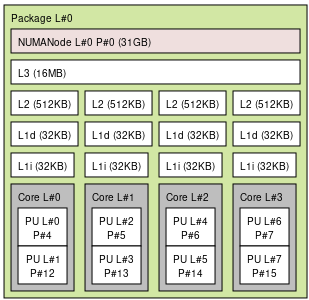
Then also open another shell, and do lstopo, you should get separate results:
Benchmark
I did this benchmark on Overwatch, the conclusions are the following:
- After a fresh restart, I already have a small number of processes (around 300), and most of them are sleeping, which means that Overwatch basically already has the entirety of the CPU for itself. Doing the cpuset trick reduced the performance: I think it's because Overwatch works optimally in more than 4 cores.
- Playing while doing another heavy workload, like stream with software encoding, works better with the cpuset trick.
Wine
Wine is a program that enables running windows executables on Linux. Through Wine, windows executables run natively on your linux machine (Wine Is Not an Emulator xD), Wine will be there to remap all Windows specific behavior of the program to something Linux can handle, DXVK for example replaces the part of Wine that maps DirectX (Windows specific) calls of executables to Vulkan calls (That Linux can handle). Tweaking Wine can have quite the impact on games, both positive and negative.
Environment variables
Some wine environment variables can be set that can help with performance, given that they can break games, they can be added on a per-game basis as usual in Lutris. The variables are the following:
STAGING_SHARED_MEMORY=1
STAGING_WRITECOPY=1
Threading synchronisation
To leverage the kernel's threading synchronisation primitives (see Kernel: threading synchronization) in windows apps/gaes, wine has to be the middle-man in between.
Esync-Fsync
To be able to handle fsync/futex2, you will need a patched version of wine. To enable it, you need to set the following environment variable
WINEFSYNC=1
WINEESYNC=1
Where WINEESYNC=1 is here as a fallback if ever fsync doesn't work.
To know wether esync or fsync are running. You can try running your game/launcher from the command line and you should see one of the following in the logs:
-
esync:[...] esync: up and running [...] -
fsync:[...] fsync: up and running [...]
Fastsync
To be able to use fastsync, you need the following, in this order
-
Be running a
winesyncenabled kernel, more information in this section -
Have a custom wine built with
winesyncsupport (e.g.wine-tkgoffers it). This may meanfsyncsupport needs to be disabled. -
Disable all environment variables related to
esync/fsync(and also from lutris' game options):WINEESYNC=0 WINEFSYNC=0
To know if fastsync is correctly working, you may run your game/launcher from the command line once and look for the following lines:
wineserver: using server-side synchronization.
wine: using fast synchronization.
This command should also return few executables
lsof /dev/winesync
Note: even with this, sometimes fastsync did not correctly work for me... fastsync should have a similar performance to fsync/futex2 so far, so if it doesn't work for you, switch back to fsync/futex2 then try again a little bit later.
Wine-tkg
wine-tkg is a set of scripts that clone and compile wine's source code, on your own machine, with extra patches that offer better performance and better game compatibility. One of the interesting offered extra features are additional threading synchronization primitives that work with the corresponding patched linux-tkg kernel. One can use Esync+Fsync+Futex2 or fastsync (with its corresponding kernel module winesync).
compiler optimizations
On top of the config variables that can be toggled in customization.cfg in wine-tkg, you can set custom compiler optimizations by editing the following lines of the file wine-tkg-profiles/advanced-customization.cfg
_GCC_FLAGS="... EDIT HERE ..."
# Custom LD flags to use instead of system-wide makepkg flags set in /etc/makepkg.conf. Default is "-pipe -O2 -ftree-vectorize".
_LD_FLAGS="-Wl,-O1,--sort-common,--as-needed"
# Same as _GCC_FLAGS but for cross-compiled binaries.
_CROSS_FLAGS="... EDIT HERE ..."
# Same as _LD_FLAGS but for cross-compiled binaries.
_CROSS_LD_FLAGS="-Wl,-O1,--sort-common,--as-needed"
Where you can change ... EDIT HERE ... with flags from here: note that LTO nor PGO works with wine, you can at most use the BASE + GRAPHITE + MISC flags
Game / "Wine prefix" manager
To run games on Linux, wine creates a so-called "prefix" folder with an arbitrary user chosen name, let's say game-prefix. It contains all the configuration specific to wine and a folder structure, within the drive_c subfolder, that follows Windows' structure: you can find e.g. Program Files or windows/system32 subfolders in it. The DLLs in the latter folder are actually created by wine, through reverse engineering. From a game's/window's app perspective, these DLLs to behave just like windows, and wine takes care of the rest (by implementing system calls itself, in the wineserver I believe, or redirecting to the linux kernel, correct me if I am wrong please).
Usually, one creates one prefix per game/app, as sometimes each game has some quirks that wine doesn't handle well by default for which a tweak is needed. But that tweaks would break other games apps. And that's where a "game manager" / "wine prefix manager" comes into play to avoid tedious and repetitive manual configurations:
- Automatically creates prefixes for each of your game
- Ships various version of Wine to work with the various versions of your games
- Bundles various DXVK versions to chose from
- Offers various options that can be toggled (
fsync,dxvk-nvapi/dlss,fsr,latencyflex...) - May have built-in support for extra tools like FPS counters (see Performance overlays)
Lutris
Lutris is one of these Generic open source game managers, it offers a database of scripts to automatically install various games and the quirks and/or extra configuration (e.g. extra fonts) needed to run them. It also enables you to give it your own compiled wine version and that's why I am using it currently. It is however lagging a bit behind in integrating the new tools that are being developped (e.g. latencyflex) and offering newer versions of runtime components (Wine, dxvk, ...). To see the toggles Lutris offers, install a game, then click Configure > Runner options tab.
Bottles
Bottles is a modern take on generic open source game managers, it has a more intuitive configuration UI, ships the latest builds of wine/dxvk, and tries to implement integration with all the latest other tools. I could however not find how to make it use my own compiled wine version.
Heroic Games Launcher
Heroic Games Launcher is an opensource game manager for games you own on GOG or Epic Games. I have not tried it at all so that's all I can say x)
Steam
Valve's official closed source game manager handles Linux natively and offers to run windows specific games with Steam's own builds of proton-wine. It also accepts custom proton builds like e.g. proton-tkg (wine-tkg repo) or GloriousEggroll's proton-ge-custom prebuilds.
Troubleshooting: first thing to try
When your game simply doesn't work or worked once and then never again, try removing the Wine Prefix created by steam for the game: remove the folder SteamLibrary/steamapps/compdata/$GAMEID/pfx (where $GAMEID is some unique ID that identifies the game, e.g. 1151640 for Horizon Zero Dawn). Then try relaunching the game.
Troubleshooting: getting logs
To first step to any troubeshooting is to get logs, in Steam, you need to set a specific launch option
PROTON_LOG=1 %command%
Which you can reach by doing this (taken from here):
- Open your Steam Library
- Right click the game's title and select
Properties. - On the
Generaltab you'll find `Launch Options`` section. - Enter the launch options
PROTON_LOG=1 %command% - Close the game's
Propertieswindow and launch the game. - Recreate your issue
- A file name
steam-$GAMEID.log(where$GAMEIDis some unique ID that identifies the game, like1151640forHorizon Zero Dawn) will be in your home folder (/home/foo)
In the log file (steam-$GAMEID.log), look for err: lines first, and use the keywords that appear there to know what to google for. Otherwise give the log entirely to people who may ask for it.
Shared NTFS partition with Windows
If you simply used a shared NTFS partition with windows and making Steam (Linux) discover it without further tweaks, you most probably will run into problems.
Like this one with IPHLPAPI.DLL (which I ran into)
24337.090:0124:0128:err:module:import_dll Library IPHLPAPI.DLL (which is needed by L"E:\\SteamLibrary\\steamapps\\common\\Horizon Zero Dawn\\HorizonZeroDawn.exe") not found
The fix is to delete the prefix then to follow Proton's documentation on the matter which involves having the path /SteamLibrary/steamapps/compatdata symlink to a folder outside of the NTFS partition, to a folder within a Linux filesystem (Btrfs, EXT4, ...etc ).
Note:
- To avoid having problems when using an NTFS partition on Linux, use
ntfs3as a filesystem type in your /etc/fstab file to use ntfs3 kernel driver (instead ofntfswhich uses ntfs-3g userspace driver) with the mount optionwindows_names(described here). With that, creating the prefix/SteamLibrary/steamapps/compatdatawithin the NTFS partition will fail. - If you get an
rm: traversal failedwhen trying to delete the prefix (or something else within the NTFS partition). That means your NTFS partition got corrupted and you will need to use Windows to scan and fix errors in the filesystem. Unfortunately Linux has no tool to fix NTFS filesystems.
Hardware
What's a good PSU
Turns out the 80+ rating doesn't fully capture the quality of a Power Supply Unit, see here for explanations and a list of recommended ones based tech specs: https://psutierlist.org
RAM Overclocking
Input lag / latency: benchmark at home
I have always had a wired gaming mouse, and always had sometimes this issue where the cable gets entangled when I am playing my FPS game. So I started looking into wirless ones, and this got me interested in mouse latencies: do wireless mice have higher input lag ? This question generalizes to mice and keyboards in general, and also to games.
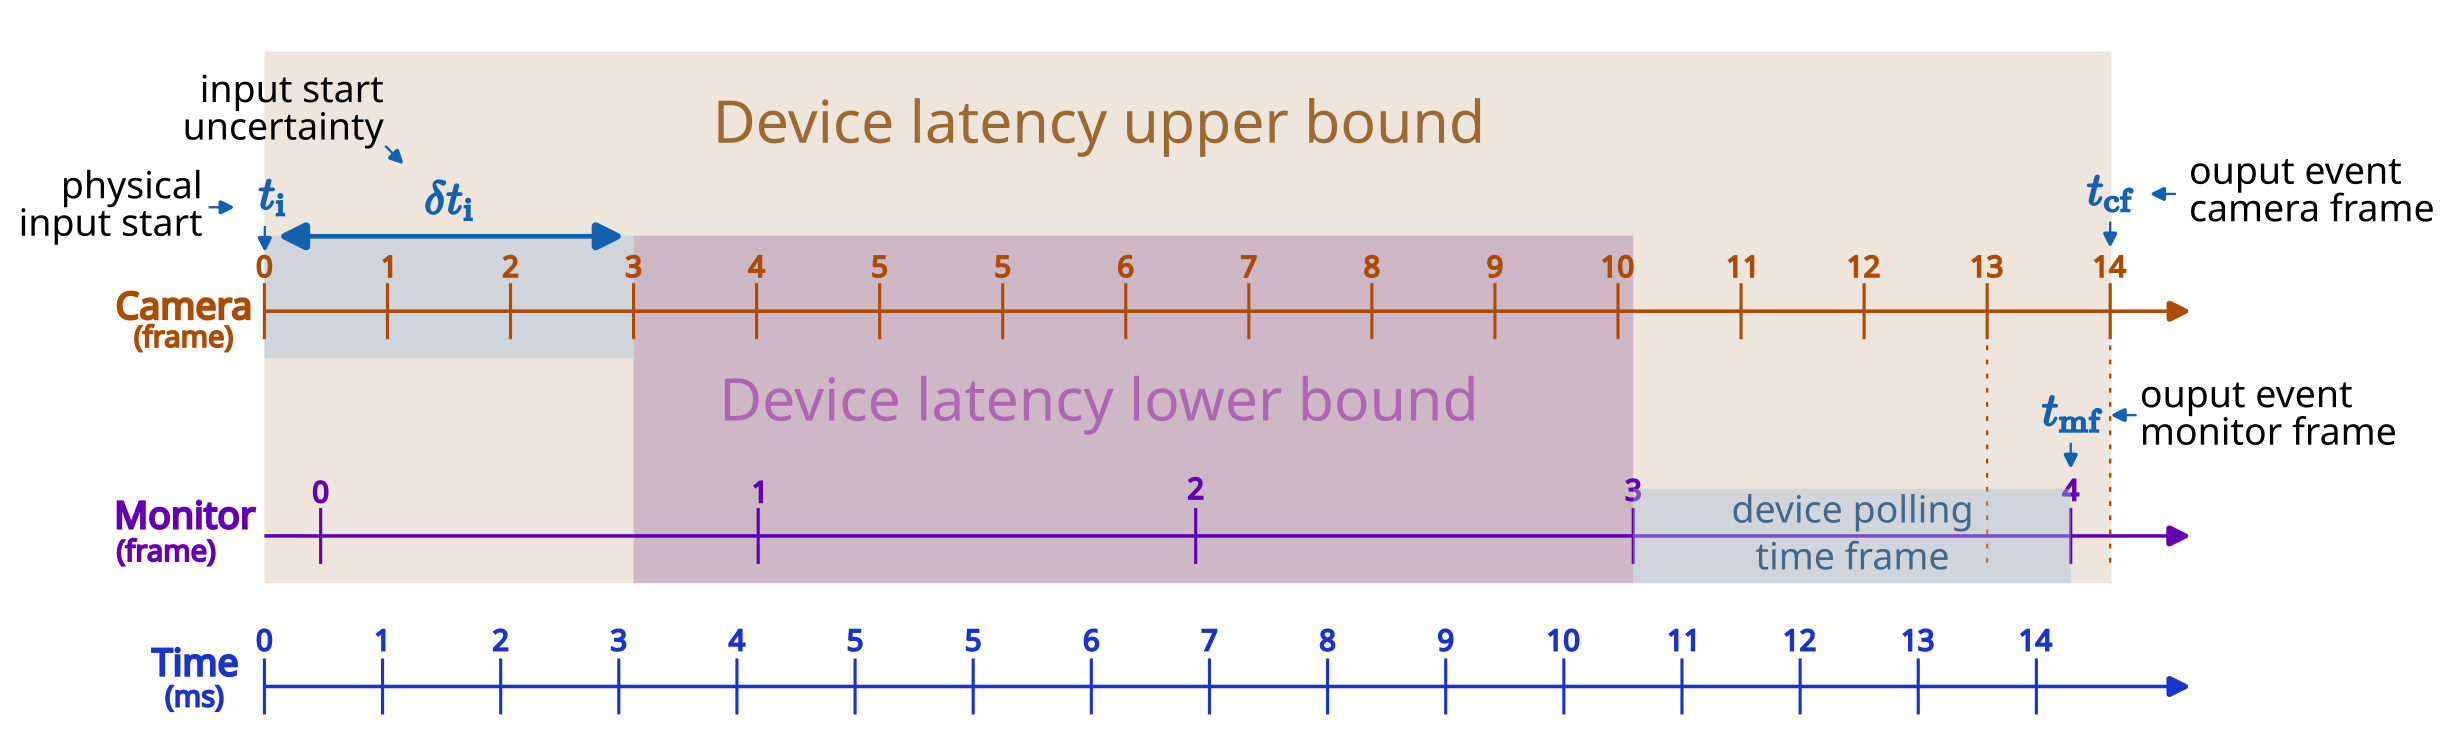
For that, one can test, by himself, his own mouse or keyboard (or game), provided that one has a high refresh rate monitor and a smartphone with a high refresh rate camera. Thankfully enough, I have a 270Hz monitor and a smartphone that offers 960fps slow-mo videos: This gives me a latency "resolution" $\Delta t_\text{res} = T_\text{mon} = 1000/270 \approx 3.7 \text{ms}$ and a latency "precision" $\Delta t_\text{prec} = T_\text{cam} = 1000/960 \approx 1\text{ms}$, plenty to get accurate enough latencies !
Here's how I proced to test latencies:
- have your smartphone ready to take a slow-mo video, while having both the mouse/keyboard area and monitor visible within the frame
- start the slow-mo
- hit the keyboard/mouse key or hit the mouse with your finger, hit it fast so the inaccuracy of when the mouse starts to move, click records is the smallest.
- Analyze the video:
- The origin of the time $
t_\text{i}$ ("physical input start") is taken at the first camera frame where we can consider that the input has started, and we write $\delta t_i$ the uncertainty on it, because the actual frame where the click/move signal is registered by the device is hard to determine.- For a click:
- $
t_\text{i}$: the frame right before the frame where the button starts getting pushed - $
\delta t_i$: the number of frames between $t_\text{i}$ and the first frame where the button does not get pushed any lower
- $
- For mouse movement:
- $
t_\text{i}$: the frame right before the mouse body gets deformed from the hit - $
\delta t_i$: the number of frames between $t_\text{i}$ and when the entire mouse body moves
- $
- For a click:
- Identify the the time of the first camera frame $
t_\text{cf}$ ("output event camera frame") where something happens on-screen, in reaction to the input: mouse cursor moves, letter appears, game view moves ...etc.- Note that $
t_\text{cf}$ is at most $\Delta t_\text{res}$ away from the last screen refresh $t_\text{mf}$ ("output event monitor frame") where the image got updated, equivalently:- $
t_\text{cf} - \Delta t_\text{res} \le t_\text{mf} \le t_\text{cf}$ - The high speed camera introduces an uncertainty of $
\Delta t_\text{res}$
- $
- The time $
t_\text{mf}$ of the last monitor frame refresh reflects what information has been given to the PC in the $\Delta t_\text{res}$ timeframe that preceded, so we need to take that into account in our computation of the lower bound of the latency
- Note that $
- The origin of the time $
Now we have enough information to define an approximate upper-bound and lower-bound estimation of the device's latency (click latency / delay of start-of-movement):
- Upper bound $
\mu_\text{max} = t_\text{cf} - t_\text{i}$ - Lower bound $
\mu_\text{min} = \mu_\text{max} - \Delta t_\text{prec} - \Delta t_\text{res} - \delta t_\text{i}$
An important note:
- If you are testing the device itself, do NOT test on a game: a game adds input lag on top of the one the keyboard/mouse has. I found out that testing on the mouse cursor on the desktop is way better ! Preferably with the compositor disabled.
Once you have an estimation of the latency of your device, you can start benchmarking game related input lag!
An interesting note: The website https://rtings.com has some high quality mouse/keyboard benchmarks where:
- They measure latencies directly from the USB signal leaving the mouse without even using a monitor.
- They subtract the pre-travel distance time when measuring a keyboard's latency
However, you may find it that the delay of start of movement you measure is lower than what they report (as I did with my Sensei Ten mouse), I contacted them and it seems that the difference lies in the fact that the benchmarking procedure I took pushes the mouse with a high acceleration, whereas they test with an electric motor that cannot start with a high acceleration.
Some benchmarks following this procedure are following in the benchmarks/mice section.
Display server
X11 and Wayland are display server communications protocols with a display server. Wayland (2008) is the successor to X11 (1984) with a more modern, more secure design.
X11 has only one reference implementation that's still being used, Xorg. Whereas Wayland has various implementations, e.g. in each major DE has its own.
Wayland
As of KDE 6 and Gnome 46, gaming on wayland just works without any downside (except maybe a slightly higher input lag, to be confirmed with a latency benchmark).
Games however still use XWayland (a "small" X server within the Wayland session to play the game) by default, to enable native wayland:
- Non-proton Wine
- Set
DISPLAY=""environment variable
- Set
- Proton
- Unspported on Steam's Proton releases
- Custom proton releases (e.g.
proton-ge,proton-cachyos,proton-tkg) support it, setPROTON_ENABLE_WAYLAND=1environment variable
- HDR is supported but needs to be configured
My subjective experience with enabling Proton native-wayland in Arc Raiders is a much lower input lag.
X11
Some config recommendations:
- The
TearFreeoption, to enable it onAMDGPU, follow this.- It may be argued that it highers the input lag, I think that it's theoretically right and we want the lowest felt input lag.
- However, with high refresh rate monitors (e.g. 240Hz), image update smoothness is noticeable vs the theoretically added input lag. Try and see !
- This option entirely removes screen tearing with anything: for example scrolling on Firefox, on compositor-less DEs like LXDE, becomes super smooth.
- It may be argued that it highers the input lag, I think that it's theoretically right and we want the lowest felt input lag.
- If you have a FreeSync/Gsync monitor and a GPU that supports it, follow this documentation on how to enable it on Linux. Reviews of monitors seem to show that enabling this actually adds input lag, but once again, it's better than tearing.
KDE
To hit "Direct scanout", i.e. bypassing the compositor entirely, for better input lag and less strain on a potential iGPU driving the monitor (see this bug report and this one), these conditions need to be met:
- No color profile set (i.e. set to "None" in the settings)
- HDR is disabled
- Night light is disabled
- Default kwin effects are set
To confirm that "direct scanout" is happening, you can open "Kwin debug console" > "Effects" tab (rightmost one) > Load "showcompositing" : this will show "compositing" in the top right of the screen unless direct scanout happens.
Sound tweaks with Pipewire/Pulseaudio
This section is about some tweaks one can do with Pulseaudio or Pipewire (will replace Pulseaudio and offers more features).
Stream only the game sounds
You are in a Discord call and streaming at the same time, but you only want OBS to stream the game's sounds ? Search no more. The solution is here (that I found here): the idea is to create some kind of virtual soundcard, let's call it Game-Sink, where the game will output it sound on. Then you redirect the sound from Game-Sink to your actual soundcard.
Create Game-Sink:
pactl load-module module-null-sink sink_name=game_sink sink_properties=device.description=Game-Sink
Find the actual name of $OriginalSoundcard: you do this command and look at its output, you should recognize your card's name there:
pactl list sinks | grep name:
For example, for me I have a SteelSeries Arctis PRO with the Game DAC (with cable), the name of my card is alsa_output.usb-SteelSeries_SteelSeries_GameDAC_000000000000-00.iec958-stereo. So here's how you do the loopback from Game-Sink:
pactl load-module module-loopback source="game_sink.monitor" sink="alsa_output.usb-SteelSeries_SteelSeries_GameDAC_000000000000-00.iec958-stereo" source_output_properties="stream.capture.sink=1"
Then, all what's left is to do is to open pavucontrol (google how to install it if you don't have it) and select Game-Sink for where obs-studio picks its audio from. And select Game-Sink for where the game outputs its audio to.
Improve the sound of your headset
There is a nice Github repository, called AutoEq, that references the frequency responses of various headsets that have been reviewed by websites like rtings.com and others. The frequency responses are made available as .wav files in that repository.
A headset with high fidelity should have a flat frequency response, but affordable/real life headsets do not exhibit a flat one. What one can do with those .wav files is to use them and correct what is fed to the headset with software and improve the perceived sound. Although, one must know that the frequency response of one's own headset is for sure different from the ones available in AutoEq. But it may still improve one's audio experience if, let's say, all the headsets from your specific model have a similar frequency response.
The Graphical way
Install easyeffects (pulseeffects-legacy-git for Pulseaudio from the AUR if on Archlinux) and enable the "Convolver" plugin for your ouput sound:
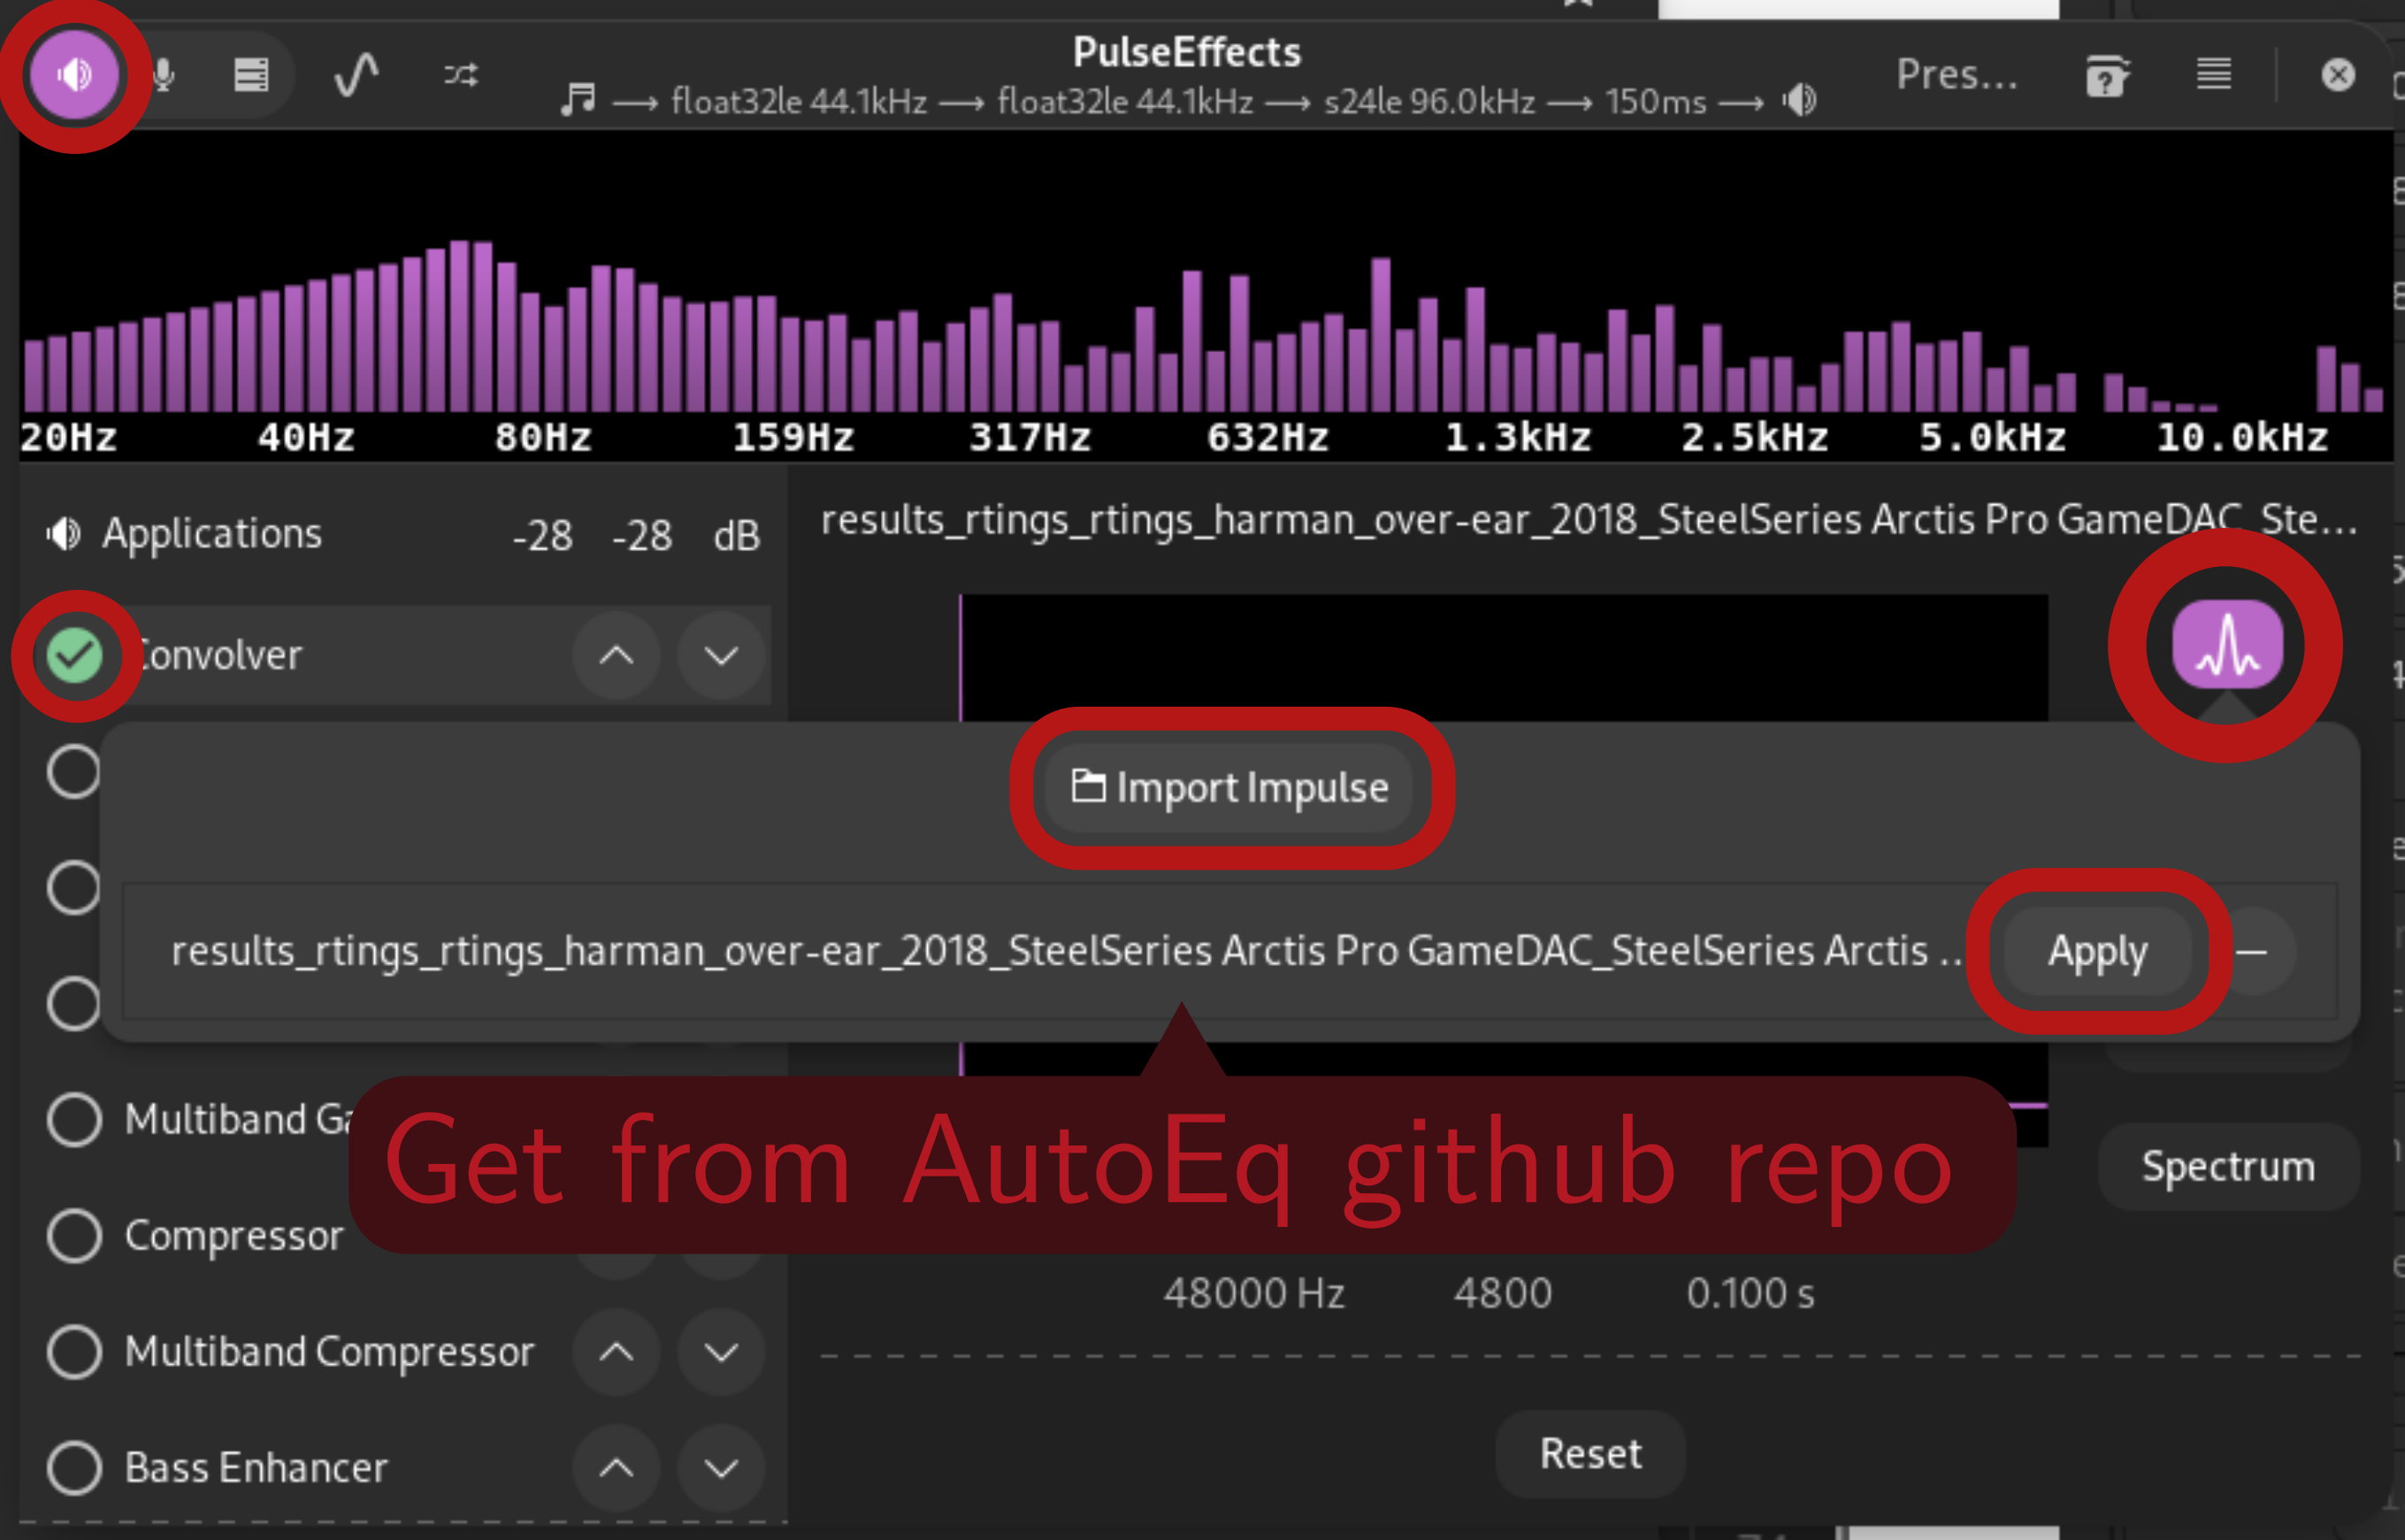
You need to download the corresponding .wav file to your headset, from the AutoEq github repository. For example the files related to my headset are these ones. There's a 44.1kHz and a 48kHz version for those .wav files. Pick the highest frequency your soundcard can handle, or just try both if you are too lazy to figure that out haha.
Note: the easyeffects app must remain open for this to keep on working, except if you enable the "start as a service on login" menu option then log out and back in.
Mic noise suppression
You have cherry blue mechanical keyboard, your friends and teammates keep on complaining/sending death threats about you being too noisy with your keyboard ? Fear no more.
A bit of history: People from Mozilla made some research to apply neural networks to noise suppression from audio feeds, they published everything about it, including the code. Another person, "Werman", picked up their work and made it work as a PulseAudio plugin.
The Graphical way
- If you are using Pipewire, install easyeffects, it probably is in your distro's repositories.
- If you are still on Pulseaudio, you can install a "legacy" version of
easyeffects, called pulseffects-legacy. It may be available in your distro's repositories (e.g.pulseeffects-legacy-gitfrom the AUR, on Archlinux) or you need to build it from source.
Enable the "Noise Reduction" plugin for your mic:
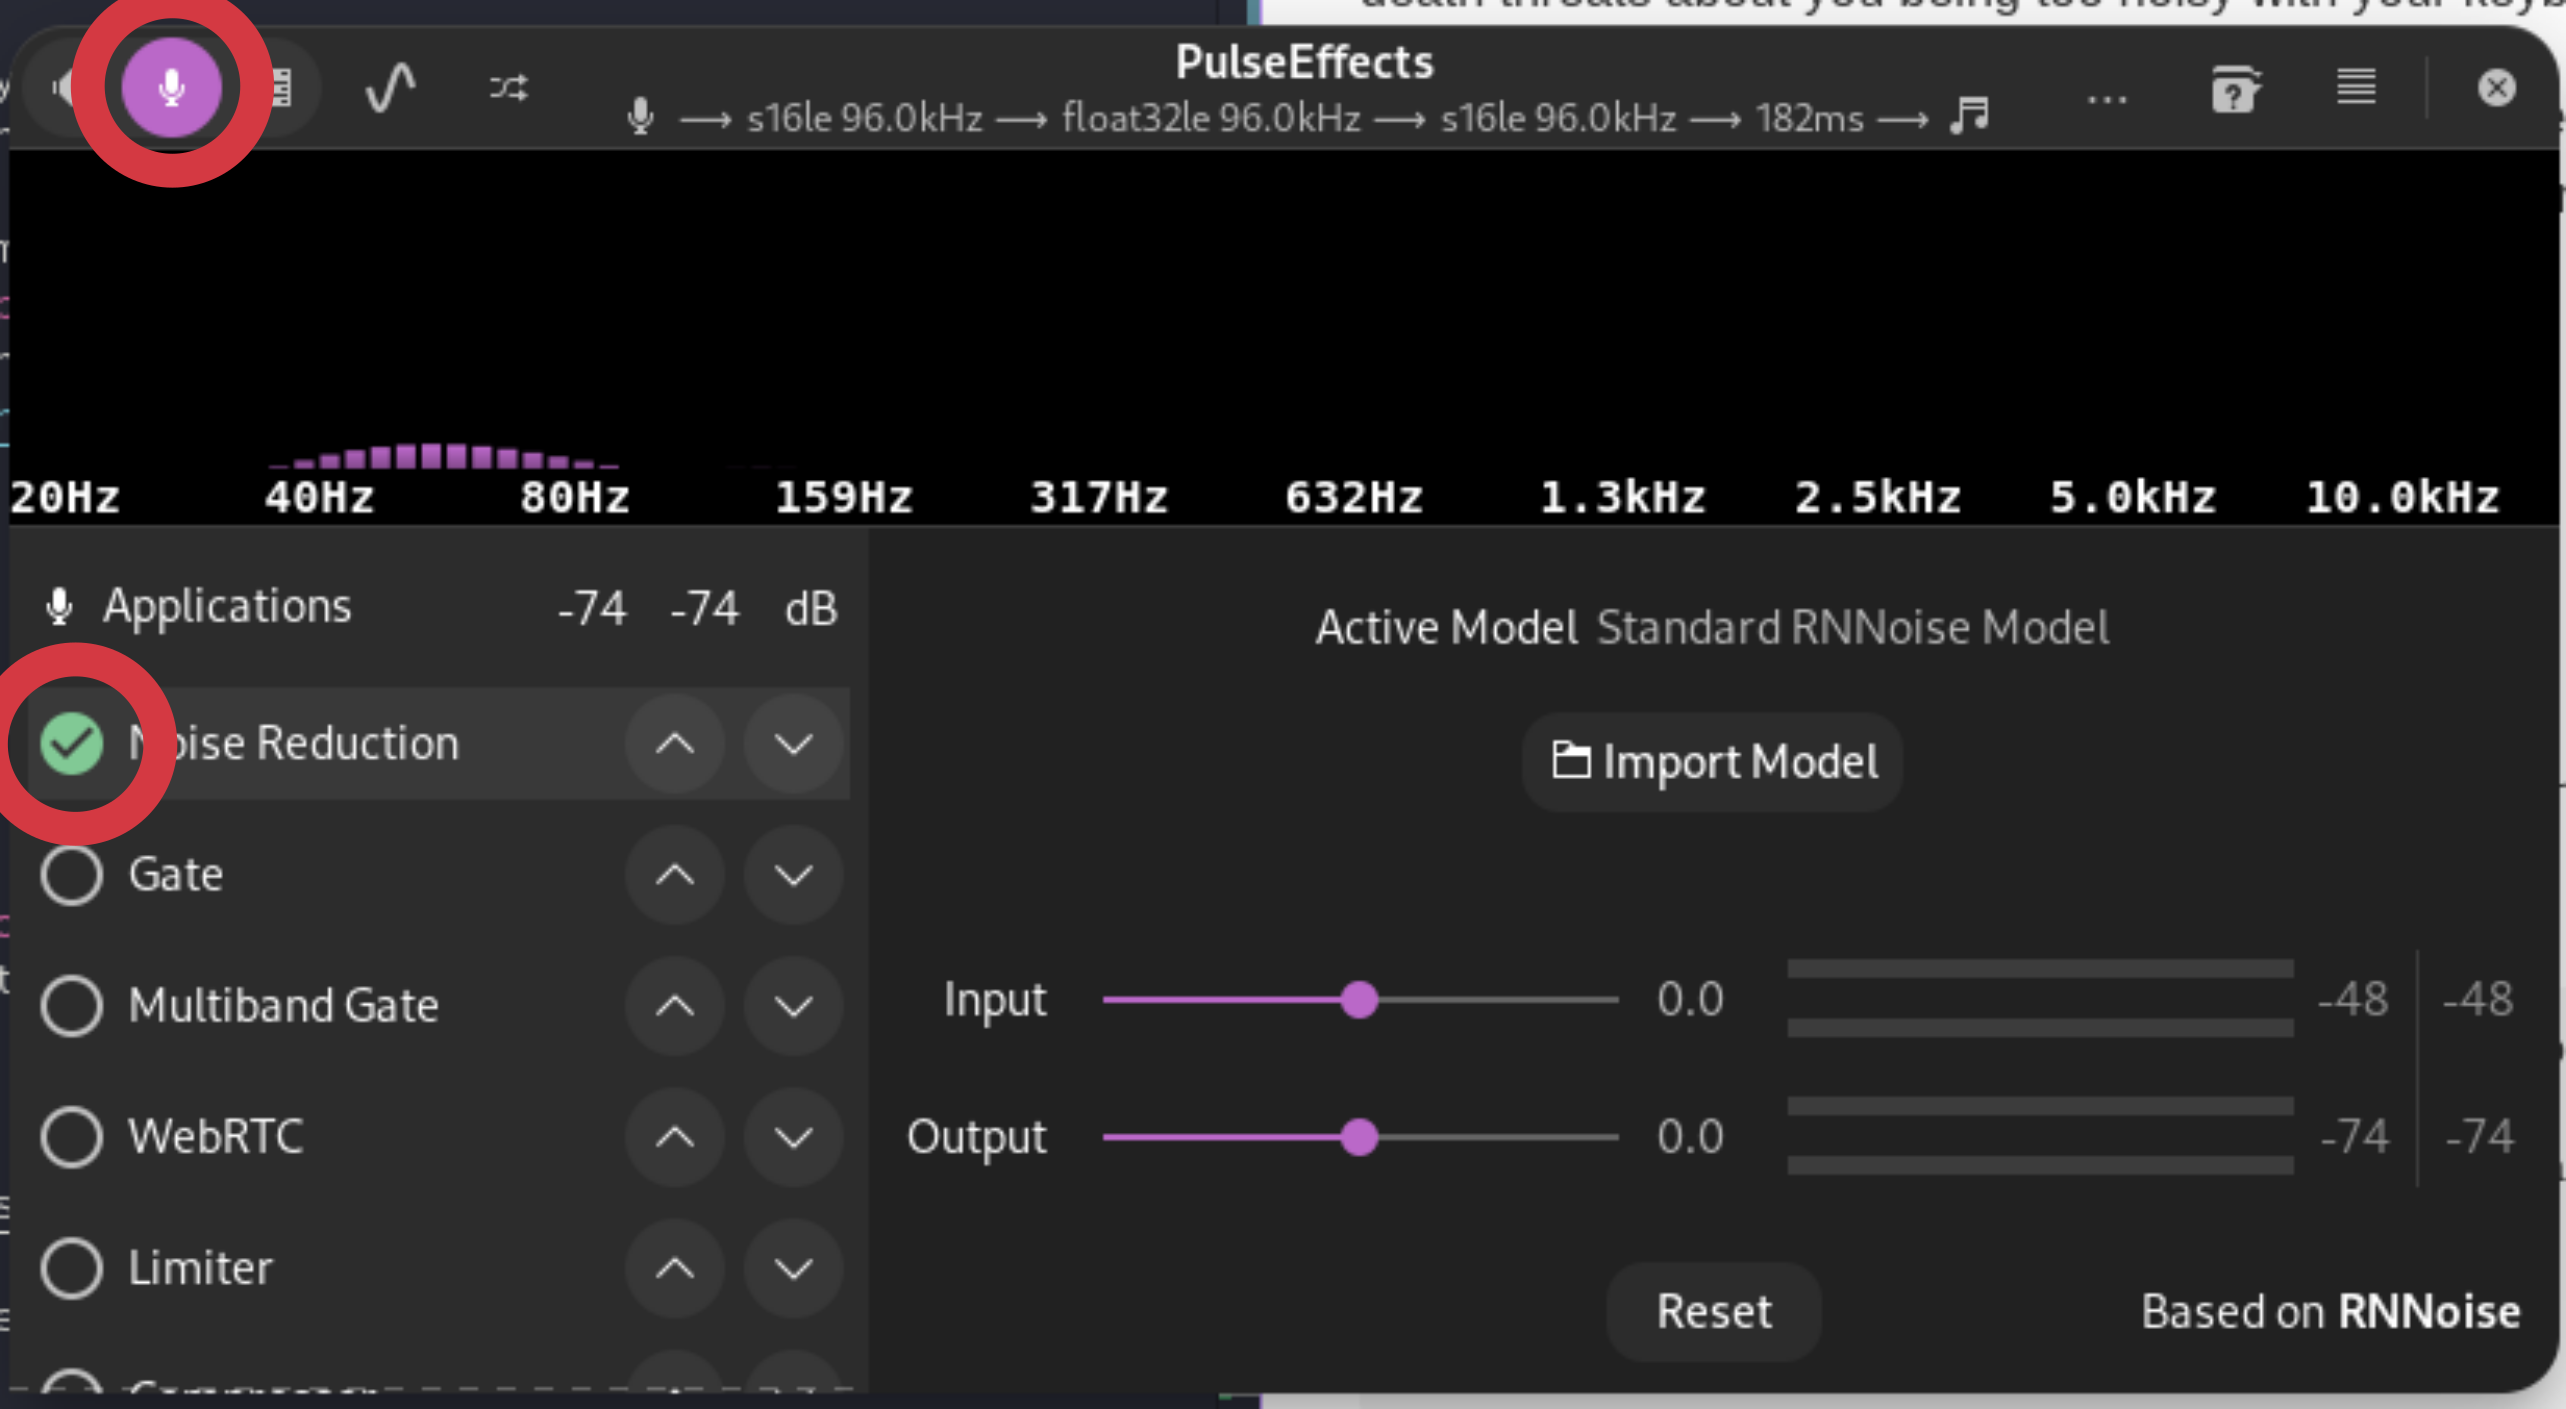
Note: the easyeffects app must remain open for this to keep on working, except if you enable the "start as a service on login" menu option then log out and back in.
The command line way
All this is explained in Werman's Git repository. I will put it back here. It works for both Pipewire and Pulseaudio
- Clone, build and install the plugin
git clone https://github.com/werman/noise-suppression-for-voice.git noise-suppression
cd noise-suppression
cmake -Bbuild-x64 -H. -DCMAKE_BUILD_TYPE=Release
cd build-x64
make
sudo make install
- At each login, one needs to do this: create a virtual mic, instance the denoiser module and make it output to the virtual mic, and be fed from the actual mic. This can be saved in a bash script so it can be easilly run.
For Stereo mics
#!/bin/bash

pactl load-module module-null-sink sink_name="denoised_mic_stereo" sink_properties="device.description=Denoised-Mic-Stereo" rate="48000"

pactl load-module module-ladspa-sink sink_name=denoiser_stereo sink_properties="device.description=Denoiser-Stereo" sink_master="denoised_mic_stereo" label="noise_suppressor_stereo" plugin="librnnoise_ladspa" control="50"

pactl load-module module-loopback source="alsa_input.usb-SteelSeries_SteelSeries_GameDAC_000000000000-00.multichannel-input" sink="denoiser_stereo" channels="2" source_dont_move="true" sink_dont_move="true" source_output_properties="stream.capture.sink=1"
For mono mics
#!/bin/bash

pactl load-module module-null-sink sink_name="denoised_mic_mono" sink_properties="device.description=Denoised-Mic-Mono" rate="48000"

pactl load-module module-ladspa-sink sink_name="denoiser_mono" sink_properties="device.description=Denoiser-Mono" sink_master="denoised_mic_mono" label="noise_suppressor_mono" plugin="librnnoise_ladspa" control="50"

pactl load-module module-loopback source="alsa_input.usb-SteelSeries_SteelSeries_GameDAC_000000000000-00.multichannel-input" sink="denoiser_mono" channels="1" source_dont_move="true" sink_dont_move="true" source_output_properties="stream.capture.sink=1"
Where alsa_input.usb-SteelSeries_SteelSeries_GameDAC_000000000000-00.multichannel-input is the name of my mic input. You can obtain the name of your mic input with:
pactl list sources short
Benchmarks
Benchmarks are welcome: If you happen to do some you are welcome to PR them. I sugggest to use MangoHud and upload the results to its corresponding website (more information), before uploading the results make sure to include as many information as possible to be able to "reproduce"
- hardware: CPU, GPU, RAM (with timings)
- Software: version of the distro, Kernel (if linux-tkg, the modified options in
customization.cfg), Wine (if wine-tkg, the modified options too), DXVK, Mesa/AMDVLK/Nvidia, compilation process (if manually compiled) - Game: how to reproduce the measured benchmarks: Fsync/Esync ? is it a benchmark tool ingame ? a saved play ? Can it be shared so other can benchmark against the same thing with different hardware/software ?
- Save all the frametimes, i.e. use
fps_sampling_period=0so the percentiles are accurately measured
Games
cpusettrick- Overwatch
- Benchmark 1:
cpuseton vs off, with both ccx separation and smt separation.
- Benchmark 1:
- Overwatch
Mice
I performed the benchmark according to the section Input lag / latency: benchmark at home, with a 270Hz monitor and 960fps slow-mo videos
- SteelSeries Sensei Ten
- Razer Viper Ultimate
- Attack Shark X3 / VGN Game Power x3 / Kysona M600 (rebrands of the same mouse)
- Ajazz aj139pro
- VGN Firefly F1 Pro Max (
4kHzpolling rate,1msdebounce)- Delay to start of movement:
<= 5msvideo-linux-1, video-linux-2, video-windows-1 - Click latency:
<= 9msvideo-linux-1, video-linux-2, video-windows-1, video-windows-2 (windows click latency tests give20ms-10msprobably due to extra software delay from the "files" app)
- Delay to start of movement:
Misc
- Asus ROG laptop 2022 and BIOS updates: if you get the error
Selected file is not a proper bioswith EZ Flash in the BIOS menu. You need a USB stick that's USB3, with a GPT partition table, with secure boot disabled in the BIOS (so you need to put secure boot back to setup mode after the update, and re-enroll your keys). - There is very nice documentation on the Archlinux wiki about improving performance
- Background YT videos: If you have youtube music in the background, try to switch to an empty tab and not leave the tab on the video. I noticed that like this the video doesn't get rendered and helps freeing your GPU or CPU (depending on who is doing the decoding).
- KDE file indexer : If you're using KDE, you may consider disabling the file indexer. This is either done in the KDE settings or with
balooctl disable(requires a reboot).
Contributors


Similar repos


Languages
Shell
100.0%
An incomplete compilation of things that may improve your gaming experience on Linux
Shell
499
102 commits
updated Jul 7, 2026
README
A linux gaming guide
This is some kind of guide/compilation of things, that I got to do/learn about while on my journey of gaming on linux. I am putting it here so it can be useful to others! If you want to see something added here, or to correct something where I am wrong, you are welcome to open an issue or a PR !
Table of Content
- A linux gaming guide
- Table of Content
- Gaming kickstart
- Extras
- Advanced topics for those interested
Gaming kickstart
Gaming on Linux has never been easier
- Chose your Linux distribution
- Install your GPU drivers
- AMD
- Needs
mesa, which ships theRADVvulkan driver. Probably already part of the base distro
- Needs
- Nvidia
- RTX 2000 and newer: install Nvidia's "open" driver
- Older GPUs: use Nvidia's "closed" driver
- AMD
- Install the Steam client (prefer a distro that ships it so dependencies get properly pulled)
- If the games you want to run isn't in Steam, see Prefix managers
- Game on!
Extras
Performance overlays
Performance overlays are small "widgets" that stack on top of your game view and show performance statistics (framerate, temperatures, frame times, CPU/RAM usages... etc). Two possibilities:
- Recommended: MangoHud
- Available in the repositories of most linux distros
- To activate it, add the environment variable
MANGOHUD=1 - Configuration
- Config files/env vars: HUD Configuration.
- GUI: GOverlay
- Ideal for benchmarking.
- Fallback: DXVK
- Has its own HUD and can be enabled by setting the variable
DXVK_HUD- The possible values are explained in its repository
- Has its own HUD and can be enabled by setting the variable
SteamTinkerLaunch
Steam Tinker Launch opens a window after starting a game from Steam that offers adding in various tweaks before actually starting the game.
Steam Tinker Launch is a versatile Linux wrapper tool for use with the Steam client which allows for easy graphical configuration of game tools, such as GameScope, MangoHud, modding tools and a bunch more. It supports both games using Proton and native Linux games, and works on both X11 and Wayland.
Make sure to follow these instructions.
Game mode
GameMode is wrapper script that puts your computer in performance mode:
- Changes the CPU frequency scaling to
performance - Can change the game's processes priority
- Can change the GPU's power profile
- (see config) to see what it can offer
How to use:
- Archwiki entry on GameMode
- SteamTinkerLaunch can be set to use it
- Lutris uses it automatically if it's detected
Is it running ?
- Run the command
gamemoded -s. - Waybar can be setup to show the state of GameMode.
streaming: OBS
OBS is the famous open source streaming software: it helps streaming and recording your games, desktop, audio input/output, webcams, IP cameras... etc.
obs-vkcapture: low-overhead game capture method
obs-vkcapture implements the "dma-buf" sharing protocol for capturing games with low/no overhead.
To use it:
-
Use
game captureas "source" in OBS-
You may need to run
obs-studiowith the environment variable,OBS_USE_EGL=1OBS_USE_EGL=1 obs
-
-
Run your game with either
OBS_VKCAPTURE=1environment variable- or: prepend your game launch with
obs-vkcapture %command% - Note: SteamTinkerLaunch can help with that
GPU Encoders
- AMD GPUs, prefer using
ffmpeg-vaapito leverage the GPU for encoding. - NVidia GPUs, prefer using
nvencto leverage the GPU for encoding.
Software encoding on AMD Ryzen CPUs
If you want to use a software encoder, it's a very good idea to manually assign separate CCX/CCDs for the game and OBS on AMD CPUs that have more than two. I benchmarked it and it makes a difference.
Saving replays
OBS: replay Buffer
OBS offers saving the last X seconds of your gaming session in RAM, and it saves it to a file once you press a pre-defined keyboard shortcut.
To enable it:
- Settings > Output > Replay Buffer > Enable Replay Buffer
- You can also set there how long is the saved window
- This adds a new button the the main window: "Start replay buffer"
- It will keep in RAM the last X seconds all the time
- While "replay buffer" is started and running, you can either
- press the "save" button that is right next to "stop replay buffer"
- trigger the keyboard shortcut for "save replay"
gpu-screen-recorder
gpu-screen-recorder is a cli, GUI and overlay tool for recording, replay and streaming efficiently with the GPU.
You can run this command with GameMode to be able to save replays with a hotkey. Needs more prep on wayland.
gpu-screen-recorder -w DP-1 -f 60 -q medium -r 20 -k av1 -bm vbr -c webm -ac opus -a "$(pactl get-default-sink).monitor" -o /tmp -v no -sc scripts/clip_upload.sh > /tmp/gamemode.log 2>&1
Useful examples are here.
Linux distribution recommendation
If you are hesitating on what Linux distribution to use. Here's this guide's recommendation:
The reasons for the recommendation:
- To get the best performance, one simply needs the latest updates, as soon as possible.
- Cutting-edge new gaming tools are shipped on those distributions first
CachyOS
- Based on Archlinux
- Rolling-release distro: packages continuously get updated.
- Ships package updates just few days after they get released. While remaining perfectly stable.
- Has a specific Gaming guide
- Many kernels to chose from
CachyOS does compile packages with the x86-64-v3, x86-64-v4 and Zen4 instruction set and LTO to provide a higher performance. Core packages also get PGO or BOLT optimization.
and important for nvidia users:
CachyOS includes a custom hardware detection tool that automatically identifies and installs the necessary drivers and packages for your system. This eliminates the need for manual driver searching, saving you time and effort after installation.
Archlinux
- Rolling-release distro: packages continuously get updated.
- Ships package updates just few days after they get released. While remaining perfectly stable.
- Can use the archinstall TUI tool for a more user-friendly install.
Headset Control
HeadsetControl helps configuring some gaming headsets that have a battery, adjustable side-tone, LEDs...
CoolerControl
CoolerControl is a GUI app for system monitoring and fan curve configuration.
RGB Control
Advanced topics for those interested
What comes here are topics that gamers don't need to be aware of to be able to play, but can be interesting for some, so here they are.
Self-compiling
Compiling is the process of transforming human written code (like C/C++/Rust/... etc) to machine runnable programs (the .exe files on Windows, on Linux they usually have no extension :P). Compiling is actually done by a program, a compiler, on linux it's gcc or clang. There is not a unique way to translate/compile code to machine runnable programs, the compiler has lots of freedom on how to implement that, and we can influence them by telling them to try "harder" to optimize the machine code, by giving them the so called "flags": a set of command line options given to the compiler, an example is
gcc main.c -O2 -march=native -pipe
where -O2, -march=native and -pipe are compiler flags. There are many flags that compilers accept, the ones specific to optimization are given in GCC's documentation. A few important (meta)flags
- The
-Ox, wherex=1,2,3, is a generic flag that sets the generic level optimization, it activates many other flags that actually do something. Distros compile the packages they ship usually with-O2 - The
-marchflag is a flag that tells the compiler to use additional features that aren't available for all CPUs: newer CPU implement some "instruction sets" (aka additional features) that enable them to perform some tasks faster, like SIMD instructions. It makes some programs faster, likeffmpegwith video conversion. These instruction sets are not used by default in packages shipped by distros as they need to have them able to run on all machines, even those from 2001. So one can win some performance by just compiling with-march=nativetheir computational heavy programs. Although some have embedded detection code to use additional instruction sets if detected. Some Linux Distributions like Gentoo enable you to compile every single package on your own machine so you can have ALL the apps built with-march=native(it may take several hours depending on your CPU) - Link Time Optimizations (LTO) that involve the use of the flags
-flto,-fdevirtualize-at-ltransand-flto-partition - Profile Guided Optimizations (PGO) that involve the use of
-fprofile-generate=/path/to/stats/folder,-fprofile-use=/path/to/stats/folderflags. The idea behind is to produce a first version of the program, with performance counters added in with the-fprofile-generate=/path/to/stats/folderflag. Then you use the compiled program in your real life use-cases (it will be way slower than usual), the program meanwhile fills up some extra files with useful statistics in/path/to/stats/folder. Then you compile again your program with the-fprofile-use=/path/to/stats/folderflag with the folder/path/to/stats/folderfiled with statistics files that have the.gcdaextension.
A nice introduction to compiler optimizations -Ox, LTO and PGO, is made in a Suse Documentation that you can find here: https://documentation.suse.com/sbp/all/html/SBP-GCC-10/index.html
The Kernel, Wine, RADV and DXVK can be compiled on your own machine so you can use additional compile flags (up to a certain level) for the particular CPU you own and potentially faster with more "aggressive" compiler flags. I said potentially as you need to check for yourself if it is truly the case or not.
Flags to try
Here is a group of flags can use when building your own programs
BASE="-march=native -O3 -pipe"
GRAPHITE="-fgraphite-identity -floop-strip-mine"
MISC="-floop-nest-optimize -fno-semantic-interposition -fipa-pta"
LTO3="-flto -fdevirtualize-at-ltrans -flto-partition=one"
LTO2="-flto -fdevirtualize-at-ltrans -flto-partition=balanced"
LTO1="-flto -fdevirtualize-at-ltrans -flto-partition=1to1"
It is recommended to try them in the following order, if one fails (for whatever reasons: fails to compile or doesn't work), try the next one:
BASE + GRAPHITE + MISC + LTO3:
-march=native -O3 -pipe -fgraphite-identity -floop-strip-mine -floop-nest-optimize -fno-semantic-interposition -fipa-pta -flto -fdevirtualize-at-ltrans -flto-partition=one
BASE + GRAPHITE + MISC + LTO2:
-march=native -O3 -pipe -fgraphite-identity -floop-strip-mine -floop-nest-optimize -fno-semantic-interposition -fipa-pta -flto -fdevirtualize-at-ltrans -flto-partition=balanced
BASE + GRAPHITE + MISC + LTO1:
-march=native -O3 -pipe -fgraphite-identity -floop-strip-mine -floop-nest-optimize -fno-semantic-interposition -fipa-pta -flto -fdevirtualize-at-ltrans -flto-partition=1to1
BASE + GRAPHITE + MISC
-march=native -O3 -pipe -fgraphite-identity -floop-strip-mine -floop-nest-optimize -fno-semantic-interposition -fipa-pta
BASE + GRAPHITE
-march=native -O3 -pipe -fgraphite-identity -floop-strip-mine
BASE
-march=native -O3 -pipe
DirectX to Vulkan mapping
Most games built to run on Windows will uses Windows' proprietary DirectX graphics API. Linux does not support DirectX and instead supports Vulkan (modern) and OpenGL (legacy), which are an open-source, multi-platform alternative. For games to run on linux, stateful translations layers from DirectX are necessary:
- DXVK: translates DirectX API, from version 8 to 11, to Vulkan
- vkd3d-proton: DirectX 12 to Vulkan Valve/Proton fork
WineD3D: wine's built-in DirectX 8-to-11 to OpenGL translation layer (poor performance)- vkd3d: DirectX 12 to Vulkan,
DXVK self-building
You can compile your own latest one with some "better" compiler optimizations if you wish, and that's what I am doing but I have no idea about the possible FPS benefits of doing that. To do so you will need to put what DXVK's compile script gives you in ~/.local/share/lutris/runtime/dxvk/. Link here: https://github.com/doitsujin/dxvk
git clone https://github.com/doitsujin/dxvk.git
cd dxvk
# Build new DLLS
./package-release.sh master ~/.local/share/lutris/runtime/dxvk/ --no-package
Custom compile flags
DXVK can be compiled with user provided compile flags. For that, you edit build-win32.txt and build-win64.txt and change the following before running the ./package-release.sh script:
[built-in options]
c_args=[... TO BE FILLED ...]
cpp_args=[... TO BE FILLED ...]
c_link_args = ['-static', '-static-libgcc', ... TO BE FILLED ...]
cpp_link_args = ['-static', '-static-libgcc', '-static-libstdc++', ... TO BE FILLED ...]
Where you can replace ... TO BE FILLED ... with BASE + GRAPHITE + MISC + LTO3 flags defined here if you don't enable PGO. If you want to use PGO, you can use the BASE + GRAPHITE + MISC + LTO2 + -fprofile-generate=/path/to/dxvk-pgo-data or -fprofile-use=/path/to/dxvk-pgo-data, depending on the stage you are in. You can change the =/path/to/dxvk-pgo-data path. You also need to add '-lgcov' to c_link_args and cpp_link_args
Note: you need to respect the syntax of the build-winXX.txt files. Flags are quoted and separated with comas e.g. c_args=['-O2', '-march=native'].
These flag changes may improve performance or not, the best is to test with and without and see for oneself. If regressions happen or it doesn't want to compile you can try other flags.
GPU
Some interesting information about GPUs, the device that does the heavy lifting when running games.
Drivers
Drivers for the GPUs comes in two parts
- Kernel driver: usually built as a module
- Nvidia: several kernel modules are possible
- "open" driver (recommended): an open-source out-of-tree (i.e. not available in Linux' source code), built using DKMS, maintained by Nvidia
nouveau: an open-source reverse engineered module, not useful for gaming.- Nova: in-development
nouveaureplacement, written in Rust within the Linux kernel codebase. - "closed" driver: closed source driver wrapped as a kernel module using DKMS. Maintained by Nvidia. Slowly becoming legacy.
- AMD
amdgpu: open-source driver upstream in the Linux source code, maintained by AMD.
- Nvidia: several kernel modules are possible
- User-space driver to implement Vulkan
- AMD
RADVvulkan driver, part of themesaproject
- Nvidia
- proprietary, part of Nvidia's driver install
NVKvulkan driver, still under development under themesaumbrella.
- AMD
Nvidia
- Arch's documentation: https://wiki.archlinux.org/index.php/NVIDIA
AMD
- Arch's documentation: https://wiki.archlinux.org/index.php/AMDGPU
RADV: Self-compile
You can compile only RADV by hand with the extra bonus of using your own compiler optimizations as described in this section and use it for any Vulkan game, in a per game basis.
First, you get the source code
git clone --depth=1 https://gitlab.freedesktop.org/mesa/mesa.git
This command will create a mesa folder. To compile only RADV, you go into the sources folder and do the following
cd path/to/mesa
git clean -fdx
mkdir build && cd build
export CFLAGS="... [To be Filled] ..."
export CXXFLAGS="${CFLAGS}"
export LDFLAGS="-Wl,-O1,--sort-common,--as-needed,-z,now ${CFLAGS}"
meson .. \
    -D prefix="$HOME/radv-master" \
    --libdir="$HOME/radv-master/lib" \
    -D b_ndebug=true \
    -D b_lto=TO BE CHANGED \
    -D b_pgo=TO BE CHANGED \
    -D buildtype=release \
    -D platforms=x11,wayland \
    -D dri-drivers= \
    -D gallium-drivers= \
    -D vulkan-drivers=amd \
    -D gles1=disabled \
    -D gles2=disabled \
    -D opengl=false
meson configure
ninja install
Where you need to fill a a few lines
CFLAGSwith flags, you can useBASE + GRAPHITE + MISC + LTO3from the flags to try section.- If you enabled the
LTOflags you must set-D b_lto=true, otherwise-D b_lto=false - With regards to PGO, first read the bullet point about PGO
- Profile generation
- you must set
-D b_pgo=generate - append
-fprofile-generate=$HOME/radv-pgo-datatoCFLAGS, where you can replace$HOME/radv-pgo-databy another folder if you wish
- you must set
- Profile use
- you must set
-D b_pgo=use - append
-fprofile-use=$HOME/radv-pgo-datatoCFLAGS, where you replace$HOME/radv-pgo-datawith the same folder you used for profile generation
- you must set
- No PGO, you must set
-D b_pgo=off
- Profile generation
These may improve performance or not, the best is to test with and without and see for oneself. If regressions happen, follow the steps in flags to try section to reduce the number of flags.
After running the lines above, you get the driver installed in $HOME/radv-master, you can change the folder name and where it is in the line -D prefix="$HOME/radv-master". Now, to use it for Overwatch (or any other game), you must set the following environment variable (in Lutris, it's in "Configure" > "System Options" > Environment variables, and add it):
VK_ICD_FILENAMES=$HOME/radv-master/share/vulkan/icd.d/radeon_icd.x86_64.json:$OTHER_PATH/radeon_icd.i686.json
where you should manually replace $HOME by your home path /home/Joe and $OTHER_PATH by where radeon_icd.i686.json actually is, you can find out with
sudo updatedb
locate radeon_icd.i686.json
If the games crashes after doing all this, you can either try other git commits (you will need some git knowledge) or revert to the stable driver by simply removing the VK_ICD_FILENAMES environment variable. And if you don't wanna hear about bleeding edge mesa anymore you can simply remove the mesa source folder along with $HOME/radv-master.
Kernel
CPU mitigations
The kernel has various protection mechanisms from malicious program-execution based attacks, that are mostly Side Channel Attacks like Transient execution vulnerability, which are about a legitimate code leaking data to a malicious code that is running on the same core.
These protections/mitigations sometimes come with an extra overhead on the CPU (see 1, 2, 3, 4, 5, 6) and can be disabled by adding mitigations=off to your kernel boot parameters or by building a kernel without the mitigation code paths.
To know what vulnerabilites your CPU is affected by, use lscpu
$ lscpu # for a Zen5 CPU
# [... snip ...]
Vulnerabilities:
  Gather data sampling:      Not affected
  Ghostwrite:                Not affected
  Indirect target selection: Not affected
  Itlb multihit:             Not affected
  L1tf:                      Not affected
  Mds:                       Not affected
  Meltdown:                  Not affected
  Mmio stale data:           Not affected
  Old microcode:             Not affected
  Reg file data sampling:    Not affected
  Retbleed:                  Not affected
  Spec rstack overflow:      Vulnerable
  Spec store bypass:         Vulnerable
  Spectre v1:                Vulnerable: __user pointer sanitization and usercopy barriers only; no swapgs barriers
  Spectre v2:                Vulnerable; IBPB: disabled; STIBP: disabled; PBRSB-eIBRS: Not affected; BHI: Not affected
  Srbds:                     Not affected
  Tsa:                       Not affected
  Tsx async abort:           Not affected
  Vmscape:                   Vulnerable
###
Personal (potentially very wrong) opinion: for regular desktop use, if you get to the point that you are running malicious code, your system is probably already compromised and the said malicious code doesn't even need to use such contrived vulnerabilites to obtain sensitive data. Therefore, using a desktop with mitigations disabled doesn't seem that bad. The mitigations or more for servers running e.g. VMs for different customers and making sure their data remains confidential. This may render your browser vulnerable to side channel attacks from infected/untrustworthy websites that can steal information available within the browser at least.
Threading synchronization
you may have heard about esync, fsync or futex2 threading synchronisation kernel syscalls. They have been developed by CodeWeavers and Collabora. Chronologically, here's what happened
esync- Oldest implementation
- Uses the kernel's
eventfdsystem call.- Issues arise in some distros when a game opens a lot of "file descriptors" (the maximum amount can be increased)
- Support matrix:
- Any Linux kernel with
eventfdsupport - Upstream Wine:
>= 10.15: used as fallback ifntsyncisn't available- Otherwise used by default
- Proton: used as fallback if
fsyncisn't available
- Any Linux kernel with
FUTEX_WAIT_MULTIPLE,- Works witn an additional flag on the
futexsystem call. - It was referred to in wine as
fsync(that we will also callfsync1). - This work did not get upstreamed in the linux kernel (out-of-tree) nor in wine and now part of the past.
- Works witn an additional flag on the
futex_waitv/fsync/futex2implementing a new system call futex_waitv()- Still referred to as
fsyncin wine (so basically anfsync2). Which led to some confusions - Support matrix:
- Linux >=
5.16 - Upstream Wine: never
- Proton
- Linux >=
- Still referred to as
ntsync(also previously calledwinesync)- latest proposal of synchronization subsystem that mimicks Windows' behavior the closest
- Similar to
futexandeventfd, aimed to serve exclusively for mapping Windows API sync mechanisms. - Same performance as
fsyncbut with broader compatibility with Windows apps - Support matrix:
- Linux kernel >= 6.14
- Upstream Wine >= 10.15 (enabled by default)
- Proton
- Official: not yet
- proton-ge-custom >= 10-10 (enabled by default)
- proton-tkg (enabled by default if compiled with support enabled)
x2APIC
x2APIC is the modern successor of the legacy local APIC (the per-core interrupt controller) for handling interrupts and may improve performance.
On AMD Ryzen it's actually not enabled by default. To enable it:
- Add
x2apic_physto your kernel boot parameters- otherwise booting will probably hang with the console showing
x2apic: IRQ remapping doesn't support X2APIC modesomewhere during boot afterx2apicis enabled in the next step.
- otherwise booting will probably hang with the console showing
- Go to BIOS:
AMD CBS > CPU Opitons > Local APIC modeand selectx2apic
To check whether x2APIC is currently active:
dmesg | grep -i x2apic

x2apic: enabled by BIOS, switching to x2apic ops
APIC: Switched APIC routing to: physical x2apic
Custom kernels
Using a self-compiled kernel can bring some gaming improvements. Ready to use pre-build custom kernels are readily available:
- Xanmod kernel
- Liquorix
- Linux-zen
- linux-tkg
- CachyOS: ships many variants
Compiling your own: linux-tkg
For self-compiling a kernel, linux-tkg provides tooling to compile the linux Kernel from source (takes about ~30mins, but can be stripped down with modprobed-db) with some customization options e.g. changing/tweaking the default scheduler ; along with other patches that help getting better performance in games. You can also provide your own patches.
AMD Ryzen CPU cache topology
The cache is the closest memory to the CPU, and data from RAM needs to go through the cache first before being processed by the CPU. The CPU doesn't read from RAM directly. This cache memory is very small (at maximum few hundred megabytes as of current CPUs) and this leads to some wait time in the CPU: when some data needs to be processed but isn't already in cache (a "cache miss"), it needs to be loaded from RAM. When the cache is "full", because it will always be, some "old" data in cache is synced back in RAM then replaced by some other data from RAM: this takes time.
There is usually 3 levels of cache memory in our CPUs: L1, L2, and L3. The L1 and L2 are few hundred kilobytes and the L3 a (few) dozen megabytes. Each core has usually its own L1 and L2 cache, the L3 is shared with other cores.
Ryzen CPUs are made of "chiplets": physical "islands" (some kind of sub-CPUs) of 8 cores with identical specs. A CPU can have several "chiplets".
This anandtech article gives a thorough analysis of cache topology in Zen 2 and Zen 3, which apply so far till Zen4 :
zen/zen+/zen2: the chiplets are split into two regions of 4 cores with separate 16MB L3 cache.zen3/zen4/zen5: the chiplet is a single island of 8 cores (2 can be disabled in some variants) with 32MB of shared L3X3D: some AMD CPUs come with a chiplet that has 64MB added to its L3 cache, bringing it to a total of 96MB
One can obtain the cache topology if his current machine by running the following command:
$ lstopo
The lstopo of my previous Ryzen 3700X gives this
For my Ryzen 5950X gives this
Core pinning: cpuset
Note: This section is deprecated and needs to be updated to document systemd slices and the taskset CLI tool.
Now that we are aware of cache topology in AMD CPUs. We can try giving an entire CCX (for Zen/Zen+/Zen2 for CPUs that have >=6 cores) or CCD (for Zen3/Zen4, for CPUs that have >=12 cores) to your game, and make (nearly) everything else run in the other CCX(s)/CCD(s). With this, as far as I can hypothesize, one reduces the amount of L3 cache misses for the game, since it doesn not share it with other processes.
cpuset is a linux mechanism to create groups of cores (a cpu set) to which you can assign processes, at runtime. Any process in a given cpu set will spawn child processes in the same cpu set. Have a read at the doc to understand how things work.
Two scripts are provided in this repo:
- tasks_redirect_generic.sh. This script needs to be run with
lutrisopenned by before launching a game.- Creates two cpusets
theGoodandtheUgly. - Redirects every process to
theUgly - Prompts to redirect
lutristo thetheGoodcpuset, so anything launched throughlutrisstarts in the same cpuset automatically.
- Creates two cpusets
- reverse_tasks_redirect.sh: reverses the splitting done by the script above.
- Info: created cpu sets (that are folders) can be removed if all the processes they contain get redirected to the main cpu set, that contains all cores.
Checking that it works
Core IDs should be carefully chosen so the cpu sets are separated by CCX/CCD and not just make a non hardware aware split. One way to check it is, after doing the splitting, to call lstopo in both cpusets and have a look at its output. A way to do so is to move one shell to the new group, as root:
/bin/echo $$ >> /dev/cpuset/theGood/tasks
lstopo
Then also open another shell, and do lstopo, you should get separate results:
Benchmark
I did this benchmark on Overwatch, the conclusions are the following:
- After a fresh restart, I already have a small number of processes (around 300), and most of them are sleeping, which means that Overwatch basically already has the entirety of the CPU for itself. Doing the cpuset trick reduced the performance: I think it's because Overwatch works optimally in more than 4 cores.
- Playing while doing another heavy workload, like stream with software encoding, works better with the cpuset trick.
Wine
Wine is a program that enables running windows executables on Linux. Through Wine, windows executables run natively on your linux machine (Wine Is Not an Emulator xD), Wine will be there to remap all Windows specific behavior of the program to something Linux can handle, DXVK for example replaces the part of Wine that maps DirectX (Windows specific) calls of executables to Vulkan calls (That Linux can handle). Tweaking Wine can have quite the impact on games, both positive and negative.
Environment variables
Some wine environment variables can be set that can help with performance, given that they can break games, they can be added on a per-game basis as usual in Lutris. The variables are the following:
STAGING_SHARED_MEMORY=1
STAGING_WRITECOPY=1
Threading synchronisation
To leverage the kernel's threading synchronisation primitives (see Kernel: threading synchronization) in windows apps/gaes, wine has to be the middle-man in between.
Esync-Fsync
To be able to handle fsync/futex2, you will need a patched version of wine. To enable it, you need to set the following environment variable
WINEFSYNC=1
WINEESYNC=1
Where WINEESYNC=1 is here as a fallback if ever fsync doesn't work.
To know wether esync or fsync are running. You can try running your game/launcher from the command line and you should see one of the following in the logs:
-
esync:[...] esync: up and running [...] -
fsync:[...] fsync: up and running [...]
Fastsync
To be able to use fastsync, you need the following, in this order
-
Be running a
winesyncenabled kernel, more information in this section -
Have a custom wine built with
winesyncsupport (e.g.wine-tkgoffers it). This may meanfsyncsupport needs to be disabled. -
Disable all environment variables related to
esync/fsync(and also from lutris' game options):WINEESYNC=0 WINEFSYNC=0
To know if fastsync is correctly working, you may run your game/launcher from the command line once and look for the following lines:
wineserver: using server-side synchronization.
wine: using fast synchronization.
This command should also return few executables
lsof /dev/winesync
Note: even with this, sometimes fastsync did not correctly work for me... fastsync should have a similar performance to fsync/futex2 so far, so if it doesn't work for you, switch back to fsync/futex2 then try again a little bit later.
Wine-tkg
wine-tkg is a set of scripts that clone and compile wine's source code, on your own machine, with extra patches that offer better performance and better game compatibility. One of the interesting offered extra features are additional threading synchronization primitives that work with the corresponding patched linux-tkg kernel. One can use Esync+Fsync+Futex2 or fastsync (with its corresponding kernel module winesync).
compiler optimizations
On top of the config variables that can be toggled in customization.cfg in wine-tkg, you can set custom compiler optimizations by editing the following lines of the file wine-tkg-profiles/advanced-customization.cfg
_GCC_FLAGS="... EDIT HERE ..."
# Custom LD flags to use instead of system-wide makepkg flags set in /etc/makepkg.conf. Default is "-pipe -O2 -ftree-vectorize".
_LD_FLAGS="-Wl,-O1,--sort-common,--as-needed"
# Same as _GCC_FLAGS but for cross-compiled binaries.
_CROSS_FLAGS="... EDIT HERE ..."
# Same as _LD_FLAGS but for cross-compiled binaries.
_CROSS_LD_FLAGS="-Wl,-O1,--sort-common,--as-needed"
Where you can change ... EDIT HERE ... with flags from here: note that LTO nor PGO works with wine, you can at most use the BASE + GRAPHITE + MISC flags
Game / "Wine prefix" manager
To run games on Linux, wine creates a so-called "prefix" folder with an arbitrary user chosen name, let's say game-prefix. It contains all the configuration specific to wine and a folder structure, within the drive_c subfolder, that follows Windows' structure: you can find e.g. Program Files or windows/system32 subfolders in it. The DLLs in the latter folder are actually created by wine, through reverse engineering. From a game's/window's app perspective, these DLLs to behave just like windows, and wine takes care of the rest (by implementing system calls itself, in the wineserver I believe, or redirecting to the linux kernel, correct me if I am wrong please).
Usually, one creates one prefix per game/app, as sometimes each game has some quirks that wine doesn't handle well by default for which a tweak is needed. But that tweaks would break other games apps. And that's where a "game manager" / "wine prefix manager" comes into play to avoid tedious and repetitive manual configurations:
- Automatically creates prefixes for each of your game
- Ships various version of Wine to work with the various versions of your games
- Bundles various DXVK versions to chose from
- Offers various options that can be toggled (
fsync,dxvk-nvapi/dlss,fsr,latencyflex...) - May have built-in support for extra tools like FPS counters (see Performance overlays)
Lutris
Lutris is one of these Generic open source game managers, it offers a database of scripts to automatically install various games and the quirks and/or extra configuration (e.g. extra fonts) needed to run them. It also enables you to give it your own compiled wine version and that's why I am using it currently. It is however lagging a bit behind in integrating the new tools that are being developped (e.g. latencyflex) and offering newer versions of runtime components (Wine, dxvk, ...). To see the toggles Lutris offers, install a game, then click Configure > Runner options tab.
Bottles
Bottles is a modern take on generic open source game managers, it has a more intuitive configuration UI, ships the latest builds of wine/dxvk, and tries to implement integration with all the latest other tools. I could however not find how to make it use my own compiled wine version.
Heroic Games Launcher
Heroic Games Launcher is an opensource game manager for games you own on GOG or Epic Games. I have not tried it at all so that's all I can say x)
Steam
Valve's official closed source game manager handles Linux natively and offers to run windows specific games with Steam's own builds of proton-wine. It also accepts custom proton builds like e.g. proton-tkg (wine-tkg repo) or GloriousEggroll's proton-ge-custom prebuilds.
Troubleshooting: first thing to try
When your game simply doesn't work or worked once and then never again, try removing the Wine Prefix created by steam for the game: remove the folder SteamLibrary/steamapps/compdata/$GAMEID/pfx (where $GAMEID is some unique ID that identifies the game, e.g. 1151640 for Horizon Zero Dawn). Then try relaunching the game.
Troubleshooting: getting logs
To first step to any troubeshooting is to get logs, in Steam, you need to set a specific launch option
PROTON_LOG=1 %command%
Which you can reach by doing this (taken from here):
- Open your Steam Library
- Right click the game's title and select
Properties. - On the
Generaltab you'll find `Launch Options`` section. - Enter the launch options
PROTON_LOG=1 %command% - Close the game's
Propertieswindow and launch the game. - Recreate your issue
- A file name
steam-$GAMEID.log(where$GAMEIDis some unique ID that identifies the game, like1151640forHorizon Zero Dawn) will be in your home folder (/home/foo)
In the log file (steam-$GAMEID.log), look for err: lines first, and use the keywords that appear there to know what to google for. Otherwise give the log entirely to people who may ask for it.
Shared NTFS partition with Windows
If you simply used a shared NTFS partition with windows and making Steam (Linux) discover it without further tweaks, you most probably will run into problems.
Like this one with IPHLPAPI.DLL (which I ran into)
24337.090:0124:0128:err:module:import_dll Library IPHLPAPI.DLL (which is needed by L"E:\\SteamLibrary\\steamapps\\common\\Horizon Zero Dawn\\HorizonZeroDawn.exe") not found
The fix is to delete the prefix then to follow Proton's documentation on the matter which involves having the path /SteamLibrary/steamapps/compatdata symlink to a folder outside of the NTFS partition, to a folder within a Linux filesystem (Btrfs, EXT4, ...etc ).
Note:
- To avoid having problems when using an NTFS partition on Linux, use
ntfs3as a filesystem type in your /etc/fstab file to use ntfs3 kernel driver (instead ofntfswhich uses ntfs-3g userspace driver) with the mount optionwindows_names(described here). With that, creating the prefix/SteamLibrary/steamapps/compatdatawithin the NTFS partition will fail. - If you get an
rm: traversal failedwhen trying to delete the prefix (or something else within the NTFS partition). That means your NTFS partition got corrupted and you will need to use Windows to scan and fix errors in the filesystem. Unfortunately Linux has no tool to fix NTFS filesystems.
Hardware
What's a good PSU
Turns out the 80+ rating doesn't fully capture the quality of a Power Supply Unit, see here for explanations and a list of recommended ones based tech specs: https://psutierlist.org
RAM Overclocking
Input lag / latency: benchmark at home
I have always had a wired gaming mouse, and always had sometimes this issue where the cable gets entangled when I am playing my FPS game. So I started looking into wirless ones, and this got me interested in mouse latencies: do wireless mice have higher input lag ? This question generalizes to mice and keyboards in general, and also to games.
For that, one can test, by himself, his own mouse or keyboard (or game), provided that one has a high refresh rate monitor and a smartphone with a high refresh rate camera. Thankfully enough, I have a 270Hz monitor and a smartphone that offers 960fps slow-mo videos: This gives me a latency "resolution" $\Delta t_\text{res} = T_\text{mon} = 1000/270 \approx 3.7 \text{ms}$ and a latency "precision" $\Delta t_\text{prec} = T_\text{cam} = 1000/960 \approx 1\text{ms}$, plenty to get accurate enough latencies !
Here's how I proced to test latencies:
- have your smartphone ready to take a slow-mo video, while having both the mouse/keyboard area and monitor visible within the frame
- start the slow-mo
- hit the keyboard/mouse key or hit the mouse with your finger, hit it fast so the inaccuracy of when the mouse starts to move, click records is the smallest.
- Analyze the video:
- The origin of the time $
t_\text{i}$ ("physical input start") is taken at the first camera frame where we can consider that the input has started, and we write $\delta t_i$ the uncertainty on it, because the actual frame where the click/move signal is registered by the device is hard to determine.- For a click:
- $
t_\text{i}$: the frame right before the frame where the button starts getting pushed - $
\delta t_i$: the number of frames between $t_\text{i}$ and the first frame where the button does not get pushed any lower
- $
- For mouse movement:
- $
t_\text{i}$: the frame right before the mouse body gets deformed from the hit - $
\delta t_i$: the number of frames between $t_\text{i}$ and when the entire mouse body moves
- $
- For a click:
- Identify the the time of the first camera frame $
t_\text{cf}$ ("output event camera frame") where something happens on-screen, in reaction to the input: mouse cursor moves, letter appears, game view moves ...etc.- Note that $
t_\text{cf}$ is at most $\Delta t_\text{res}$ away from the last screen refresh $t_\text{mf}$ ("output event monitor frame") where the image got updated, equivalently:- $
t_\text{cf} - \Delta t_\text{res} \le t_\text{mf} \le t_\text{cf}$ - The high speed camera introduces an uncertainty of $
\Delta t_\text{res}$
- $
- The time $
t_\text{mf}$ of the last monitor frame refresh reflects what information has been given to the PC in the $\Delta t_\text{res}$ timeframe that preceded, so we need to take that into account in our computation of the lower bound of the latency
- Note that $
- The origin of the time $
Now we have enough information to define an approximate upper-bound and lower-bound estimation of the device's latency (click latency / delay of start-of-movement):
- Upper bound $
\mu_\text{max} = t_\text{cf} - t_\text{i}$ - Lower bound $
\mu_\text{min} = \mu_\text{max} - \Delta t_\text{prec} - \Delta t_\text{res} - \delta t_\text{i}$
An important note:
- If you are testing the device itself, do NOT test on a game: a game adds input lag on top of the one the keyboard/mouse has. I found out that testing on the mouse cursor on the desktop is way better ! Preferably with the compositor disabled.
Once you have an estimation of the latency of your device, you can start benchmarking game related input lag!
An interesting note: The website https://rtings.com has some high quality mouse/keyboard benchmarks where:
- They measure latencies directly from the USB signal leaving the mouse without even using a monitor.
- They subtract the pre-travel distance time when measuring a keyboard's latency
However, you may find it that the delay of start of movement you measure is lower than what they report (as I did with my Sensei Ten mouse), I contacted them and it seems that the difference lies in the fact that the benchmarking procedure I took pushes the mouse with a high acceleration, whereas they test with an electric motor that cannot start with a high acceleration.
Some benchmarks following this procedure are following in the benchmarks/mice section.
Display server
X11 and Wayland are display server communications protocols with a display server. Wayland (2008) is the successor to X11 (1984) with a more modern, more secure design.
X11 has only one reference implementation that's still being used, Xorg. Whereas Wayland has various implementations, e.g. in each major DE has its own.
Wayland
As of KDE 6 and Gnome 46, gaming on wayland just works without any downside (except maybe a slightly higher input lag, to be confirmed with a latency benchmark).
Games however still use XWayland (a "small" X server within the Wayland session to play the game) by default, to enable native wayland:
- Non-proton Wine
- Set
DISPLAY=""environment variable
- Set
- Proton
- Unspported on Steam's Proton releases
- Custom proton releases (e.g.
proton-ge,proton-cachyos,proton-tkg) support it, setPROTON_ENABLE_WAYLAND=1environment variable
- HDR is supported but needs to be configured
My subjective experience with enabling Proton native-wayland in Arc Raiders is a much lower input lag.
X11
Some config recommendations:
- The
TearFreeoption, to enable it onAMDGPU, follow this.- It may be argued that it highers the input lag, I think that it's theoretically right and we want the lowest felt input lag.
- However, with high refresh rate monitors (e.g. 240Hz), image update smoothness is noticeable vs the theoretically added input lag. Try and see !
- This option entirely removes screen tearing with anything: for example scrolling on Firefox, on compositor-less DEs like LXDE, becomes super smooth.
- It may be argued that it highers the input lag, I think that it's theoretically right and we want the lowest felt input lag.
- If you have a FreeSync/Gsync monitor and a GPU that supports it, follow this documentation on how to enable it on Linux. Reviews of monitors seem to show that enabling this actually adds input lag, but once again, it's better than tearing.
KDE
To hit "Direct scanout", i.e. bypassing the compositor entirely, for better input lag and less strain on a potential iGPU driving the monitor (see this bug report and this one), these conditions need to be met:
- No color profile set (i.e. set to "None" in the settings)
- HDR is disabled
- Night light is disabled
- Default kwin effects are set
To confirm that "direct scanout" is happening, you can open "Kwin debug console" > "Effects" tab (rightmost one) > Load "showcompositing" : this will show "compositing" in the top right of the screen unless direct scanout happens.
Sound tweaks with Pipewire/Pulseaudio
This section is about some tweaks one can do with Pulseaudio or Pipewire (will replace Pulseaudio and offers more features).
Stream only the game sounds
You are in a Discord call and streaming at the same time, but you only want OBS to stream the game's sounds ? Search no more. The solution is here (that I found here): the idea is to create some kind of virtual soundcard, let's call it Game-Sink, where the game will output it sound on. Then you redirect the sound from Game-Sink to your actual soundcard.
Create Game-Sink:
pactl load-module module-null-sink sink_name=game_sink sink_properties=device.description=Game-Sink
Find the actual name of $OriginalSoundcard: you do this command and look at its output, you should recognize your card's name there:
pactl list sinks | grep name:
For example, for me I have a SteelSeries Arctis PRO with the Game DAC (with cable), the name of my card is alsa_output.usb-SteelSeries_SteelSeries_GameDAC_000000000000-00.iec958-stereo. So here's how you do the loopback from Game-Sink:
pactl load-module module-loopback source="game_sink.monitor" sink="alsa_output.usb-SteelSeries_SteelSeries_GameDAC_000000000000-00.iec958-stereo" source_output_properties="stream.capture.sink=1"
Then, all what's left is to do is to open pavucontrol (google how to install it if you don't have it) and select Game-Sink for where obs-studio picks its audio from. And select Game-Sink for where the game outputs its audio to.
Improve the sound of your headset
There is a nice Github repository, called AutoEq, that references the frequency responses of various headsets that have been reviewed by websites like rtings.com and others. The frequency responses are made available as .wav files in that repository.
A headset with high fidelity should have a flat frequency response, but affordable/real life headsets do not exhibit a flat one. What one can do with those .wav files is to use them and correct what is fed to the headset with software and improve the perceived sound. Although, one must know that the frequency response of one's own headset is for sure different from the ones available in AutoEq. But it may still improve one's audio experience if, let's say, all the headsets from your specific model have a similar frequency response.
The Graphical way
Install easyeffects (pulseeffects-legacy-git for Pulseaudio from the AUR if on Archlinux) and enable the "Convolver" plugin for your ouput sound:
You need to download the corresponding .wav file to your headset, from the AutoEq github repository. For example the files related to my headset are these ones. There's a 44.1kHz and a 48kHz version for those .wav files. Pick the highest frequency your soundcard can handle, or just try both if you are too lazy to figure that out haha.
Note: the easyeffects app must remain open for this to keep on working, except if you enable the "start as a service on login" menu option then log out and back in.
Mic noise suppression
You have cherry blue mechanical keyboard, your friends and teammates keep on complaining/sending death threats about you being too noisy with your keyboard ? Fear no more.
A bit of history: People from Mozilla made some research to apply neural networks to noise suppression from audio feeds, they published everything about it, including the code. Another person, "Werman", picked up their work and made it work as a PulseAudio plugin.
The Graphical way
- If you are using Pipewire, install easyeffects, it probably is in your distro's repositories.
- If you are still on Pulseaudio, you can install a "legacy" version of
easyeffects, called pulseffects-legacy. It may be available in your distro's repositories (e.g.pulseeffects-legacy-gitfrom the AUR, on Archlinux) or you need to build it from source.
Enable the "Noise Reduction" plugin for your mic:
Note: the easyeffects app must remain open for this to keep on working, except if you enable the "start as a service on login" menu option then log out and back in.
The command line way
All this is explained in Werman's Git repository. I will put it back here. It works for both Pipewire and Pulseaudio
- Clone, build and install the plugin
git clone https://github.com/werman/noise-suppression-for-voice.git noise-suppression
cd noise-suppression
cmake -Bbuild-x64 -H. -DCMAKE_BUILD_TYPE=Release
cd build-x64
make
sudo make install
- At each login, one needs to do this: create a virtual mic, instance the denoiser module and make it output to the virtual mic, and be fed from the actual mic. This can be saved in a bash script so it can be easilly run.
For Stereo mics
#!/bin/bash

pactl load-module module-null-sink sink_name="denoised_mic_stereo" sink_properties="device.description=Denoised-Mic-Stereo" rate="48000"

pactl load-module module-ladspa-sink sink_name=denoiser_stereo sink_properties="device.description=Denoiser-Stereo" sink_master="denoised_mic_stereo" label="noise_suppressor_stereo" plugin="librnnoise_ladspa" control="50"

pactl load-module module-loopback source="alsa_input.usb-SteelSeries_SteelSeries_GameDAC_000000000000-00.multichannel-input" sink="denoiser_stereo" channels="2" source_dont_move="true" sink_dont_move="true" source_output_properties="stream.capture.sink=1"
For mono mics
#!/bin/bash

pactl load-module module-null-sink sink_name="denoised_mic_mono" sink_properties="device.description=Denoised-Mic-Mono" rate="48000"

pactl load-module module-ladspa-sink sink_name="denoiser_mono" sink_properties="device.description=Denoiser-Mono" sink_master="denoised_mic_mono" label="noise_suppressor_mono" plugin="librnnoise_ladspa" control="50"

pactl load-module module-loopback source="alsa_input.usb-SteelSeries_SteelSeries_GameDAC_000000000000-00.multichannel-input" sink="denoiser_mono" channels="1" source_dont_move="true" sink_dont_move="true" source_output_properties="stream.capture.sink=1"
Where alsa_input.usb-SteelSeries_SteelSeries_GameDAC_000000000000-00.multichannel-input is the name of my mic input. You can obtain the name of your mic input with:
pactl list sources short
Benchmarks
Benchmarks are welcome: If you happen to do some you are welcome to PR them. I sugggest to use MangoHud and upload the results to its corresponding website (more information), before uploading the results make sure to include as many information as possible to be able to "reproduce"
- hardware: CPU, GPU, RAM (with timings)
- Software: version of the distro, Kernel (if linux-tkg, the modified options in
customization.cfg), Wine (if wine-tkg, the modified options too), DXVK, Mesa/AMDVLK/Nvidia, compilation process (if manually compiled) - Game: how to reproduce the measured benchmarks: Fsync/Esync ? is it a benchmark tool ingame ? a saved play ? Can it be shared so other can benchmark against the same thing with different hardware/software ?
- Save all the frametimes, i.e. use
fps_sampling_period=0so the percentiles are accurately measured
Games
cpusettrick- Overwatch
- Benchmark 1:
cpuseton vs off, with both ccx separation and smt separation.
- Benchmark 1:
- Overwatch
Mice
I performed the benchmark according to the section Input lag / latency: benchmark at home, with a 270Hz monitor and 960fps slow-mo videos
- SteelSeries Sensei Ten
- Razer Viper Ultimate
- Attack Shark X3 / VGN Game Power x3 / Kysona M600 (rebrands of the same mouse)
- Ajazz aj139pro
- VGN Firefly F1 Pro Max (
4kHzpolling rate,1msdebounce)- Delay to start of movement:
<= 5msvideo-linux-1, video-linux-2, video-windows-1 - Click latency:
<= 9msvideo-linux-1, video-linux-2, video-windows-1, video-windows-2 (windows click latency tests give20ms-10msprobably due to extra software delay from the "files" app)
- Delay to start of movement:
Misc
- Asus ROG laptop 2022 and BIOS updates: if you get the error
Selected file is not a proper bioswith EZ Flash in the BIOS menu. You need a USB stick that's USB3, with a GPT partition table, with secure boot disabled in the BIOS (so you need to put secure boot back to setup mode after the update, and re-enroll your keys). - There is very nice documentation on the Archlinux wiki about improving performance
- Background YT videos: If you have youtube music in the background, try to switch to an empty tab and not leave the tab on the video. I noticed that like this the video doesn't get rendered and helps freeing your GPU or CPU (depending on who is doing the decoding).
- KDE file indexer : If you're using KDE, you may consider disabling the file indexer. This is either done in the KDE settings or with
balooctl disable(requires a reboot).
Similar repos
Contributors
Languages
Shell
100.0%