
A UI made in Pyside6 to make training LoRA/LoCon and other LoRA type models in sd-scripts easy
Python
90
1,529 commits
updated Sep 21, 2026
README
Updates
05/30/2026
- Swap to using uv instead of pip. If you have an existing install, git pull first, then run the typical update script, otherwise you may have to run the updat script again should it fail.
02/22/2026
- Fix handling for forward pass and weight references for kohya's lora implementations to address excessive system memory using --use_ramtorch_network with them.
02/21/2026
- Fix for train_network to properly track steps for state saving and resumption
02/19/2026
- Anima support added, including UI elements for it.
- Made refresh branch the default branch, if you need the old branch, use "flux" branch instead
02/01/2026
- UI enhancements and adjustments (https://github.com/67372a/LoRA_Easy_Training_Scripts/pull/68) contributed by https://github.com/DraconicDragon
- toggle-able Global Protected Tags File
- Rectified Flow settings mainly oriented towards recent SDXL/NoobAI RF experiments (likely marked as experimental in some way, tucked into an expandable element
- Reorganization and tweaks to layout
- make EDM2 compatible with DDP and deepspeed in FFT, and DDP + LoRA (https://github.com/67372a/sd-scripts/pull/226)
12/07/2025
- Fixes to ramtorch fork handling of weight's to devices where stochastic_to is applied (fp32->bf16)
- Made all gradient accumlation in ramtorch fork always fp32, casting to weight dtype as needed
- Adjusted application of ramtorch to the network in train_network, was incorrectly forcing to the base weights dtype, now left at fp32 (full modes still cast network to the full dtype)
- This fixes fp16 handling, though bf16 is still recommended over fp16
After these changes, use_ramtorch_network training as it relates to glora via lycoris seems more effective. I still need to review other network types for any issues.
A larger change I made was incorporating EXPERIMENTAL support for sdxl flow matching (Based on Bluvoll et alls work: https://github.com/bluvoll/sd-scripts).
Model: https://civitai.com/models/2071356/experimental-noobai-with-rectified-flow-eq-vae
Args as pulled from Bluvoll's readme (pass as extra training args in easy scripts)
--flow_model Required to train into Rectified Flow target
--flow_use_ot Not needed, want info? ask lodestone
--flow_timestep_distribution = uniform or logit_normal, just run uniform
--flow_uniform_static_ratio allows static values for shift, default 2.5
--contrastive_flow_matching Magic thingie that makes training results a bit sharper
--cfm_lambda needed by the one above, default 0.05, I prefer 0.02
--flow_logit_mean needed by logit_normal timestep_distribution
--flow_logit_std needed by logit_normal timestep_distribution
--flow_uniform_base_pixels default 1048576 or 1024x1024 allows dynamic shifting based on resolutions useful for higher than 1024x1024 training.
--flow_uniform_shift allows dynamic shifting
--vae_custom_scale suggested for Anzhc's eq-vae put 0.1406
--vae_custom_shift suggested for Anzhc's eq-vae put -0.4743
--vae_reflection_padding suggested to use with Anzhc's eq-vae, my shitty experiment wasn't trained with this.
I did regression to make sure that SDXL non-flow matching still worked and that flow matching will run without error, I did not do complete regression of all model and configuration permutations.
Please open issues if any are observed.
11/22/2025
Pushed some fixes and enhancements for ramtorch's helper for applying it to modules generally and lycoris specifically. use_ramtorch_network wasn't working as intended, now it appears to be working.
RamTorch
- now properly maintains pinning of memory for it's weights and biases, before was losing the due to reassignment vs copy. This should make it faster, as without pinning, all transfers would become blocking silently
- passes forward requires_grad from original tensor setting during ramtorch init
- now accepts and sets a target dtype, before it would always store the RAM weights as fp32 first, so now it should use less RAM and result in faster transfers. This is set in sd_scripts to align with weight_dtype.
lycoris
- now properly async transfers weights from RAM, before it wasn't. To be transparent, bad impl by one LLM vs another for that piece as not really familiar, was more thorough this time and based on testing this new approach does look to work.
sd_scripts
- Added a CUDA sync explicitly after backward in sd_scripts to make sure all streams complete
So overall, fixed use_ramtorch_network for lycoris, improved ramtorch application to models so it should be faster and use less RAM.
11/21/2025
Reimplemented is_val subset support, also reimplemented making all subset parameters static for is_val or val split, this was missed when I reimplemented validation loss in the new branch.
As a result, even if you change nothing, after updating, validation loss metrics will change given the same training settings due to the enforcement of static parameters (e.x. cropping, shuffling captions, etc, anything that introduces randomization is disabled for is_val subsets OR dynamic subsets created by val split). Ultimately this will lead to a more consistent measure of validation loss going forward.
11/20/2025
There was a bug with the ramtorch fork pyproject where it wasn't properly pulling in the modules directory. This has been corrected. Running update.bat or update.sh should get everything updated correctly.
I also added experimental ramtorch support to Kohya's loras, not fully tested, let me know if there are issues.
11/17/2025
I am currently working on a new branch to rebase off the latest sd3 from upstream sd_scripts, the new branch chain (refresh/refresh/sd-upstream) doesn't have all the features of current default branch chain (flux/flux/sd3), but runs leaner and supports newer models. I am still working on adding back features deemed useful. RamTorch is not working correctly in the existing default branch (flux), please switch to the new branch (refresh)
Right now some of the significant things that aren't present are:
- is_val subsets
- wavelet loss
- full_bf16 stochastic accumulation
- probably some other stuff I don't recall atm.
Ramtorch (Shout out to lodestone for his great work! https://github.com/lodestone-rock/RamTorch) is supported for network training, it can be applied to the base model and network/lora, in addition, optimizer state offload is implemented to two optimizers currently.
To use ramtorch:
- extra training arg use_ramtorch=True enables it for the base model
- extra training arg use_ramtorch_network=True enables it for the network/lora, NOTE, this requires the optimizer to have .to()s defined that move the parameter to the correct device, I have implemented that currently for OCGOpt and SimplifiedAdEmaMixExM, plan to see about a generalized solution to avoid having to manually update all the optimizers.
- the previously mentioned optimizers default to offloading state to CPU/RAM (controllable vis storage_device optimizer argument, e.x. setting it to CUDA would place the states in vram). Defaulting behaviors below if not explictly set:
- If state_storage_dtype is not provided as an arg, default to training dtype
- If state_storage_device is not provided as an arg, default to accelerator's device, unless use_ramtorch_network is true, then use cpu
- use lycoris based networks/loras, I have not tested or implemented changes to allow Kohyas's implementations to work, only lycoris
The vram savings can be absurdly massive, for example, someone I have testing was able to train a 512 linear dim, 256 conv dim locon for SDXL, BS 7, and still didn't fully fill their VRAM, ~22GB out of 24GB, ofc, filled more system RAM. Others have been running as high as BS 18 with smaller dims.
With any reasonable batch size (4+), the overhead of ramtorch and CPU offloading appears to be negligible, in fact, it may actually speed up things due to use of streams, asynchronous operations, non blocking, etc.
The quality of outputs is not degraded in anyway as far as I have observed.
I havent nesscarily tested every lycoris setting or type fully, there may be some gaps. We have a discussion thread going around RamTorch in this context at https://github.com/67372a/LoRA_Easy_Training_Scripts/discussions/51, but feel free to open issues for any encountered.
4/13/2025 IMPORTANT
- IMPORTANT: Fixed defect related to Lycoris bypass mode
It came to my attention when I was looking through lycoris code to make enhancements, that the bypass_mode arg was not being properly handled, if you did not explicitly pass false, it would be None, and end up resolving to TRUE. This would end up bypassing weight decomposition for DoRA, as there exists no logic, despite original author's documentation, that it should be overridden to false. Now, i have fixed this in my fork so that bypass mode defaults to FALSE, and if dora is enabled, it will also be forced to false. This may have significant effects how training behaves in cases where bypass_mode was being erroneously being enabled, especially DoRA!
In essence, during the forward pass, weight decomposition for DoRA was not being applied, the bypass route would also not apply DoRA style network dropout if set.
So, all DoRAs trained without explictly setting bypass_mode to false (which I doubt most people would do) were not trained correctly / fully, as such, the full benefits were not realized.
1/28/2025 -> 4/13/2025
- Bunch of things, will try to compile
1/28/2025 IMPORTANT
- Apply float32 tiny as eps to Scaled Quadratic loss
- Fix adaptive gradient clipping in layer mode, was incorrectly amplifying gradients smaller than the parameter, not clipping ones larger.
- This will require retuning as a result!
- adaptive_clip, if in use, will need to be increased to avoid excessive clipping and returned. Recommend starting at 0.18.
- Weight decay will likely need to be decreased and retuned. Recommend starting at 3e-6 if using stable weight decay, if not using swd, can start at 5e-4 or similar most likely.
- SPAM threshold and starting step may need to be increased and returned. Recommend starting at 500 for threshold, and 10 for start step.
- Optimizer util functions: Adjust all eps to be float32 tiny by default, or if eps value set to 0
- ADOPTAOSchedule: Adjust to apply clipping on step one
Enhancements over original
- Triton is installed for Windows and Linux, which can provide an improvement to training speed. Make sure to follow the steps at https://github.com/woct0rdho/triton-windows?tab=readme-ov-file#install-from-wheel for Windows. Linux also requires 12.X CUDA be installed and properly setup on the paths required as per the Nvidia documentation.
- All safe to update dependencies in sd_scripts have been updated to their latest versions.
- A wide array of additional optimizers. (e.x. Compass, FCompass, FishMonger, FARMScrop, Ranger21, AdEMAMix etc.)
- A version of Compass called CompassPlus that incorporates many of the features of Ranger21.
- Enhanced versions of some optimizers with additional features made available (e.x. centralization and gradient clipping) and with stochastic rounding implemented.
- See https://github.com/67372a/LoRA_Easy_Training_scripts_Backend/tree/flux/custom_scheduler/LoraEasyCustomOptimizer for added / modified optimizers.
- Validation loss for SD and Flux loras, and SDXL finetune.
- Use the following args under Extra Args to manage
- validation_split - float 0.0 - 1.0: The percentage amount of all training datasets to split off for validation. Recommend a value of at least 0.1
- validation_seed - string - A seed that used by the process to determine the images split off, order, etc.
- validate_every_n_steps - int - Every n steps, run validation, if not set, runs every epoch. Recommend a value of 25, depending on your effective batch size and number of steps.
- max_validation_steps - int - The maximum number of batches of images that will be processed during a validation, recommend setting this to a high value and not worrying about it, so all images in the val dataset are processed each time.
- Options to scale IP noise gamma based on timestep or apply to last channel only.
- Use the following args under Extra Args to manage
- ip_noise_gamma_scaling - string(sine, linear, exponential) - The scaling, starting from timestep zero, of ip noise gamma. Recommend exponential or linear based on testing and validation loss.
- ip_noise_gamma_scaling_exponent - float - Exponent for exponential scaling, default is 2.0.
- ip_noise_gamma_scaling_min - The minimum of ip noise gamma to apply regardless of scaling. Recommend not using, or using a lower value than the primary value.
- ip_noise_gamma_last_channel_only - Applies IP noise gamma to the last channel (think VAE) of the latent
- Fixed logging of max and average key norms when using lycoris
- IP Noise gamma for Flux networks/loras
- Warmup Stable Decay (WSD) scheduler, by default decay phase will match number of warmup steps, else use Extra Args and set lr_decay_steps to either a decimal (for percent of total steps) or number (for absolute steps) for decay.
LoRA_Easy_Training_Scripts
A set of training scripts written in python for use in Kohya's SD-Scripts. It has a UI written in pyside6 to help streamline the process of training models.
Table of contents
Prerequisites
- Git must be installed and available on your PATH.
- Python 3.11 is required. The installer uses uv to manage virtual environments and will automatically download Python 3.11 if it is not already installed on your system.
Installation
This project uses uv (from Astral) for fast package installation and virtual environment management. uv is installed automatically by the installer scripts if it is not already present — you do not need to install it manually. After installation, virtual environments are created with uv venv --python 3.11 --seed, which ensures pip is available inside each venv for compatibility.
Windows
Open up a command line within the folder that you want to install to, then run:
git clone https://github.com/67372a/LoRA_Easy_Training_Scripts -b refresh
cd LoRA_Easy_Training_Scripts
install.bat
The installer will:
- Download and install uv if not present (via the standalone PowerShell installer).
- Create a Python 3.11 virtual environment at
./venvusinguv venv. - Install frontend dependencies via
uv pip install. - If running locally, initialize git submodules and delegate to the backend installer, which creates a second venv at
backend/sd_scripts/venvand installs all ML/training dependencies (PyTorch, xformers, etc.) viauv pip install.
A few questions will be asked along the way — just make sure to answer them.
Linux
git clone --recurse-submodules https://github.com/67372a/LoRA_Easy_Training_Scripts -b refresh
cd LoRA_Easy_Training_Scripts
git submodule update --init --recursive
./install.sh
The installer will automatically download and install uv (via the standalone curl installer) and Python 3.11 if needed, then create venvs and install all dependencies using uv pip install.
If you specifically need to target Python 3.11 explicitly, you can use ./install311.sh instead.
Standalone Backend Installation
The backend can be installed independently from the frontend UI (useful for headless/remote training setups):
cd backend
./install.sh
The backend has its own copy of install_uv.py and is fully self-contained — it does not require the frontend repo to be present.
NOTE:
If you are using one of the installers, one of the questions it will ask you is "Are you using this locally? (y/n):" — make sure you say y if you are going to be training on the computer you are using. This is very important to get correctly because the backend will not install otherwise, and you will be stuck wondering why it is not doing anything.
Colab
If you wish to train LoRAs but you lack the hardware, you can use this Google Colab created by Jelosus2 to be able to train them. Additionally, you can check the guide if you have trouble setting all up. Note: You still need to git clone the repo and install the UI on your local machine. Be sure to answer the prompt "Are you using this locally? (y/n):" with "n".
For Colab, the installer uses backend/colab_install.sh which runs the backend installer with the colab flag. This installs uv, creates the venv with Python 3.11, installs all ML dependencies via uv pip install, and configures accelerate automatically.
Usage
You can launch the UI using the run.bat file if you are on windows, or run.sh file if you are on linux.
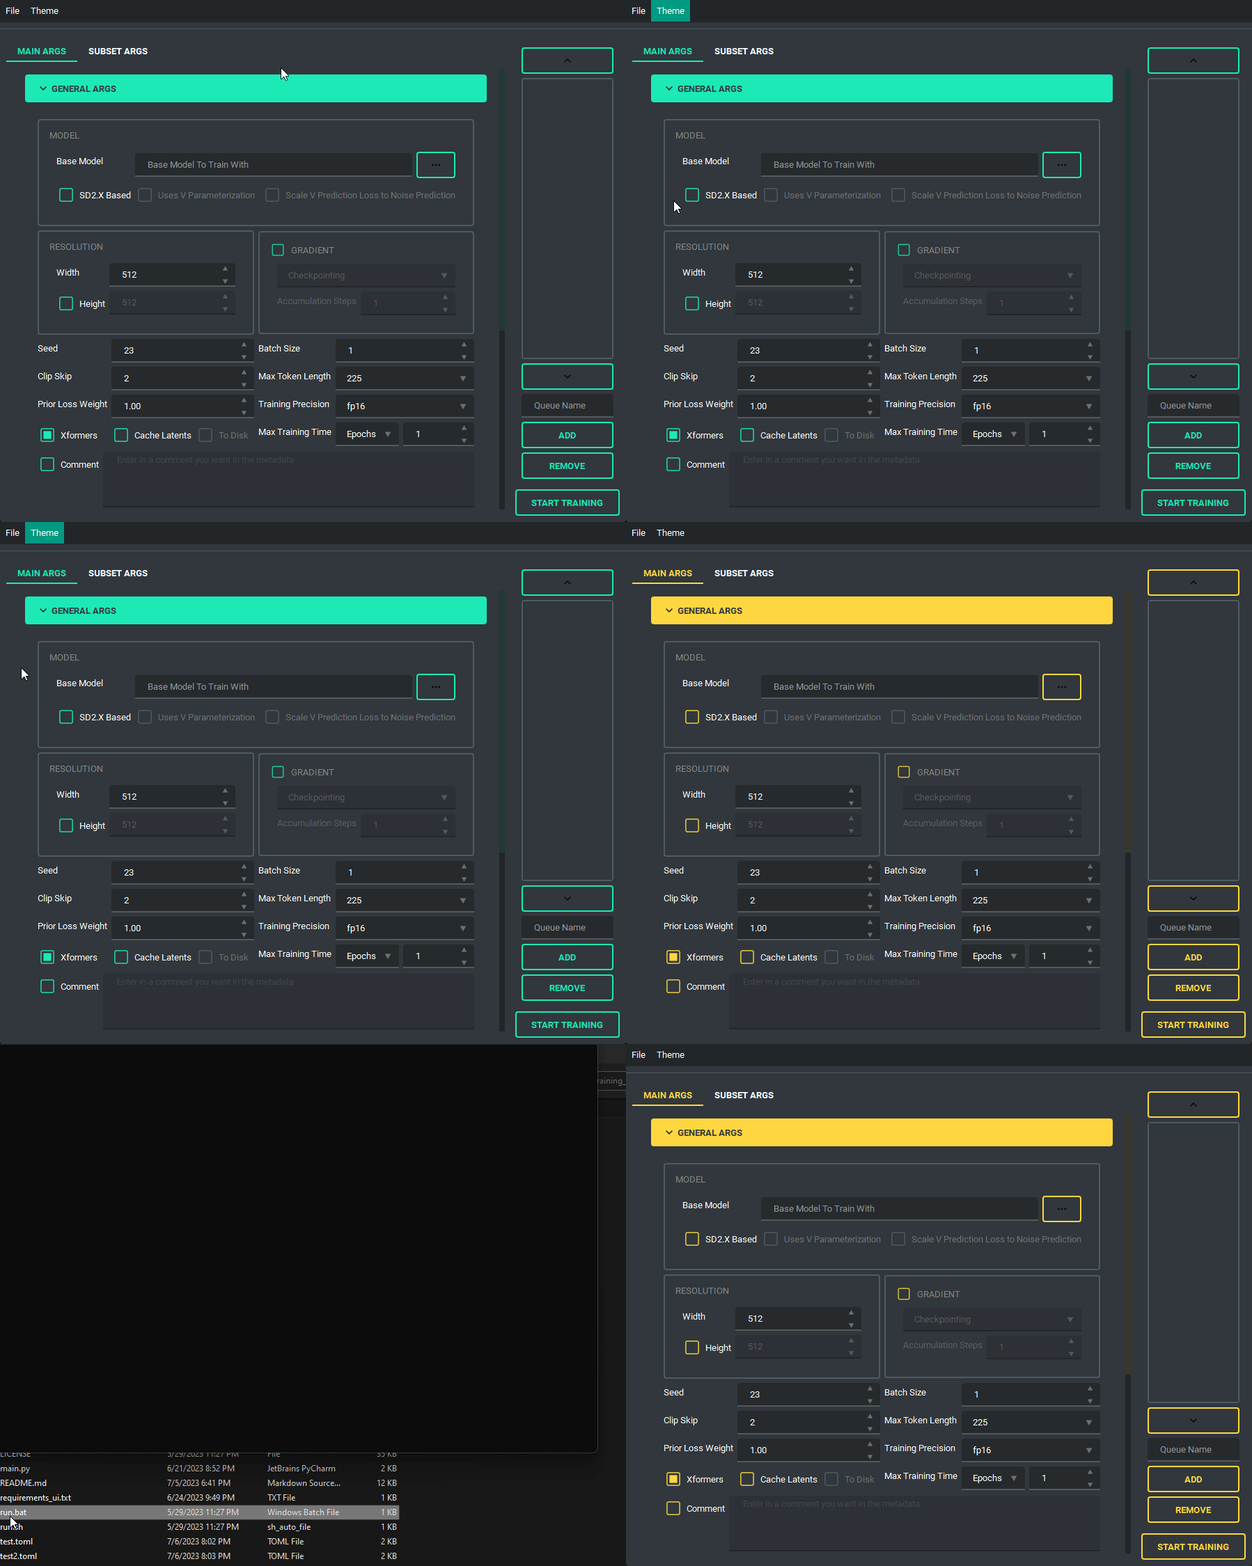
The UI looks like this:
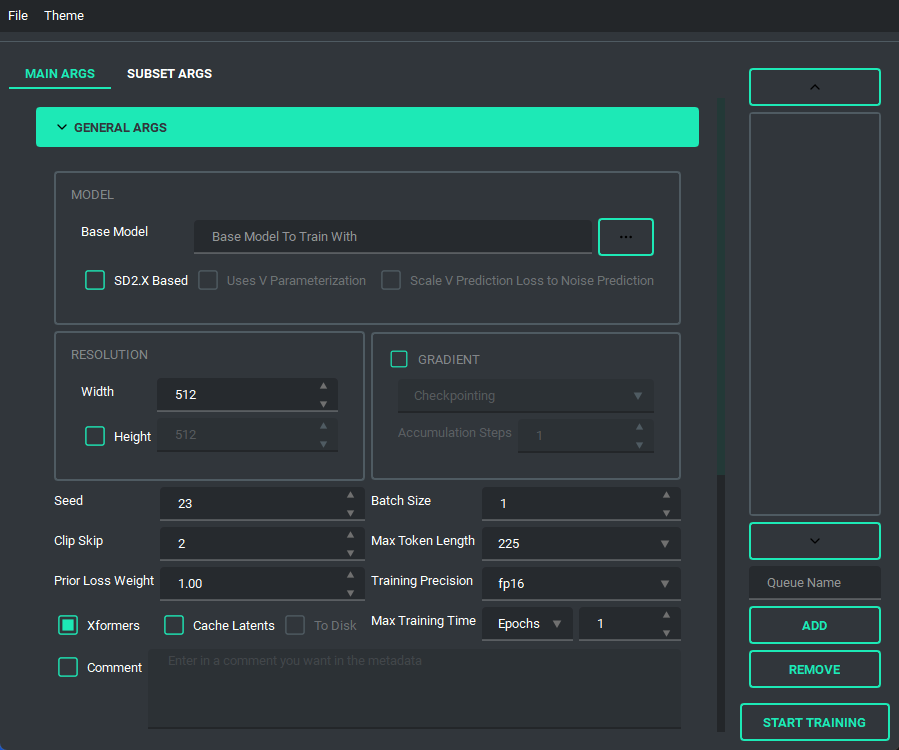
and has a bunch of features to it to make using it as easy as I could. So lets start with the basics. The UI is divided into two parts, the "args list" and the "subset list", this replaces the old naming scheme of <number>_<name> to try and reduce confusion. The subset list allows you to add and remove subsets to have however many you want!
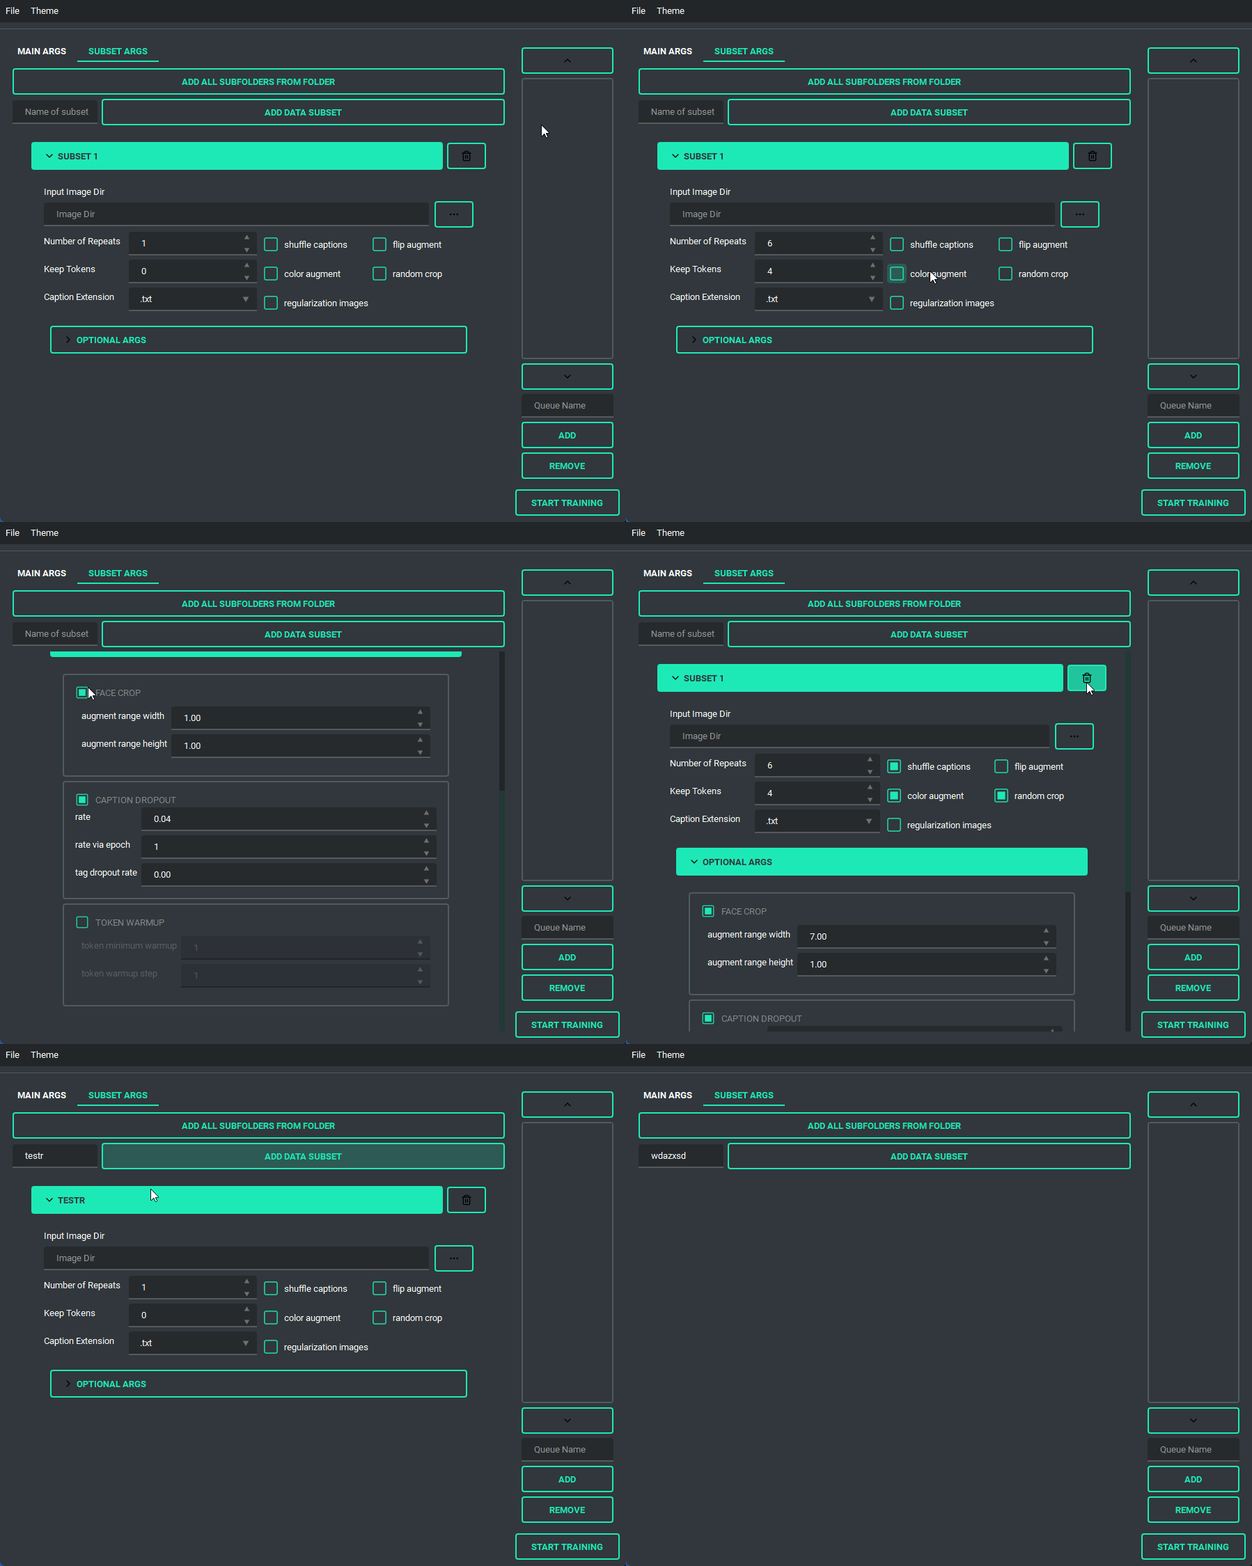
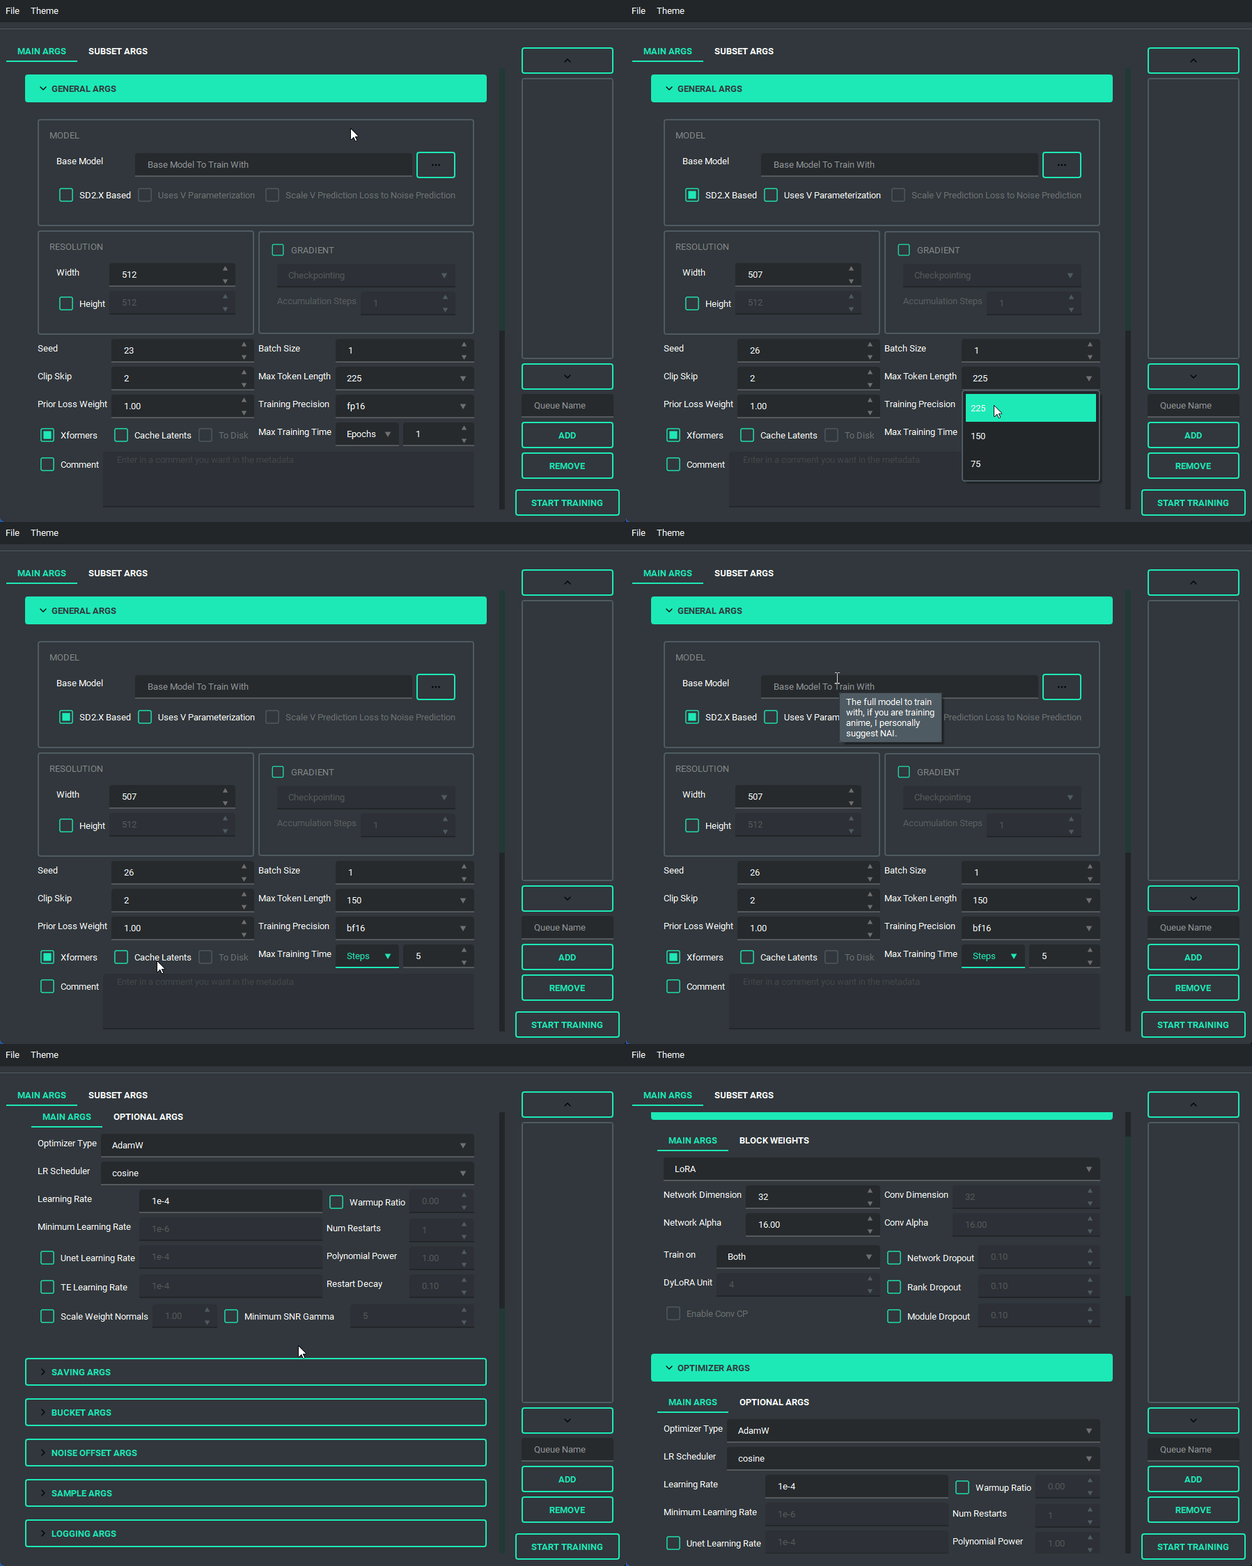
You are also able to collapse and expand the sections of the "args list", so that way you can have open only the section you are working on at the moment.
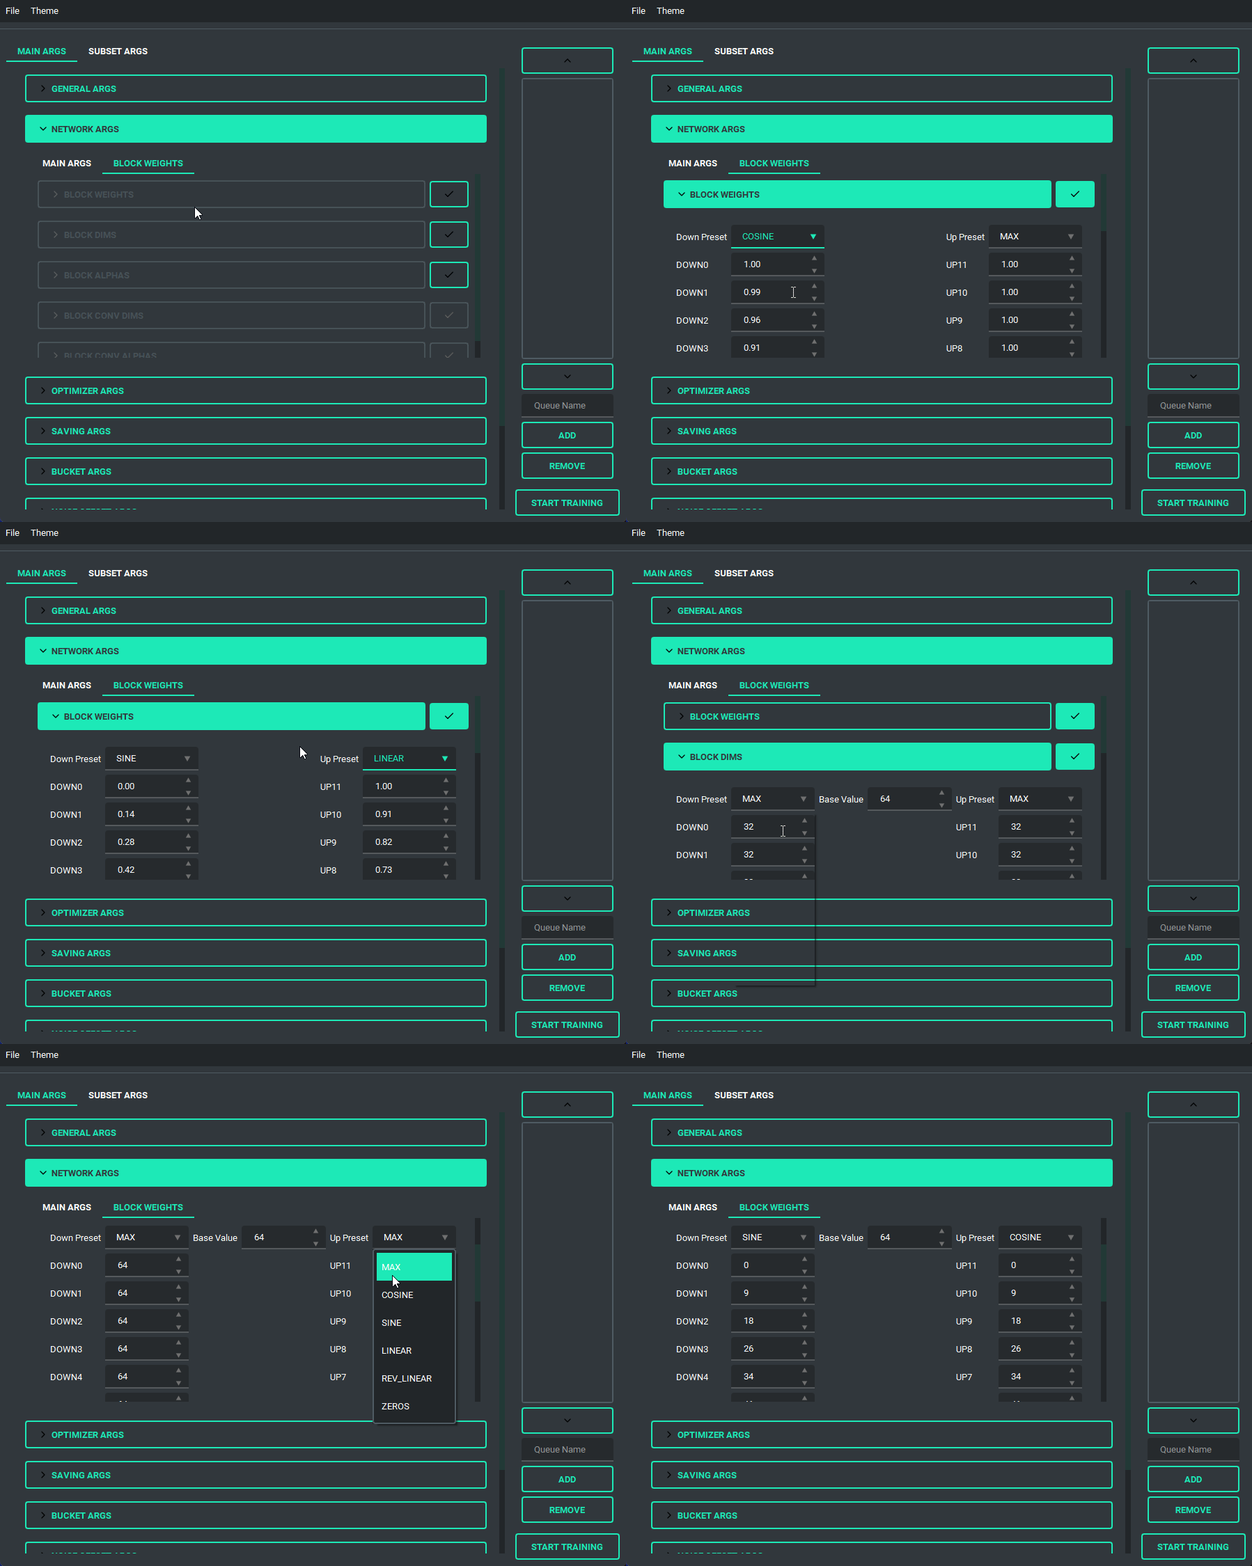
Block Weight training is possible through setting the weights, dims, and alpha in the network args.
Pretty much every file selector has two ways to add a file without having to type it all in, a proper file dialog, and a way to drag and drop the value in!
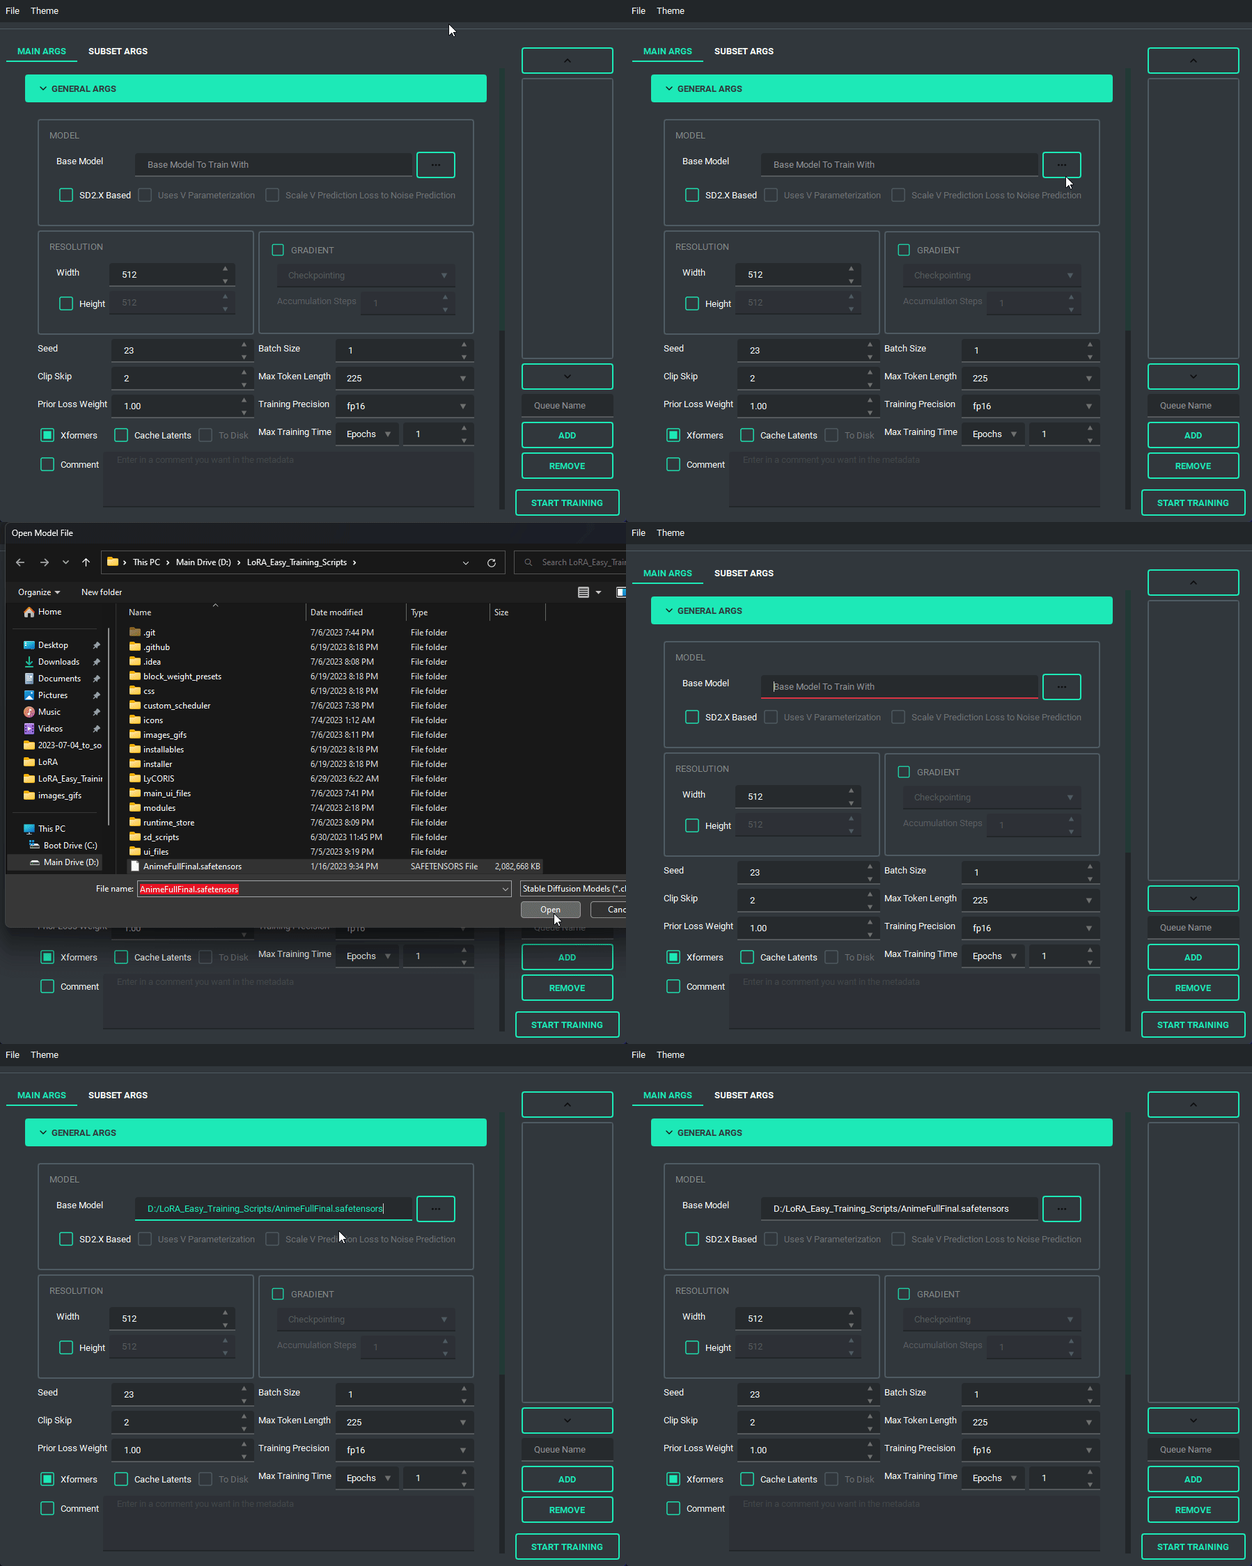
TOML saving and loading are available so that you don't have to put in every variable every time you launch the program. All you need to do is either use the menu on the top right, or the keybind listed.
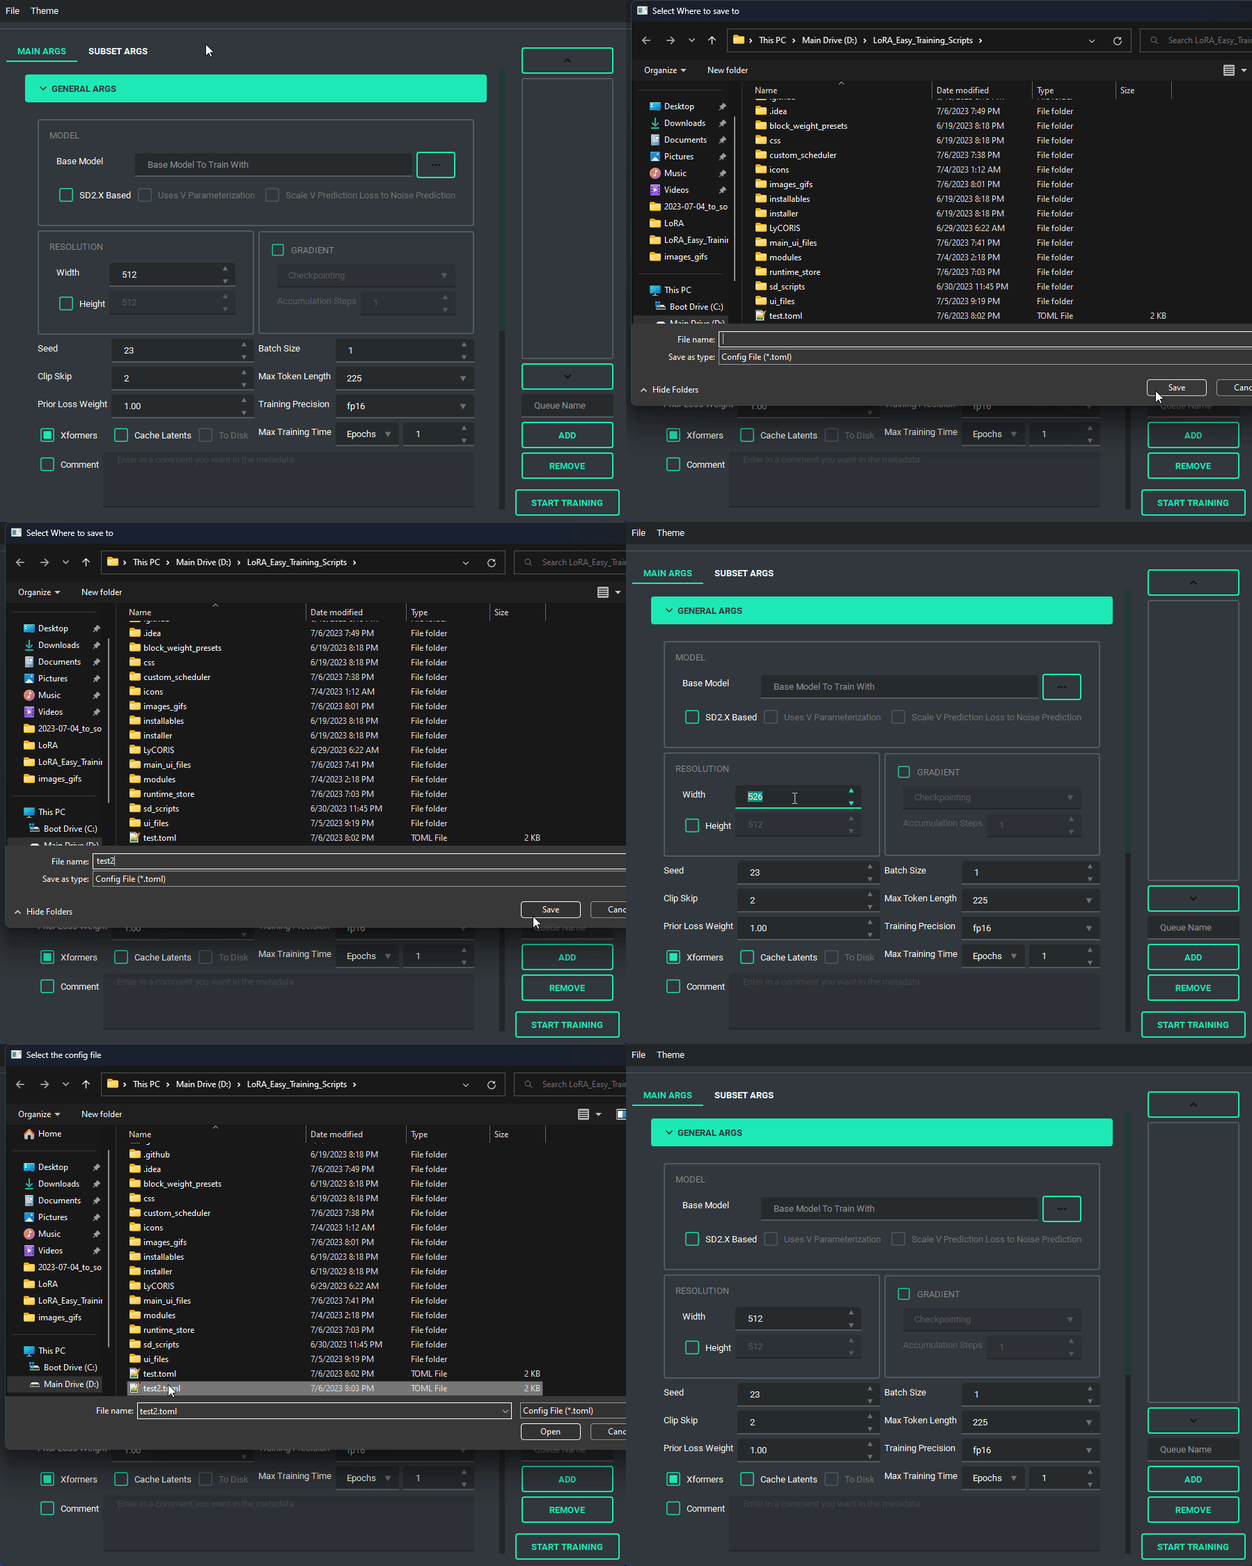 NOTE: This change is entirely different from the old system, so unfortunately the JSON files of the old scripts are no longer valid.
I have added a custom scheduler, CosineAnnealingWarmupRestarts. This scheduler allows restarts which restart with a decay, so that each restart has a bit less lr than the last, A few things to note about it though, warmup steps are not all applied at the beginning, but rather per epoch, I have set it up so that the warmup steps get divided evenly among them, decay is settable, and it uniquely has a minimum lr, which is set to 0 instead if the lr provided is smaller.
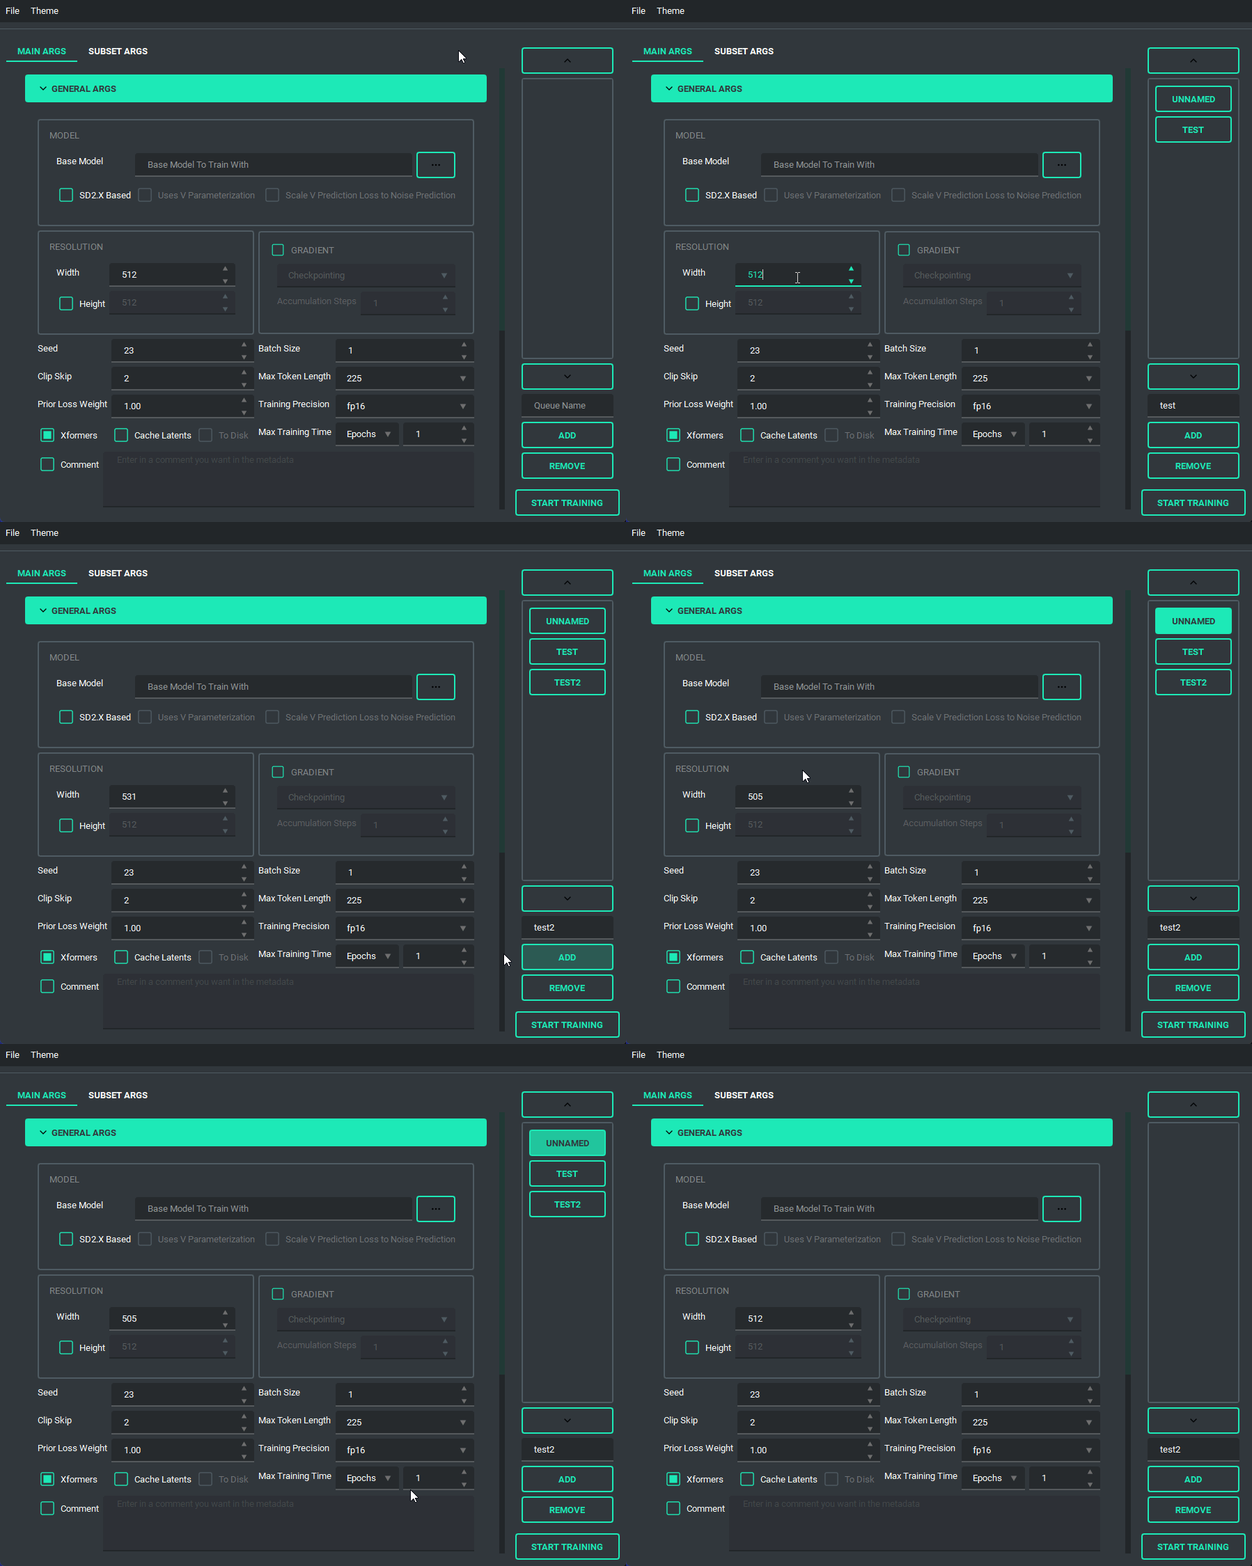
The Queue System is intuitive and easy to use, allowing you to save a config into a little button on the bottom left then allowing you to pull it back up for editing if you need to. Additionally you can use the arrow keys to change the positions of the queue items. A cool thing about this is that you can still edit args and even add or remove queue items while something else is training.
And finally, we have the ability to switch themes. These themes are only possible because of the great repo that adds in some material design and the ability to apply them on the fly called qt-material, give them a look as the work they've done is amazing.
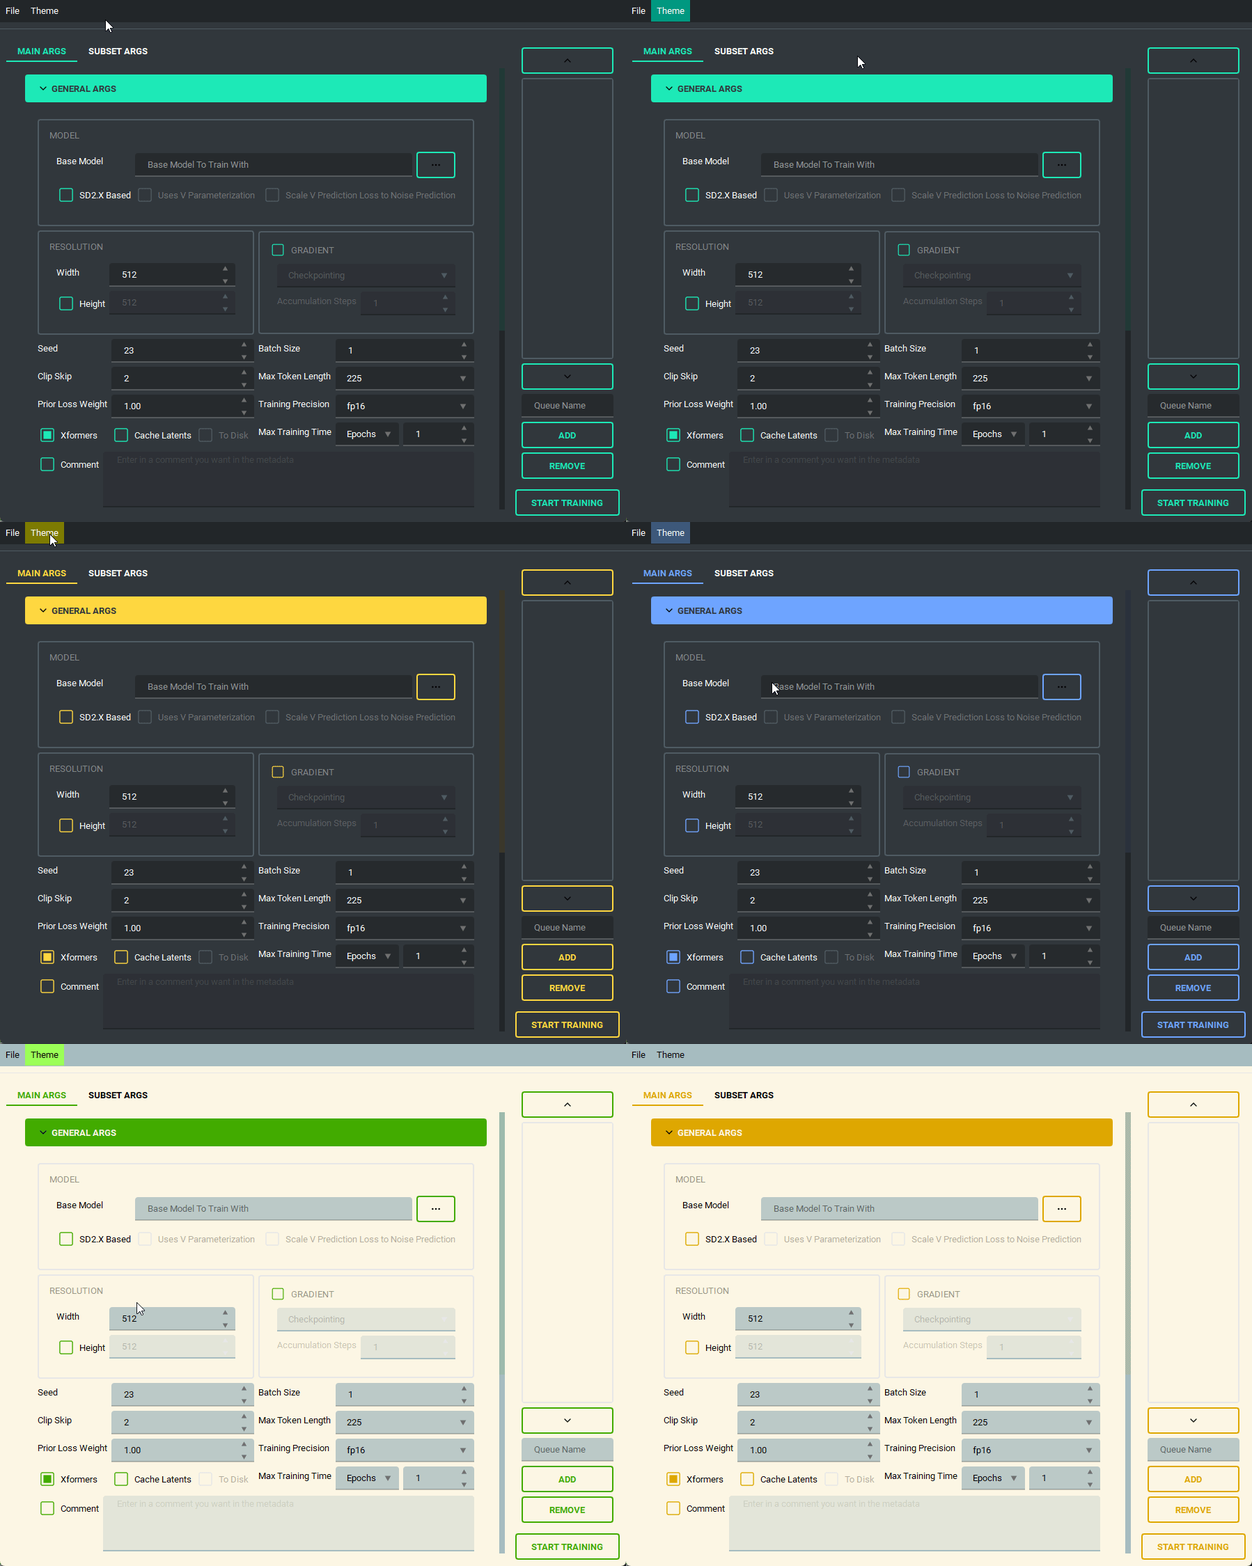 The themes also save between boots
Configuration
I'd like to take a moment and look at what the output of the TOML saving and loading system looks like so that people can change it if they want outside of the UI.
here is an example of what a config file looks like:
[[subsets]]
num_repeats = 10
keep_tokens = 1
caption_extension = ".txt"
shuffle_caption = true
flip_aug = false
color_aug = false
random_crop = true
is_reg = false
image_dir = "F:/Desktop/stable diffusion/LoRA/lora_datasets/atla_data/10_atla"

[noise_args]

[sample_args]

[logging_args]

[general_args.args]
pretrained_model_name_or_path = "F:/Desktop/stable diffusion/LoRA/nai-fp16.safetensors"
mixed_precision = "bf16"
seed = 23
clip_skip = 2
xformers = true
max_data_loader_n_workers = 1
persistent_data_loader_workers = true
max_token_length = 225
prior_loss_weight = 1.0
max_train_epochs = 2

[general_args.dataset_args]
resolution = 768
batch_size = 2

[network_args.args]
network_dim = 8
network_alpha = 1.0

[optimizer_args.args]
optimizer_type = "AdamW8bit"
lr_scheduler = "cosine"
learning_rate = 0.0001
lr_scheduler_num_cycles = 2
warmup_ratio = 0.05

[saving_args.args]
output_dir = "F:/Desktop"
save_precision = "fp16"
save_model_as = "safetensors"
output_name = "test"
save_every_n_epochs = 1

[bucket_args.dataset_args]
enable_bucket = true
min_bucket_reso = 256
max_bucket_reso = 1024
bucket_reso_steps = 64

[optimizer_args.args.optimizer_args]
weight_decay = 0.1
betas = "0.9,0.99"
As you can see everything is sectioned off into their own sections. Generally they are seperated into two groups, args, and dataset_args, this is because of the nature of the config and dataset_confg files within sd-scripts. Generally speaking, the only section that you might want to edit that doesn't correspond to a UI element (for now) is the [optimizer_args.args.optimizer_args] section, which you can add, delete, or change options for the optimizer, A proper UI for it will come later, once I figure out how I want to set it up.
Changelog
- January 26, 2024
- merged pr's #150, #156, #157, #159, #164, and #171
- decoupled vpred to allow use for non SD2 based models
- rewrote the install script for windows to be a bit better, and fail less
- Added support for diag-oft and the two lycoris args constrain and rescaled
- updated the noise offset input to allow for an arbitrary number of decimals
- changed the behavior of the gradient section to allow for both gradient checkpointing and gradient accumulation steps to be enabled
- Added a "no-theme" mode for those who have disappearing checkboxes (finally, sorry it took so long)
- Added the arg
ip Noise gammato the UI, as it looked like it was useful. - updated sd-scripts and lycoris, as of three weeks ago, I will be updating these again fairly soon
- November 11, 2023
- Updated LyCORIS and sd_scripts
- completely re-wrote the code behind the network args, should be far less buggy now
- this should have also fixed a long standing visual bug and fixes a newer bug that prevented network_dropout from applying correctly
- Added support for SDXL
- Changed some of the args to allow for use of vpred without the v2 arg
- updated the installer to (hopefully) fix the failure to install correctly on 10X0 cards
- Added an installer for linux systems from issue #155. This assumes that you have python 3.10, python venv, and git installed
- other smaller bug fixes
- In all honesty, I was waiting for SDXL to be merged to main for so long that I forgot all of the changes I made over time, which is why I kept putting off updating the readme, apologies. I'll try to keep up with it again now that I've written this version.
- July 6, 2023
- Updated LyCORIS
- Overhauled the UI, to fit on smaller screens
- changed the saving ui to better use space
- save the last location when saving and loading toml, only when you actually save or load a toml
- added a folder selection to the save toml and tag occurrence inputs.
- Added a system to prevent overwriting by renaming the file name to <name>_<number>
- Reorganized the network args to better fit with what LyCORIS now supports
- Refactored the algo select to be better maintainable down the line
- Changed the behavior of the dropouts as LyCORIS now supports all of them, they no longer get disabled.
- Fixed a bug in which gradient checkpointing doesn't load correctly
- June 24, 2023
- Updated sd-scripts and LyCORIS
- Added support for a new LR Scheduler, Cosine Annealing Warmup Restarts
- Fixed a bug in which warmup_steps wasn't being applied
- Added a button that you can use to add all folders in a folder to the subset section
- Updated the toml loading slightly so that it sets the name of the folder in the subsets when it loads
- June 14, 2023
- Updated sd-scripts and LyCORIS
- Nothing new was added, just bug fixes for them
- Added support for LyCORIS's dropout and and CP decomposition
- This update should fix a bunch of the issues people were having in relation to using LoHa, and other LyCORIS types.
- June 11, 2023
- Changed queue behavior slightly to better fit what is actually happening
- added an "optimizer args" section to the UI so that you can put in values for things like betas and weight decay
- Added training comment
- June 6, 2023
- Updated sd-scripts
- Added the new args related to the new update,
scale_weight_normsto the optimizer argsnetwork_dropout,rank_dropout, andmodule_dropoutto the network argsscale_v_pred_loss_like_noise_predto the general args, as that is directly tied to using a V Param based SD2.x model.
- Added tooltips for above args, so give those a read to explain what they do
- June 5, 2023
- Added support for the block weight training
- Added support for the tag file output and toml file output on train, disabled by default, is in the saving args
- May 29, 2023
- Changed the behavior of the Queue so that it doesn't overwrite the previously saved values in the selected queue item when a new one is added
- Change the behaviour of file selects so that they go to the folder last selected if valid
- Changed up the type hints to (hopefully) fix compatability for arch users
- Refactored a lot of the connecting parts of the code to ensure more things have their own accountability, this also makes the code more maintainable and readable
- This ended up being bigger than expected, so I may have accidentally introduced a bug
- Changed the max for the repeats spinbox so that you can go higher than 99, if for some reason you want to do that.
- May 27, 2023
- Fixed noise offset default being 0.1
- Fixed the bug in which scrolling into elements would accidently change their values
- Fixed an installation issue because of the new Pyside6 update
- Added queues to the UI. Now the UI can queue up trainings
- this was a sort of big addition, so tell me if anything breaks
- May 22, 2023 (cont.)
- Made the training threaded, so that it can be done while still allowing you to use the UI
- Fixed the way betas was being saved in the toml files so that it doesn't break on load
- Fixed the installer by removing torch 2.1.0 and adding 2.0.1 in it's place as well as add a fallback execution policy bat that just assumes your powershell is at the normal location in system32
- Fixed the limit on the samples box to allow higher than 99
- Fixed Dadapt and Lion not working properly, forgot that they must be installed individually.
- Added an update.bat that will update everything then reinstall everything so that it is ensured to be updated
- Fixed a small issue in which loading one of the lr_schedulers with spaces wouldn't load properly
- Added the forgotten min_snr_gamma
- May 22, 2023
- First release of the new UI system. This has been a long time coming and I put in a ton of work to make it as user friendly as possible. Some Things to note, This doesn't have support for queues or block weight training for the moment, they are planned though and will be added down the line.
- If you find any bugs, please tell me, I want to fix them if something is wrong. After all, I am only one person
- I'm adding a link to my ko-fi page as of this update so people that want to support me can! Thanks for all of the feedback of the scripts through the development time I spent on it, and I hope to continue to improve it as I go.
Similar repos


Languages
Python
99.8%
A UI made in Pyside6 to make training LoRA/LoCon and other LoRA type models in sd-scripts easy
Python
90
1,529 commits
updated Sep 21, 2026
README
Updates
05/30/2026
- Swap to using uv instead of pip. If you have an existing install, git pull first, then run the typical update script, otherwise you may have to run the updat script again should it fail.
02/22/2026
- Fix handling for forward pass and weight references for kohya's lora implementations to address excessive system memory using --use_ramtorch_network with them.
02/21/2026
- Fix for train_network to properly track steps for state saving and resumption
02/19/2026
- Anima support added, including UI elements for it.
- Made refresh branch the default branch, if you need the old branch, use "flux" branch instead
02/01/2026
- UI enhancements and adjustments (https://github.com/67372a/LoRA_Easy_Training_Scripts/pull/68) contributed by https://github.com/DraconicDragon
- toggle-able Global Protected Tags File
- Rectified Flow settings mainly oriented towards recent SDXL/NoobAI RF experiments (likely marked as experimental in some way, tucked into an expandable element
- Reorganization and tweaks to layout
- make EDM2 compatible with DDP and deepspeed in FFT, and DDP + LoRA (https://github.com/67372a/sd-scripts/pull/226)
12/07/2025
- Fixes to ramtorch fork handling of weight's to devices where stochastic_to is applied (fp32->bf16)
- Made all gradient accumlation in ramtorch fork always fp32, casting to weight dtype as needed
- Adjusted application of ramtorch to the network in train_network, was incorrectly forcing to the base weights dtype, now left at fp32 (full modes still cast network to the full dtype)
- This fixes fp16 handling, though bf16 is still recommended over fp16
After these changes, use_ramtorch_network training as it relates to glora via lycoris seems more effective. I still need to review other network types for any issues.
A larger change I made was incorporating EXPERIMENTAL support for sdxl flow matching (Based on Bluvoll et alls work: https://github.com/bluvoll/sd-scripts).
Model: https://civitai.com/models/2071356/experimental-noobai-with-rectified-flow-eq-vae
Args as pulled from Bluvoll's readme (pass as extra training args in easy scripts)
--flow_model Required to train into Rectified Flow target
--flow_use_ot Not needed, want info? ask lodestone
--flow_timestep_distribution = uniform or logit_normal, just run uniform
--flow_uniform_static_ratio allows static values for shift, default 2.5
--contrastive_flow_matching Magic thingie that makes training results a bit sharper
--cfm_lambda needed by the one above, default 0.05, I prefer 0.02
--flow_logit_mean needed by logit_normal timestep_distribution
--flow_logit_std needed by logit_normal timestep_distribution
--flow_uniform_base_pixels default 1048576 or 1024x1024 allows dynamic shifting based on resolutions useful for higher than 1024x1024 training.
--flow_uniform_shift allows dynamic shifting
--vae_custom_scale suggested for Anzhc's eq-vae put 0.1406
--vae_custom_shift suggested for Anzhc's eq-vae put -0.4743
--vae_reflection_padding suggested to use with Anzhc's eq-vae, my shitty experiment wasn't trained with this.
I did regression to make sure that SDXL non-flow matching still worked and that flow matching will run without error, I did not do complete regression of all model and configuration permutations.
Please open issues if any are observed.
11/22/2025
Pushed some fixes and enhancements for ramtorch's helper for applying it to modules generally and lycoris specifically. use_ramtorch_network wasn't working as intended, now it appears to be working.
RamTorch
- now properly maintains pinning of memory for it's weights and biases, before was losing the due to reassignment vs copy. This should make it faster, as without pinning, all transfers would become blocking silently
- passes forward requires_grad from original tensor setting during ramtorch init
- now accepts and sets a target dtype, before it would always store the RAM weights as fp32 first, so now it should use less RAM and result in faster transfers. This is set in sd_scripts to align with weight_dtype.
lycoris
- now properly async transfers weights from RAM, before it wasn't. To be transparent, bad impl by one LLM vs another for that piece as not really familiar, was more thorough this time and based on testing this new approach does look to work.
sd_scripts
- Added a CUDA sync explicitly after backward in sd_scripts to make sure all streams complete
So overall, fixed use_ramtorch_network for lycoris, improved ramtorch application to models so it should be faster and use less RAM.
11/21/2025
Reimplemented is_val subset support, also reimplemented making all subset parameters static for is_val or val split, this was missed when I reimplemented validation loss in the new branch.
As a result, even if you change nothing, after updating, validation loss metrics will change given the same training settings due to the enforcement of static parameters (e.x. cropping, shuffling captions, etc, anything that introduces randomization is disabled for is_val subsets OR dynamic subsets created by val split). Ultimately this will lead to a more consistent measure of validation loss going forward.
11/20/2025
There was a bug with the ramtorch fork pyproject where it wasn't properly pulling in the modules directory. This has been corrected. Running update.bat or update.sh should get everything updated correctly.
I also added experimental ramtorch support to Kohya's loras, not fully tested, let me know if there are issues.
11/17/2025
I am currently working on a new branch to rebase off the latest sd3 from upstream sd_scripts, the new branch chain (refresh/refresh/sd-upstream) doesn't have all the features of current default branch chain (flux/flux/sd3), but runs leaner and supports newer models. I am still working on adding back features deemed useful. RamTorch is not working correctly in the existing default branch (flux), please switch to the new branch (refresh)
Right now some of the significant things that aren't present are:
- is_val subsets
- wavelet loss
- full_bf16 stochastic accumulation
- probably some other stuff I don't recall atm.
Ramtorch (Shout out to lodestone for his great work! https://github.com/lodestone-rock/RamTorch) is supported for network training, it can be applied to the base model and network/lora, in addition, optimizer state offload is implemented to two optimizers currently.
To use ramtorch:
- extra training arg use_ramtorch=True enables it for the base model
- extra training arg use_ramtorch_network=True enables it for the network/lora, NOTE, this requires the optimizer to have .to()s defined that move the parameter to the correct device, I have implemented that currently for OCGOpt and SimplifiedAdEmaMixExM, plan to see about a generalized solution to avoid having to manually update all the optimizers.
- the previously mentioned optimizers default to offloading state to CPU/RAM (controllable vis storage_device optimizer argument, e.x. setting it to CUDA would place the states in vram). Defaulting behaviors below if not explictly set:
- If state_storage_dtype is not provided as an arg, default to training dtype
- If state_storage_device is not provided as an arg, default to accelerator's device, unless use_ramtorch_network is true, then use cpu
- use lycoris based networks/loras, I have not tested or implemented changes to allow Kohyas's implementations to work, only lycoris
The vram savings can be absurdly massive, for example, someone I have testing was able to train a 512 linear dim, 256 conv dim locon for SDXL, BS 7, and still didn't fully fill their VRAM, ~22GB out of 24GB, ofc, filled more system RAM. Others have been running as high as BS 18 with smaller dims.
With any reasonable batch size (4+), the overhead of ramtorch and CPU offloading appears to be negligible, in fact, it may actually speed up things due to use of streams, asynchronous operations, non blocking, etc.
The quality of outputs is not degraded in anyway as far as I have observed.
I havent nesscarily tested every lycoris setting or type fully, there may be some gaps. We have a discussion thread going around RamTorch in this context at https://github.com/67372a/LoRA_Easy_Training_Scripts/discussions/51, but feel free to open issues for any encountered.
4/13/2025 IMPORTANT
- IMPORTANT: Fixed defect related to Lycoris bypass mode
It came to my attention when I was looking through lycoris code to make enhancements, that the bypass_mode arg was not being properly handled, if you did not explicitly pass false, it would be None, and end up resolving to TRUE. This would end up bypassing weight decomposition for DoRA, as there exists no logic, despite original author's documentation, that it should be overridden to false. Now, i have fixed this in my fork so that bypass mode defaults to FALSE, and if dora is enabled, it will also be forced to false. This may have significant effects how training behaves in cases where bypass_mode was being erroneously being enabled, especially DoRA!
In essence, during the forward pass, weight decomposition for DoRA was not being applied, the bypass route would also not apply DoRA style network dropout if set.
So, all DoRAs trained without explictly setting bypass_mode to false (which I doubt most people would do) were not trained correctly / fully, as such, the full benefits were not realized.
1/28/2025 -> 4/13/2025
- Bunch of things, will try to compile
1/28/2025 IMPORTANT
- Apply float32 tiny as eps to Scaled Quadratic loss
- Fix adaptive gradient clipping in layer mode, was incorrectly amplifying gradients smaller than the parameter, not clipping ones larger.
- This will require retuning as a result!
- adaptive_clip, if in use, will need to be increased to avoid excessive clipping and returned. Recommend starting at 0.18.
- Weight decay will likely need to be decreased and retuned. Recommend starting at 3e-6 if using stable weight decay, if not using swd, can start at 5e-4 or similar most likely.
- SPAM threshold and starting step may need to be increased and returned. Recommend starting at 500 for threshold, and 10 for start step.
- Optimizer util functions: Adjust all eps to be float32 tiny by default, or if eps value set to 0
- ADOPTAOSchedule: Adjust to apply clipping on step one
Enhancements over original
- Triton is installed for Windows and Linux, which can provide an improvement to training speed. Make sure to follow the steps at https://github.com/woct0rdho/triton-windows?tab=readme-ov-file#install-from-wheel for Windows. Linux also requires 12.X CUDA be installed and properly setup on the paths required as per the Nvidia documentation.
- All safe to update dependencies in sd_scripts have been updated to their latest versions.
- A wide array of additional optimizers. (e.x. Compass, FCompass, FishMonger, FARMScrop, Ranger21, AdEMAMix etc.)
- A version of Compass called CompassPlus that incorporates many of the features of Ranger21.
- Enhanced versions of some optimizers with additional features made available (e.x. centralization and gradient clipping) and with stochastic rounding implemented.
- See https://github.com/67372a/LoRA_Easy_Training_scripts_Backend/tree/flux/custom_scheduler/LoraEasyCustomOptimizer for added / modified optimizers.
- Validation loss for SD and Flux loras, and SDXL finetune.
- Use the following args under Extra Args to manage
- validation_split - float 0.0 - 1.0: The percentage amount of all training datasets to split off for validation. Recommend a value of at least 0.1
- validation_seed - string - A seed that used by the process to determine the images split off, order, etc.
- validate_every_n_steps - int - Every n steps, run validation, if not set, runs every epoch. Recommend a value of 25, depending on your effective batch size and number of steps.
- max_validation_steps - int - The maximum number of batches of images that will be processed during a validation, recommend setting this to a high value and not worrying about it, so all images in the val dataset are processed each time.
- Options to scale IP noise gamma based on timestep or apply to last channel only.
- Use the following args under Extra Args to manage
- ip_noise_gamma_scaling - string(sine, linear, exponential) - The scaling, starting from timestep zero, of ip noise gamma. Recommend exponential or linear based on testing and validation loss.
- ip_noise_gamma_scaling_exponent - float - Exponent for exponential scaling, default is 2.0.
- ip_noise_gamma_scaling_min - The minimum of ip noise gamma to apply regardless of scaling. Recommend not using, or using a lower value than the primary value.
- ip_noise_gamma_last_channel_only - Applies IP noise gamma to the last channel (think VAE) of the latent
- Fixed logging of max and average key norms when using lycoris
- IP Noise gamma for Flux networks/loras
- Warmup Stable Decay (WSD) scheduler, by default decay phase will match number of warmup steps, else use Extra Args and set lr_decay_steps to either a decimal (for percent of total steps) or number (for absolute steps) for decay.
LoRA_Easy_Training_Scripts
A set of training scripts written in python for use in Kohya's SD-Scripts. It has a UI written in pyside6 to help streamline the process of training models.
Table of contents
Prerequisites
- Git must be installed and available on your PATH.
- Python 3.11 is required. The installer uses uv to manage virtual environments and will automatically download Python 3.11 if it is not already installed on your system.
Installation
This project uses uv (from Astral) for fast package installation and virtual environment management. uv is installed automatically by the installer scripts if it is not already present — you do not need to install it manually. After installation, virtual environments are created with uv venv --python 3.11 --seed, which ensures pip is available inside each venv for compatibility.
Windows
Open up a command line within the folder that you want to install to, then run:
git clone https://github.com/67372a/LoRA_Easy_Training_Scripts -b refresh
cd LoRA_Easy_Training_Scripts
install.bat
The installer will:
- Download and install uv if not present (via the standalone PowerShell installer).
- Create a Python 3.11 virtual environment at
./venvusinguv venv. - Install frontend dependencies via
uv pip install. - If running locally, initialize git submodules and delegate to the backend installer, which creates a second venv at
backend/sd_scripts/venvand installs all ML/training dependencies (PyTorch, xformers, etc.) viauv pip install.
A few questions will be asked along the way — just make sure to answer them.
Linux
git clone --recurse-submodules https://github.com/67372a/LoRA_Easy_Training_Scripts -b refresh
cd LoRA_Easy_Training_Scripts
git submodule update --init --recursive
./install.sh
The installer will automatically download and install uv (via the standalone curl installer) and Python 3.11 if needed, then create venvs and install all dependencies using uv pip install.
If you specifically need to target Python 3.11 explicitly, you can use ./install311.sh instead.
Standalone Backend Installation
The backend can be installed independently from the frontend UI (useful for headless/remote training setups):
cd backend
./install.sh
The backend has its own copy of install_uv.py and is fully self-contained — it does not require the frontend repo to be present.
NOTE:
If you are using one of the installers, one of the questions it will ask you is "Are you using this locally? (y/n):" — make sure you say y if you are going to be training on the computer you are using. This is very important to get correctly because the backend will not install otherwise, and you will be stuck wondering why it is not doing anything.
Colab
If you wish to train LoRAs but you lack the hardware, you can use this Google Colab created by Jelosus2 to be able to train them. Additionally, you can check the guide if you have trouble setting all up. Note: You still need to git clone the repo and install the UI on your local machine. Be sure to answer the prompt "Are you using this locally? (y/n):" with "n".
For Colab, the installer uses backend/colab_install.sh which runs the backend installer with the colab flag. This installs uv, creates the venv with Python 3.11, installs all ML dependencies via uv pip install, and configures accelerate automatically.
Usage
You can launch the UI using the run.bat file if you are on windows, or run.sh file if you are on linux.
The UI looks like this:
and has a bunch of features to it to make using it as easy as I could. So lets start with the basics. The UI is divided into two parts, the "args list" and the "subset list", this replaces the old naming scheme of <number>_<name> to try and reduce confusion. The subset list allows you to add and remove subsets to have however many you want!
You are also able to collapse and expand the sections of the "args list", so that way you can have open only the section you are working on at the moment.
Block Weight training is possible through setting the weights, dims, and alpha in the network args.
Pretty much every file selector has two ways to add a file without having to type it all in, a proper file dialog, and a way to drag and drop the value in!
TOML saving and loading are available so that you don't have to put in every variable every time you launch the program. All you need to do is either use the menu on the top right, or the keybind listed.
NOTE: This change is entirely different from the old system, so unfortunately the JSON files of the old scripts are no longer valid.
I have added a custom scheduler, CosineAnnealingWarmupRestarts. This scheduler allows restarts which restart with a decay, so that each restart has a bit less lr than the last, A few things to note about it though, warmup steps are not all applied at the beginning, but rather per epoch, I have set it up so that the warmup steps get divided evenly among them, decay is settable, and it uniquely has a minimum lr, which is set to 0 instead if the lr provided is smaller.
The Queue System is intuitive and easy to use, allowing you to save a config into a little button on the bottom left then allowing you to pull it back up for editing if you need to. Additionally you can use the arrow keys to change the positions of the queue items. A cool thing about this is that you can still edit args and even add or remove queue items while something else is training.
And finally, we have the ability to switch themes. These themes are only possible because of the great repo that adds in some material design and the ability to apply them on the fly called qt-material, give them a look as the work they've done is amazing.
The themes also save between boots
Configuration
I'd like to take a moment and look at what the output of the TOML saving and loading system looks like so that people can change it if they want outside of the UI.
here is an example of what a config file looks like:
[[subsets]]
num_repeats = 10
keep_tokens = 1
caption_extension = ".txt"
shuffle_caption = true
flip_aug = false
color_aug = false
random_crop = true
is_reg = false
image_dir = "F:/Desktop/stable diffusion/LoRA/lora_datasets/atla_data/10_atla"

[noise_args]

[sample_args]

[logging_args]

[general_args.args]
pretrained_model_name_or_path = "F:/Desktop/stable diffusion/LoRA/nai-fp16.safetensors"
mixed_precision = "bf16"
seed = 23
clip_skip = 2
xformers = true
max_data_loader_n_workers = 1
persistent_data_loader_workers = true
max_token_length = 225
prior_loss_weight = 1.0
max_train_epochs = 2

[general_args.dataset_args]
resolution = 768
batch_size = 2

[network_args.args]
network_dim = 8
network_alpha = 1.0

[optimizer_args.args]
optimizer_type = "AdamW8bit"
lr_scheduler = "cosine"
learning_rate = 0.0001
lr_scheduler_num_cycles = 2
warmup_ratio = 0.05

[saving_args.args]
output_dir = "F:/Desktop"
save_precision = "fp16"
save_model_as = "safetensors"
output_name = "test"
save_every_n_epochs = 1

[bucket_args.dataset_args]
enable_bucket = true
min_bucket_reso = 256
max_bucket_reso = 1024
bucket_reso_steps = 64

[optimizer_args.args.optimizer_args]
weight_decay = 0.1
betas = "0.9,0.99"
As you can see everything is sectioned off into their own sections. Generally they are seperated into two groups, args, and dataset_args, this is because of the nature of the config and dataset_confg files within sd-scripts. Generally speaking, the only section that you might want to edit that doesn't correspond to a UI element (for now) is the [optimizer_args.args.optimizer_args] section, which you can add, delete, or change options for the optimizer, A proper UI for it will come later, once I figure out how I want to set it up.
Changelog
- January 26, 2024
- merged pr's #150, #156, #157, #159, #164, and #171
- decoupled vpred to allow use for non SD2 based models
- rewrote the install script for windows to be a bit better, and fail less
- Added support for diag-oft and the two lycoris args constrain and rescaled
- updated the noise offset input to allow for an arbitrary number of decimals
- changed the behavior of the gradient section to allow for both gradient checkpointing and gradient accumulation steps to be enabled
- Added a "no-theme" mode for those who have disappearing checkboxes (finally, sorry it took so long)
- Added the arg
ip Noise gammato the UI, as it looked like it was useful. - updated sd-scripts and lycoris, as of three weeks ago, I will be updating these again fairly soon
- November 11, 2023
- Updated LyCORIS and sd_scripts
- completely re-wrote the code behind the network args, should be far less buggy now
- this should have also fixed a long standing visual bug and fixes a newer bug that prevented network_dropout from applying correctly
- Added support for SDXL
- Changed some of the args to allow for use of vpred without the v2 arg
- updated the installer to (hopefully) fix the failure to install correctly on 10X0 cards
- Added an installer for linux systems from issue #155. This assumes that you have python 3.10, python venv, and git installed
- other smaller bug fixes
- In all honesty, I was waiting for SDXL to be merged to main for so long that I forgot all of the changes I made over time, which is why I kept putting off updating the readme, apologies. I'll try to keep up with it again now that I've written this version.
- July 6, 2023
- Updated LyCORIS
- Overhauled the UI, to fit on smaller screens
- changed the saving ui to better use space
- save the last location when saving and loading toml, only when you actually save or load a toml
- added a folder selection to the save toml and tag occurrence inputs.
- Added a system to prevent overwriting by renaming the file name to <name>_<number>
- Reorganized the network args to better fit with what LyCORIS now supports
- Refactored the algo select to be better maintainable down the line
- Changed the behavior of the dropouts as LyCORIS now supports all of them, they no longer get disabled.
- Fixed a bug in which gradient checkpointing doesn't load correctly
- June 24, 2023
- Updated sd-scripts and LyCORIS
- Added support for a new LR Scheduler, Cosine Annealing Warmup Restarts
- Fixed a bug in which warmup_steps wasn't being applied
- Added a button that you can use to add all folders in a folder to the subset section
- Updated the toml loading slightly so that it sets the name of the folder in the subsets when it loads
- June 14, 2023
- Updated sd-scripts and LyCORIS
- Nothing new was added, just bug fixes for them
- Added support for LyCORIS's dropout and and CP decomposition
- This update should fix a bunch of the issues people were having in relation to using LoHa, and other LyCORIS types.
- June 11, 2023
- Changed queue behavior slightly to better fit what is actually happening
- added an "optimizer args" section to the UI so that you can put in values for things like betas and weight decay
- Added training comment
- June 6, 2023
- Updated sd-scripts
- Added the new args related to the new update,
scale_weight_normsto the optimizer argsnetwork_dropout,rank_dropout, andmodule_dropoutto the network argsscale_v_pred_loss_like_noise_predto the general args, as that is directly tied to using a V Param based SD2.x model.
- Added tooltips for above args, so give those a read to explain what they do
- June 5, 2023
- Added support for the block weight training
- Added support for the tag file output and toml file output on train, disabled by default, is in the saving args
- May 29, 2023
- Changed the behavior of the Queue so that it doesn't overwrite the previously saved values in the selected queue item when a new one is added
- Change the behaviour of file selects so that they go to the folder last selected if valid
- Changed up the type hints to (hopefully) fix compatability for arch users
- Refactored a lot of the connecting parts of the code to ensure more things have their own accountability, this also makes the code more maintainable and readable
- This ended up being bigger than expected, so I may have accidentally introduced a bug
- Changed the max for the repeats spinbox so that you can go higher than 99, if for some reason you want to do that.
- May 27, 2023
- Fixed noise offset default being 0.1
- Fixed the bug in which scrolling into elements would accidently change their values
- Fixed an installation issue because of the new Pyside6 update
- Added queues to the UI. Now the UI can queue up trainings
- this was a sort of big addition, so tell me if anything breaks
- May 22, 2023 (cont.)
- Made the training threaded, so that it can be done while still allowing you to use the UI
- Fixed the way betas was being saved in the toml files so that it doesn't break on load
- Fixed the installer by removing torch 2.1.0 and adding 2.0.1 in it's place as well as add a fallback execution policy bat that just assumes your powershell is at the normal location in system32
- Fixed the limit on the samples box to allow higher than 99
- Fixed Dadapt and Lion not working properly, forgot that they must be installed individually.
- Added an update.bat that will update everything then reinstall everything so that it is ensured to be updated
- Fixed a small issue in which loading one of the lr_schedulers with spaces wouldn't load properly
- Added the forgotten min_snr_gamma
- May 22, 2023
- First release of the new UI system. This has been a long time coming and I put in a ton of work to make it as user friendly as possible. Some Things to note, This doesn't have support for queues or block weight training for the moment, they are planned though and will be added down the line.
- If you find any bugs, please tell me, I want to fix them if something is wrong. After all, I am only one person
- I'm adding a link to my ko-fi page as of this update so people that want to support me can! Thanks for all of the feedback of the scripts through the development time I spent on it, and I hope to continue to improve it as I go.
Similar repos
Languages
Python
99.8%