
See what people are saying
README
Jinear - Task Manager, Calendar, Notes & File Sharing
A collaborative task management and calendar application designed to streamline productivity and team coordination, enhanced with file sharing.
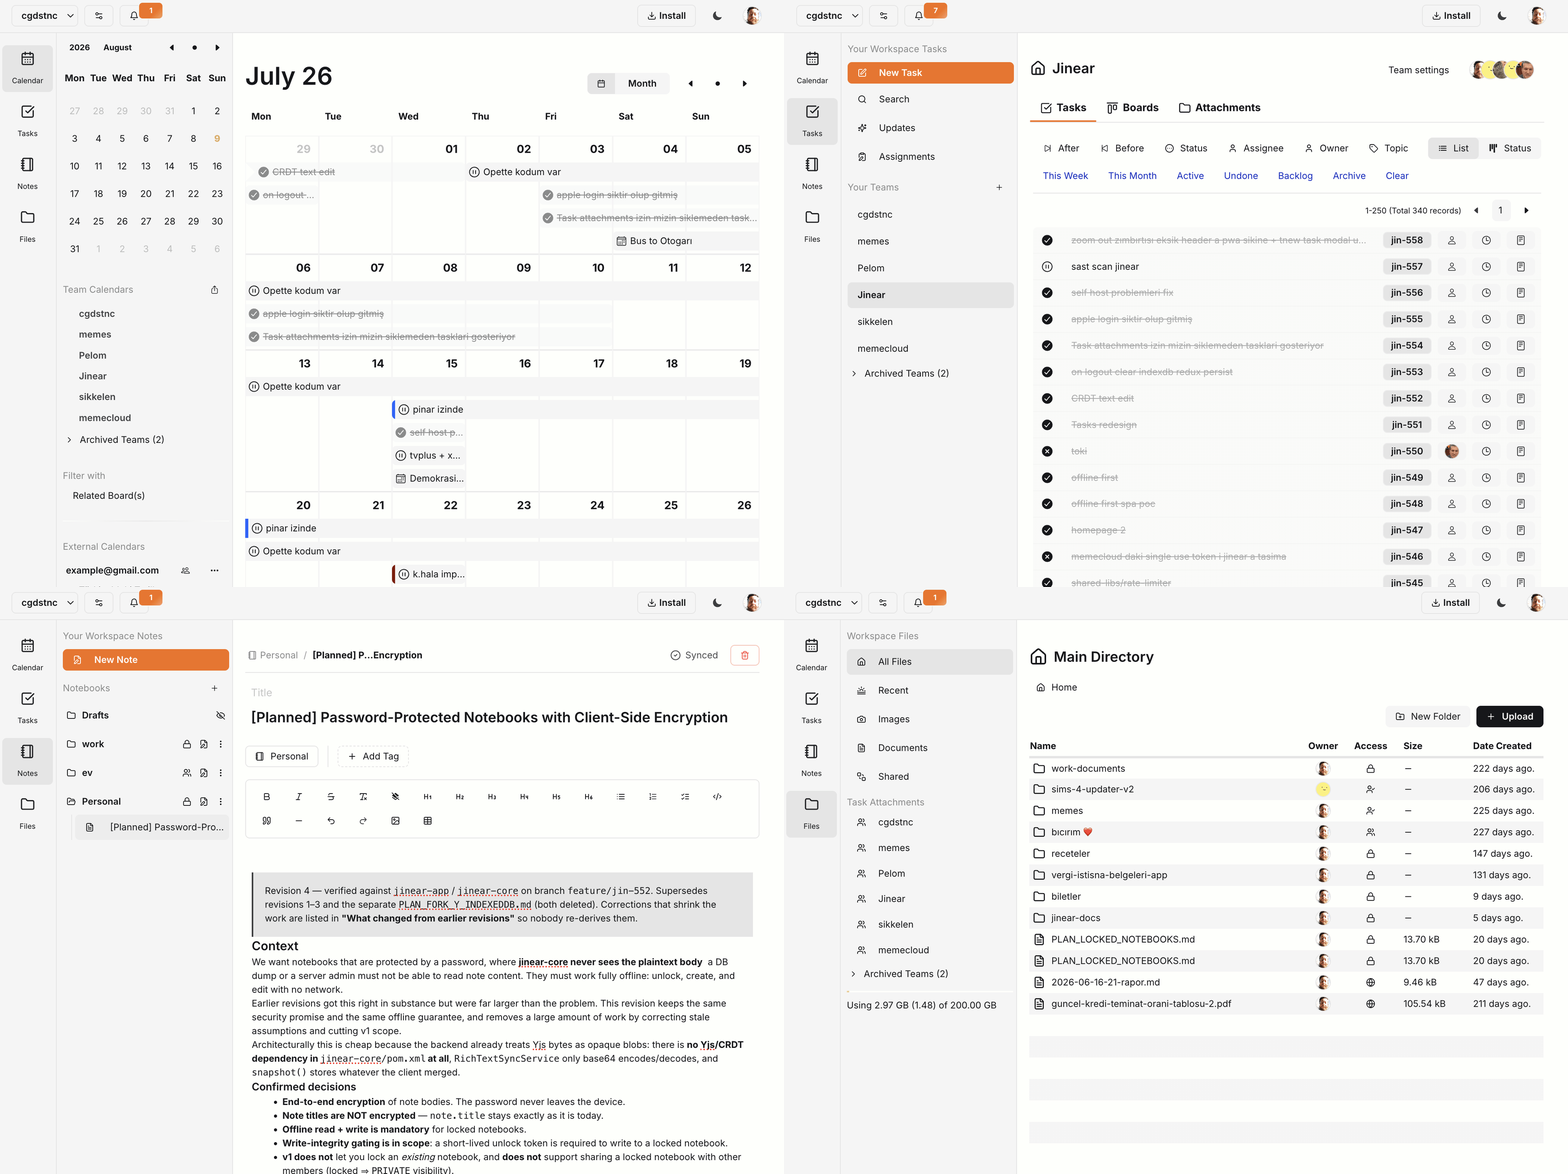
Overview
Jinear is a comprehensive solution that combines task management with calendar functionality, enhanced with additional features for improved workflow management. Originally developed as a personal project to address specific productivity needs, it has evolved into a versatile platform suitable for both individual and team use.
🌐 Try the hosted version: jinear.co
Features
- Task Management: Create, organize, and track tasks with ease
- Integrated Calendar: Seamlessly manage events and deadlines
- Notes: Create notebooks & notes with access control and improved offline functionality
- Files: Add folders & files with access control
- Collaboration Tools: Work together with team members
- AI Assistants: Connect Claude or ChatGPT to your instance over MCP
- Additional Productivity Features: Enhanced workflow capabilities
Self-Hosting
Quick Install (Recommended)
You can follow along the steps below. There's also a video walkthrough you can watch here.
Download and run the installer on your server:
curl -sSL https://gitlab.com/140crafts/use-jinear/-/raw/main/jinear-installation-scripts/install.sh -o install.sh && chmod +x install.sh && ./install.sh
Or as separate steps:
# Download
curl -sSL https://gitlab.com/140crafts/use-jinear/-/raw/main/jinear-installation-scripts/install.sh -o install.sh

# Make executable
chmod +x install.sh

# Run
./install.sh
The installer will:
- ✅ Check prerequisites (Docker, Docker Compose, etc.)
- ✅ Prompt for your domain and configuration
- ✅ Generate secure passwords and secrets automatically
- ✅ Create all necessary files and directories
- ✅ Start all services
Requirements
- Docker 20.10+ and Docker Compose 2.0+
- 5GB+ disk space (10GB+ recommended)
- 2GB+ RAM (4GB+ recommended)
- Ports 80 & 443 available (configurable; automatic HTTPS can be disabled to run behind your own reverse proxy)
- A domain name pointed to your server
After Installation
Your Jinear instance will be available at:
- 🌐 Application:
https://your-domain.com - 🔧 API:
https://api.your-domain.com - 📁 Files:
https://files.your-domain.com - 🛠 Admin panel:
https://your-domain.com/admin(only if you enabled instance management during install; the login is saved to.secrets)
Manual Installation
For advanced users who prefer manual setup, see the docs/manual-setup folder or the detailed guide in jinear-installation-scripts.
Running Behind Your Own Reverse Proxy
Caddy's host ports default to 80/443 with automatic Let's Encrypt HTTPS. To
run Jinear behind an existing reverse proxy, answer No to the installer's
"Enable automatic HTTPS?" prompt: Caddy then serves plain HTTP on a port you
choose (HTTP_PORT) and skips certificate issuance, letting your proxy terminate
TLS. See jinear-installation-scripts/README.md
for the port / scheme / cookie options.
Point your proxy at the bundled Caddy (one upstream for all three domains) rather than
at individual services; Caddy is preconfigured to talk to MinIO correctly, so file
storage needs no special setup. Your proxy must forward the original Host header for
the files. domain (Caddy/Traefik do this by default; nginx needs
proxy_set_header Host $host;), otherwise presigned uploads/downloads return 403. Note
the app and API are Host-insensitive, so they can work even when this is wrong; don't
treat "the app loads" as proof. For a ready-made nginx config, see
docs/behind-nginx.
Running Behind Traefik
Check out the docs docs/behind-traefik
Running Behind nginx
Check out the docs docs/behind-nginx, which include a copy-paste
nginx config with the Host header and upload body size already handled.
Connecting Claude or ChatGPT
Jinear can run an MCP server, so a member can connect Claude or ChatGPT to the instance and
work with their tasks, notes and files from inside the assistant. It is optional
and off by default. Your instance must be reachable over HTTPS from the internet, because
those assistants connect from their own servers; instances on a private network use Claude
Desktop with the mcp-remote proxy instead.
Check out the docs docs/mcp.
Configuration
After installation, you can customize your instance by modifying:
.env: Domain, passwords, and environment settings.config/application.properties: Application-specific settings.data/caddy/conf/Caddyfile: Reverse proxy and SSL configuration
To enable, disable or change the instance admin (the /admin panel) after installation,
edit the MANAGEMENT_* values in .env and restart. See
jinear-installation-scripts/README.md.
To turn the MCP server on or off after installation, edit MCP_ENABLED in .env, restart,
and turn on AI Assistant Connections in the admin panel. See docs/mcp.
Privacy: a self-hosted instance sends nothing unless you opt in. The installer asks about a daily update check (a random instance id and the version number) and an anonymous usage report. See docs/telemetry.md for every field that can leave your server, and for how to turn each one on or off.
Upgrading
An upgrade is docker compose pull && docker compose up -d. That replaces the images and
leaves your docker-compose.yaml and .config/application.properties exactly as they
were, so every new setting usually ships with a default and the server starts on your current
files.
See docs/upgrading.md.
Troubleshooting
SSL Certificate Issues:
- If you see staging/untrusted certificates, ensure your Caddyfile has:
acme_ca https://acme-v02.api.letsencrypt.org/directory - If you hit Let's Encrypt rate limits (50 certs/week), either wait 7 days or temporarily use staging server
- Check detailed troubleshooting: jinear-installation-scripts/README.md
View Logs:
cd <install-dir>
docker compose logs -f jinear-caddy  # SSL/proxy logs
docker compose logs -f jinear-core    # Backend logs
Architecture
Jinear consists of several services that work together. These services come preconfigured with the easy installation script. If you want to change any of the optional services, you can stop containers and change the configuration. Or you can create your own compose file and configure from scratch.
| Service | Required | Description | Default Port |
|---|---|---|---|
| jinear-core | Required | Main backend API handling authentication, task management, calendar, and business logic | 8008 Internal |
| jinear-app | Required | Installable PWA (Vite + React 19) serving the main user interface | 80 Internal |
| jinear-db | Can be replaced with external PostgreSQL (Needs config change). | PostgreSQL database storing all application data | 5432 Internal |
| jinear-redis | Can be replaced with external Redis (Needs config change). | Redis cache for session management and real-time data | 6379 Internal |
| jinear-minio | Can be replaced with external MinIO or Google Cloud Storage (Needs config change). | MinIO object storage for file uploads and attachments | 9000/9001 Internal |
| jinear-caddy | Can be changed with other web servers. Replacing needs custom configuration. | Caddy reverse proxy handling SSL/TLS termination and routing | 80/443 External (configurable) |
| jinear-db-backup | Optional (Recommended) | Automated database backup service with configurable retention | - |
Note on the marketing site & blog: the public marketing pages, pricing page, and blog (at
jinear.co/blog) are a separate statically-exported Next.js project,jinear-site. It is used for the hosted jinear.co deployment and is not part of the default self-host stack; a self-hosted instance just serves the app on your domain. See jinear-site/README.md to run it yourself.
Getting Started
Once your Jinear instance is running, access it through your configured domain.
Support
⚠️ Note
I didn’t start this project with the intention of open-sourcing it or making it self-hostable. Most of it was built in my spare time, before or after work. As a result, the configuration process isn’t as seamless as it could be. I may improve it over time.
For questions, issues, or contributions, please visit our GitLab repository.
You can also contact me from x.com/cagdasplus
License
This repository is licensed under AGPL-3.0.
Contributors

1,975 commits
Similar repos


Languages
TypeScript
56.0%
Java
29.4%
JavaScript
5.1%
CSS
4.9%
SCSS
3.5%
See what people are saying
README
Jinear - Task Manager, Calendar, Notes & File Sharing
A collaborative task management and calendar application designed to streamline productivity and team coordination, enhanced with file sharing.
Overview
Jinear is a comprehensive solution that combines task management with calendar functionality, enhanced with additional features for improved workflow management. Originally developed as a personal project to address specific productivity needs, it has evolved into a versatile platform suitable for both individual and team use.
🌐 Try the hosted version: jinear.co
Features
- Task Management: Create, organize, and track tasks with ease
- Integrated Calendar: Seamlessly manage events and deadlines
- Notes: Create notebooks & notes with access control and improved offline functionality
- Files: Add folders & files with access control
- Collaboration Tools: Work together with team members
- AI Assistants: Connect Claude or ChatGPT to your instance over MCP
- Additional Productivity Features: Enhanced workflow capabilities
Self-Hosting
Quick Install (Recommended)
You can follow along the steps below. There's also a video walkthrough you can watch here.
Download and run the installer on your server:
curl -sSL https://gitlab.com/140crafts/use-jinear/-/raw/main/jinear-installation-scripts/install.sh -o install.sh && chmod +x install.sh && ./install.sh
Or as separate steps:
# Download
curl -sSL https://gitlab.com/140crafts/use-jinear/-/raw/main/jinear-installation-scripts/install.sh -o install.sh

# Make executable
chmod +x install.sh

# Run
./install.sh
The installer will:
- ✅ Check prerequisites (Docker, Docker Compose, etc.)
- ✅ Prompt for your domain and configuration
- ✅ Generate secure passwords and secrets automatically
- ✅ Create all necessary files and directories
- ✅ Start all services
Requirements
- Docker 20.10+ and Docker Compose 2.0+
- 5GB+ disk space (10GB+ recommended)
- 2GB+ RAM (4GB+ recommended)
- Ports 80 & 443 available (configurable; automatic HTTPS can be disabled to run behind your own reverse proxy)
- A domain name pointed to your server
After Installation
Your Jinear instance will be available at:
- 🌐 Application:
https://your-domain.com - 🔧 API:
https://api.your-domain.com - 📁 Files:
https://files.your-domain.com - 🛠 Admin panel:
https://your-domain.com/admin(only if you enabled instance management during install; the login is saved to.secrets)
Manual Installation
For advanced users who prefer manual setup, see the docs/manual-setup folder or the detailed guide in jinear-installation-scripts.
Running Behind Your Own Reverse Proxy
Caddy's host ports default to 80/443 with automatic Let's Encrypt HTTPS. To
run Jinear behind an existing reverse proxy, answer No to the installer's
"Enable automatic HTTPS?" prompt: Caddy then serves plain HTTP on a port you
choose (HTTP_PORT) and skips certificate issuance, letting your proxy terminate
TLS. See jinear-installation-scripts/README.md
for the port / scheme / cookie options.
Point your proxy at the bundled Caddy (one upstream for all three domains) rather than
at individual services; Caddy is preconfigured to talk to MinIO correctly, so file
storage needs no special setup. Your proxy must forward the original Host header for
the files. domain (Caddy/Traefik do this by default; nginx needs
proxy_set_header Host $host;), otherwise presigned uploads/downloads return 403. Note
the app and API are Host-insensitive, so they can work even when this is wrong; don't
treat "the app loads" as proof. For a ready-made nginx config, see
docs/behind-nginx.
Running Behind Traefik
Check out the docs docs/behind-traefik
Running Behind nginx
Check out the docs docs/behind-nginx, which include a copy-paste
nginx config with the Host header and upload body size already handled.
Connecting Claude or ChatGPT
Jinear can run an MCP server, so a member can connect Claude or ChatGPT to the instance and
work with their tasks, notes and files from inside the assistant. It is optional
and off by default. Your instance must be reachable over HTTPS from the internet, because
those assistants connect from their own servers; instances on a private network use Claude
Desktop with the mcp-remote proxy instead.
Check out the docs docs/mcp.
Configuration
After installation, you can customize your instance by modifying:
.env: Domain, passwords, and environment settings.config/application.properties: Application-specific settings.data/caddy/conf/Caddyfile: Reverse proxy and SSL configuration
To enable, disable or change the instance admin (the /admin panel) after installation,
edit the MANAGEMENT_* values in .env and restart. See
jinear-installation-scripts/README.md.
To turn the MCP server on or off after installation, edit MCP_ENABLED in .env, restart,
and turn on AI Assistant Connections in the admin panel. See docs/mcp.
Privacy: a self-hosted instance sends nothing unless you opt in. The installer asks about a daily update check (a random instance id and the version number) and an anonymous usage report. See docs/telemetry.md for every field that can leave your server, and for how to turn each one on or off.
Upgrading
An upgrade is docker compose pull && docker compose up -d. That replaces the images and
leaves your docker-compose.yaml and .config/application.properties exactly as they
were, so every new setting usually ships with a default and the server starts on your current
files.
See docs/upgrading.md.
Troubleshooting
SSL Certificate Issues:
- If you see staging/untrusted certificates, ensure your Caddyfile has:
acme_ca https://acme-v02.api.letsencrypt.org/directory - If you hit Let's Encrypt rate limits (50 certs/week), either wait 7 days or temporarily use staging server
- Check detailed troubleshooting: jinear-installation-scripts/README.md
View Logs:
cd <install-dir>
docker compose logs -f jinear-caddy  # SSL/proxy logs
docker compose logs -f jinear-core    # Backend logs
Architecture
Jinear consists of several services that work together. These services come preconfigured with the easy installation script. If you want to change any of the optional services, you can stop containers and change the configuration. Or you can create your own compose file and configure from scratch.
| Service | Required | Description | Default Port |
|---|---|---|---|
| jinear-core | Required | Main backend API handling authentication, task management, calendar, and business logic | 8008 Internal |
| jinear-app | Required | Installable PWA (Vite + React 19) serving the main user interface | 80 Internal |
| jinear-db | Can be replaced with external PostgreSQL (Needs config change). | PostgreSQL database storing all application data | 5432 Internal |
| jinear-redis | Can be replaced with external Redis (Needs config change). | Redis cache for session management and real-time data | 6379 Internal |
| jinear-minio | Can be replaced with external MinIO or Google Cloud Storage (Needs config change). | MinIO object storage for file uploads and attachments | 9000/9001 Internal |
| jinear-caddy | Can be changed with other web servers. Replacing needs custom configuration. | Caddy reverse proxy handling SSL/TLS termination and routing | 80/443 External (configurable) |
| jinear-db-backup | Optional (Recommended) | Automated database backup service with configurable retention | - |
Note on the marketing site & blog: the public marketing pages, pricing page, and blog (at
jinear.co/blog) are a separate statically-exported Next.js project,jinear-site. It is used for the hosted jinear.co deployment and is not part of the default self-host stack; a self-hosted instance just serves the app on your domain. See jinear-site/README.md to run it yourself.
Getting Started
Once your Jinear instance is running, access it through your configured domain.
Support
⚠️ Note
I didn’t start this project with the intention of open-sourcing it or making it self-hostable. Most of it was built in my spare time, before or after work. As a result, the configuration process isn’t as seamless as it could be. I may improve it over time.
For questions, issues, or contributions, please visit our GitLab repository.
You can also contact me from x.com/cagdasplus
License
This repository is licensed under AGPL-3.0.
Similar repos
Contributors
1,975 commits
Languages
TypeScript
56.0%
Java
29.4%
JavaScript
5.1%
CSS
4.9%
SCSS
3.5%